Category Archives: FortiOS

Virtual Wire Pair

Virtual Wire Pair

This feature (276013), available in NAT and Transparent mode, replaces the Port Pair feature available in FortiOS 5.2 in Transparent mode only. When when two physical interfaces are setup as a Virtual Wire Pair, they will have no IP addressing and are treated similar to a transparent mode VDOM. All packets accepted by one of the interfaces in a virtual wire pair can only exit the FortiGate through the other interface in the virtual wire pair and only if allowed by a virtual wire pair firewall policy. Packets arriving on other interfaces cannot be routed to the interfaces in a virtual wire pair. A FortiGate can have multiple virtual wire pairs.

You cannot add VLANs to virtual wire pairs. However, you can enable wildcard VLANs for a virtual wire pair. This means that all VLAN-tagged traffic can pass through the virtual wire pair if allowed by virtual wire pair firewall policies.

Adding a virtual wire pair

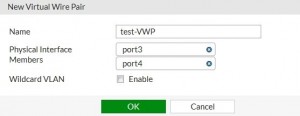
To add a virtual wire pair, go to Network > Interfaces and select Create New > Virtual Wire Pair. Select the interfaces to add to the virtual wire pair to, optionally enable Wildcard VLAN and select OK.

adding a virtual wire pair


The virtual wire pair appears on the Interface list.

Use the following command to add a virtual wire pair from the CLI that enables the wildcard VLAN feature:

config system virtual-wire-pair edit test-VWP

set member port3 port4 set wildcard-vlan enable

end

Assigning an interface to be part of a virtual wire pairing will remove the “role” value from the interface.


Having trouble configuring your Fortinet hardware or have some questions you need answered? Check Out The Fortinet Guru Youtube Channel! Want someone else to deal with it for you? Get some consulting from Fortinet GURU!

WAN link load balancing

WAN link load balancing

In the same way that incoming traffic can be load balanced, outgoing or WAN traffic can also be load balanced and for the same three reasons.

1. Reduce the places in the work flow where a single point of failure can bring the process to a halt.

2. Expand the capacity of the resources to handle the required workload.

3. Have it configured so that the process of balancing the workload is automatic.

Often, it can be just as important for an organizations members to be able to access the Internet as it is for the denizens of the Internet to access the Web facing resources.

There is now a WAN Load Balancing feature located in the Network section of the GUI (“WAN LLB”).

As part of the new WAN Load Balancing feature, the FortiOS 5.2 Router > Static > Settings GUI page has been removed. WAN Load Balancing should be used instead of the 5.2 ECMP Load Balancing Method settings. The 5.2 Link Health Monitor definitions are now only available from the CLI.

WAN links

The basis for the configuration of the virtual WAN link are the interfaces that comprise it. As interfaces are added to the “wan-load-balance” interface, they are added into the calculations that comprise the various algorithms used to do the load balancing.

  • While most of the load balancing algorithms are based on equal distribution or weighted distribution, spill over does rely on which interface is first in the sequence, so this should be kept in mind when adding the interfaces.
  • The interfaces in the virtual WAN link can be disabled if necessary if work needs to be done on an interface without interfering with the performance of the link.
  • There is no requirement that the interfaces be those labeled on the hardware as WAN interfaces.
  • In the GUI, to help analysis the effectiveness of the algorithm being used and its configuration, there is a graphic representation of the bandwidth usage of the link.

Load balancing algorithm

Once the interfaces involved has been configured the next step is to determine how the workload will be distributed. 5 load balancing algorithms are available to choose from.

Bandwidth

This is a very straight forward method of distributing the work load based on the amount of packets going through the interfaces. An integer value assigns a weight to each interface. These weights are used to calculate a percentage of the total bandwidth that is directed to the interface.

Example:

  • There are 2 interfaces
  • Interface #1 is assigned a weight of 5 because it is a 5 MB connection. (There is no requirement to match the weight to the capacity of the connection. It is just a simple way of optimizing the differing capacities in this case.)
  • Interface #2 is assigned a weight of 3 because it is a 3 MB connection.
  • The total weight is 8 so interface #1 gets 5/8 (63%) and interface #2 gets 3/8 (38%) of the traffic.

Wan Link Load Balancing Algorithm

Sessions

The session algorithm is similar to the bandwidth algorithm in that it also uses an integer value to assign a weight to each interface. The difference is that the number of sessions connected is what is being measured and not the packets flowing through the interfaces.

WAN Link Load Balancing Spillover


Having trouble configuring your Fortinet hardware or have some questions you need answered? Check Out The Fortinet Guru Youtube Channel! Want someone else to deal with it for you? Get some consulting from Fortinet GURU!

Traffic Shaping Policies

Traffic Shaping Policies

New Traffic Shaper Policy Configuration Method (269943)

Previously, traffic shapers were configured in Policy & Objects > Objects > Traffic Shapers and then applied in security policies under Policy & Objects > Policy > IPv4 . In FortiOS 5.4, traffic shapers are now configured in a new traffic shaping section in Policy & Objects > Traffic Shapers.

The way that traffic shapers are applied to policies has changed significantly in 5.4., because there is now a specific section for traffic shaping policies in Policy & Objects > Traffic Shaping Policy. In the new traffic shaping policies, you must ensure that the Matching Criteria is the same as the security policy or policies you want to apply shaping to.

There is also added Traffic Shaper support based on the following:

  • Source (Address, Local Users, Groups)
  • Destination (Address, FQDN, URL or category)
  • Service (General, Web Access, File Access, Email and Network services, Authentication, Remote Access, Tunneling, VoIP, Messaging and other Applications, Web Proxy)
  • Application
  • Application Category
  • URL Category


Creating Application Control Shapers

Application Control Shapers were previously configured in the Security Profiles > Application Control section, but for simplicity they are now consolidated in the same section as the other two types of traffic shapers: Shared and Per-IP.

To create an Application Control Shaper, you must first enable application control at the policy level, in Policy

& Objects > Policy > [IPv4 or IPv6]. Then, you can create a matching application-based traffic shaping policy that will apply to it, in the new Traffic Shaping section under Policy & Objects > Traffic Shaping Policy.

New attributes added to “firewall shaping-policy” (277030) (275431)

The two new attributes are status and url-category. The status attribute verifies whether the policy is set to enabled or disabled. The url-category attribute applies the shaping-policy to sessions without a URL rating when set to 0, and no web filtering is applied.

Syntax:

config firewall shaping-policy edit 1

set status enable

set url-category [category ID number]

New button added to “Clone” Shapers

You can now easily create a copy of an existing shaper by selecting the shaper and clicking the Clone button.


Having trouble configuring your Fortinet hardware or have some questions you need answered? Check Out The Fortinet Guru Youtube Channel! Want someone else to deal with it for you? Get some consulting from Fortinet GURU!

FortiClient Monitoring and Quarantine

FortiClient Monitoring and Quarantine

FortiClient monitoring and quarantine is currently only supported by FortiClient 5.4 for Windows.

FortiSandbox uses a single signature to identify tens of thousands of variations of viral code. A FortiSandbox can send frequent, dynamic signature updates to a FortiGate and FortiClient, which allows files to be blocked before they are sent to the FortiSandbox.

With FortiSandbox, FortiClient, and FortiGate integration, you can configure a FortiGate to send files to FortiSandbox for scanning.

When FortiSandbox determines that a file is infected, it will notify the FortiGate of this event. Then, from

FortiView, the administrator can take action to quarantine the endpoint which downloaded the infected file. FortiGate administrators can quarantine endpoints from FortiView.

To support this, the FortiClient now supports host-level quarantine, which cuts off other network traffic from the endpoint directly, preventing it from infecting or scanning the local network.

When a device is under quarantine, FortiClient cannot be shutdown or uninstalled. A user is also unable to unregister from the FortiGate that quarantined them, or register to another FortiGate unit.

Alternately, FortiGate can release the file to the client before receiving the FortiSandbox scan results, and then have FortiClient quarantine the device when the scan results are available if required.


Having trouble configuring your Fortinet hardware or have some questions you need answered? Check Out The Fortinet Guru Youtube Channel! Want someone else to deal with it for you? Get some consulting from Fortinet GURU!

Pushing signatures to AntiVirus

Pushing signatures to AntiVirus

When a FortiSandbox discovers a malicious file, it can create a signature that is sent to the FortiGate, to supplement the AntiVirus signature database. This signature can be used to block that file from entering the network again, and to prevent duplicates of the file being sent to the FortiSandbox in the future. This feature is enabled in an AntiVirus profile.

CLI Syntax

config antivirus profile edit “default”

set ftgd-analytics {everything | suspicious}

set analytics-db {enable | disable}

end

Files blocked by a FortiSandbox signature can be viewed and filtered for in the FortiSandbox dashboard.

In FortiOS 5.4 Beta 2, the URL feature is only available for proxy-based Web Filter profiles.

Information on the current database for both malware signatures and blocked URLs can be found by going to

System > External Security Devices.


Having trouble configuring your Fortinet hardware or have some questions you need answered? Check Out The Fortinet Guru Youtube Channel! Want someone else to deal with it for you? Get some consulting from Fortinet GURU!

FortiSandbox Integration

FortiSandbox Integration

The following improvements have been made to how sandboxing, using either a FortiSandbox Appliance or

FortiCloud Sandboxing, integrates with a FortiGate unit.

See the Cookbook recipe Sandboxing with FortiSandbox and FortiClient.

Connecting to a FortiSandbox

1. Go to System > External Security Devices and select Enable Sandbox Inspection.

2. You can either select FortiSandbox Appliance or FortiSandbox Cloud.

3. If you select FortiSandbox Appliance, add the Server IP address.

4. Select Test Connectivity to verify that you can connect to FortiSandbox.

5. Then edit an AntiVirus profile by going to Security Profiles > AntiVirus and selecting Send Filter to

FortiSandbox Appliance for Inspection.

6. You can also select to send Suspicious Files, Executable files or all supported files.

7. Select Use FortiSandbox Database to add signatures for suspicious files found by FortiSandbox to your

FortiGate antivirus signature database.

8. Then select this Antivirus profile in a firewall policy to send files in traffic accepted by the firewall policy to

FortiSandbox.

9. You can also go to Security Profiles > Web Filter and select Block malicious URLs discovered by

FortiSandbox.

Pushing malicious URLs to Web Filtering

The malicious URL database contains all malicious URLs active in the last month. The FortiSandbox can add the URLs where any malicious files originated to a URL filter, to block these files from being downloaded again from that URL.

This feature is enabled in a Web Filter profile under Security Profiles > Web Filter > Block malicious URLs discovered by FortiSandbox.

CLI Syntax

config webfilter profile edit <profile>

config web

set blacklist [enable | disable]

… end

Files blocked by a FortiSandbox signature can be viewed and filtered for in the FortiSandbox dashboard. Information on the current database for both malware signatures and blocked URLs can be found by going to System > External Security Devices.

FortiSandbox Dashboard in FortiView

The FortiSandbox dashboard is available from FortiView > FortiSandbox. The dashboard shows all samples submitted for sandboxing. Information on the dashboard can be filtered by checksum, file name, result, source, status, and user name. Each entry also offers a drilldown view to show more details about a particular sample.


Having trouble configuring your Fortinet hardware or have some questions you need answered? Check Out The Fortinet Guru Youtube Channel! Want someone else to deal with it for you? Get some consulting from Fortinet GURU!

Web Application Firewall

Web Application Firewall

Go to Security Profiles > Web Application Firewall. From here you can customize the default Web Application Firewall profile, or create new profiles, to protect against a variety of web-based threats. Web Application Firewall profiles can be created with a variety of options (Signatures and Constraints), similar to other security profiles.

You can set the Web Application Firewall to use an External Security Device, such as FortiWeb, by setting

Inspection Device to External.

Web Application Firewall

Selecting External in the Web Application Firewall profile adds the following configuration to the CLI:

config waf profile edit default

set external enable end

You must add the Web Application Firewall profile to a firewall policy in order for that traffic to be offloaded to the

External Security Device for processing.

If your FortiGate or VDOM Inspection mode is set to flow-based you must use the CLI to set a Web Application Firewall profile to external mode and add the Web Applic- ation Firewall profile to a firewall policy.


Having trouble configuring your Fortinet hardware or have some questions you need answered? Check Out The Fortinet Guru Youtube Channel! Want someone else to deal with it for you? Get some consulting from Fortinet GURU!

FortiMail

FortiMail

To be able to offload Anti-Spam processing to a FortiMail device you should.

1. Go to System > Feature Select and turn on AntiSpam Filter.

2. Go to System > External Security Devices, enable SMTP Service – FortiMail and add the IP address of your FortiMail device.

3. Go to Security Profiles > Anti-Spam and edit an Anti-Spam profile and set Inspection Device to External.

4. Go to Policy & Objects > IPv4 Policy, add or edit a Firewall policy, enable AntiSpam and select the profile for which you set Inspection Device to External.

When you add this Anti-Spam profile to a firewall policy, email traffic accepted by the policy is offloaded to the

FortiMail device for processing.

If your FortiGate or VDOM inspection mode is set to flow-based you must use the CLI to set an Anti-Spam profile to external mode and add the Anti-Spam profile to a fire- wall policy.

Enabling FortiMail on the External Security Devices page adds the following configuration to the CLI:

config system wccp set service-id 52

set router-id 5.5.5.5 (the IP address of the FortiGate interface that communicates with the FortiMail)

set group address 0.0.0.0

set server-list 5.5.5.65 255.255.255.255 (the IP address of the FortiMail)

set authentication disable set forward-method GRE

set return-method GRE

set assignment-method HASH

end


Selecting External in the Anti-Spam profile adds the following configuration to the CLI:

config spamfilter profile edit default

set external enable end


Having trouble configuring your Fortinet hardware or have some questions you need answered? Check Out The Fortinet Guru Youtube Channel! Want someone else to deal with it for you? Get some consulting from Fortinet GURU!