Category Archives: FortiOS 5.4 Handbook

The complete handbook for FortiOS 5.4

CSF – Cooperative Security Fabric

CSF – Cooperative Security Fabric

Cooperative Security Fabric (CSF) – also known as a Fortinet Security Fabric – spans across an entire network linking different security sensors and tools together to collect, coordinate, and respond to malicious behavior in real time. CSF can be used to coordinate the behavior of different Fortinet products in your network, including FortiGate, FortiAnalyzer, FortiClient, FortiSandbox, FortiAP, FortiSwitch, and FortiClient Enterprise Management Server (EMS). CSF supports FortiOS 5.4.1+, FortiSwitchOS 3.3+, and FortiClient 5.4.1+.

Port TCP/8009 is the port FortiGate uses for incoming traffic from the FortiClient Portal, as user information (such as IP address, MAC address, avatar, and other profile information) is automatically synchronized to the FortiGate and EMS.

The brief example below assumes that FortiTelemetry has been enabled on the top-level FortiGate (FGT1), OSPF routing has been configured, and that policies have been created for all FortiGate units to access the

Internet.

For more details on how to configure a security fabric between FortiGate units, see Installing internal FortiGates and enabling a security fabric on the Fortinet Cookbook website.

CSF – Cooperative Security Fabric

Enabling CSF on the FortiGate:

  1. On the upstream FortiGate (FGT1), go to System > Cooperative Security Fabric and enable Cooperative Security Fabric (CSF).
  2. Enter a Group name and Group password for the fabric.
  3. On a downstream FortiGate (such as FGT2 or FGT3), configure the same fabric settings as were set on FGT1.
  4. Enable Connect to upstream FortiGate.

Be sure you do not enable this on the topmost-level FortiGate (in this example, FGT1).

  1. In FortiGate IP, enter the FGT1 interface that has FortiTelemetry The FortiTelemetry port (set to 8013) can be changed as required.

Once set up, you can view your network’s CSF configuration under FortiView through two topology dashboards.

  1. On top-level FortiGate, go to FortiView > Physical Topology. This dashboard shows a vizualization of all access layer devices in the fabric.
  2. Go to FortiView > Logical Topology to view information about the interfaces (logical or physical) that each device in the fabric is connected to.

Other CSF configurations for your network are available through the Fortinet Cookbook Cooperative Security Fabric page.


Having trouble configuring your Fortinet hardware or have some questions you need answered? Check Out The Fortinet Guru Youtube Channel! Want someone else to deal with it for you? Get some consulting from Fortinet GURU!

WCCP Diagnose commands

Diagnose commands

The following get and diagnose commands are available for troubleshooting WAN optimization, web cache, explicit proxy and WCCP.


get test {wad | wccpd} <test_level>

Display usage information about WAN optimization, explicit proxy, web cache, and WCCP applications. Use <test_level> to display different information.

get test wad <test_level>

get test wccpd <test_level>


Variable                   Description

wad             Display information about WAN optimization, web caching, the explicit web proxy, and the explicit FTP proxy.

wccpd          Display information about the WCCP application.


Examples

Enter the following command to display WAN optimization tunnel protocol statistics. The http tunnel and tcp tunnel parts of the command output below shows that WAN optimization has been processing HTTP and TCP packets.

get test wad 1

WAD manager process status: pid=113 n_workers=1 ndebug_workers=0

Enter the following command to display all test options:

get test wad


WAD process 82 test usage:

1: display process status

2: display total memory usage.

99: restart all WAD processes

1000: List all WAD processes.

1001: dispaly debug level name and values

1002: dispaly status of WANOpt storages

1068: Enable debug for all WAD workers.

1069: Disable debug for all WAD workers.

2yxx: Set No. xx process of type y as diagnosis process.

3: display all fix-sized advanced memory stats

4: display all fix-sized advanced memory stats in details

500000..599999: cmem bucket stats (599999 for usage)

800..899: mem_diag commands (800 for help & usage)

800000..899999: mem_diag commands with 1 arg (800 for help & usage)

80000000..89999999: mem_diag commands with 2 args (800 for help & usage)

60: show debug stats.

61: discard all wad debug info that is currently pending

62xxx: set xxxM maximum ouput buffer size for WAD debug. 0, set back to default.

68: Enable process debug

69: Disable process debug

98: gracefully stopping WAD process

9xx: Set xx workers(0: default based on user configuration.)


Having trouble configuring your Fortinet hardware or have some questions you need answered? Check Out The Fortinet Guru Youtube Channel! Want someone else to deal with it for you? Get some consulting from Fortinet GURU!

Troubleshooting WCCP

Troubleshooting WCCP

Two types of debug commands are available for debugging or troubleshooting a WCCP connection between a FortiGate unit operating as a WCCP router and its WCCP cache engines.


Real time debugging

The following commands can capture live WCCP messages:

diag debug en

diag debug application wccpd <debug level>


Application debugging

The following commands display information about WCCP operations:

get test wccpd <integer>

diag test application wccpd <integer>

Where <integer> is a value between 1 and 6:

1. Display WCCP stats

2. Display WCCP config

3. Display WCCP cache servers

4. Display WCCP services

5. Display WCCP assignment

6. Display WCCP cache status


Enter the following command to view debugging output:

diag test application wccpd 3

Sample output from a successful WCCP connection:

service-0 in vdom-root: num=1, usable=1 cache server ID:

len=44, addr=172.16.78.8, weight=4135, status=0 rcv_id=6547, usable=1, fm=1, nq=0, dev=3(k3), to=192.168.11.55

ch_no=0, num_router=1:

192.168.11.55


Sample output from the same command from an unsuccessful WCCP connection (because of a service group password mismatch):

service-0 in vdom-root: num=0, usable=0 diag debug application wccpd -1

Sample output:

wccp_on_recv()-98: vdom-root recv: num=160, dev=3(3),

172.16.78.8->192.168.11.55

wccp2_receive_pkt()-1124: len=160, type=10, ver=0200, length=152

wccp2_receive_pkt()-1150: found component:t=0, len=20 wccp2_receive_pkt()-1150: found component:t=1, len=24 wccp2_receive_pkt()-1150: found component:t=3, len=44 wccp2_receive_pkt()-1150: found component:t=5, len=20 wccp2_receive_pkt()-1150: found component:t=8, len=24 wccp2_check_security_info()-326: MD5 check failed


Having trouble configuring your Fortinet hardware or have some questions you need answered? Check Out The Fortinet Guru Youtube Channel! Want someone else to deal with it for you? Get some consulting from Fortinet GURU!

WCCP Messages

WCCP Messages

When the WCCP service is active on a web cache server it periodically sends a WCCP HERE I AM broadcast or unicast message to the FortiGate unit operating as a WCCP router. This message contains the following information:

  • Web cache identity (the IP address of the web cache server).
  • Service info (the service group to join).


If the information received in the previous message matches what is expected, the FortiGate unit replies with a WCCP I SEE YOU message that contains the following details:

  • Router identity (the FortiGate unit’s IP address.
  • Sent to IP (the web cache IP addresses to which the packets are addressed)

When both ends receive these two messages the connection is established, the service group is formed and the designated web cache is elected.


Having trouble configuring your Fortinet hardware or have some questions you need answered? Check Out The Fortinet Guru Youtube Channel! Want someone else to deal with it for you? Get some consulting from Fortinet GURU!

WCCP packet flow

WCCP packet flow

The following packet flow sequence assumes you have configured a FortiGate unit to be a WCCP server and one or more FortiGate units to be WCCP clients.

1. A user’s web browser sends a request for web content.

2. The FortiGate unit configured as a WCCP server includes a security policy that intercepts the request and forwards it to a WCCP client.


The security policy can apply UTM features to traffic accepted by the policy.

3. The WCCP client receives the WCCP session.

4. The client either returns requested content to the WCCP server if it is already cached, or connects to the destination web server, receives and caches the content and then returns it to the WCCP server.

5. The WCCP server returns the requested content to the user’s web browser.

6. The WCCP router returns the request to the client web browser.


The client we browser is not aware that all this is taking place and does not have to be configured to use a web proxy.


Configuring the forward and return methods and adding authentication

The WCCP forwarding method determines how intercepted traffic is transmitted from the WCCP router to the WCCP cache engine. There are two different forwarding methods:

  • GRE forwarding (the default) encapsulates the intercepted packet in an IP GRE header with a source IP address of the WCCP router and a destination IP address of the target WCCP cache engine. The results is a tunnel that allows the WCCP router to be multiple hops away from the WCCP cache server.
  • L2 forwarding rewrites the destination MAC address of the intercepted packet to match the MAC address of the target WCCP cache engine. L2 forwarding requires that the WCCP router is Layer 2 adjacent to the WCCP client.


You can use the following command on a FortiGate unit configured as a WCCP router to change the forward and return methods to L2:

config system wccp edit 1

set forward-method L2 set return-method L2

end


You can also set the forward and return methods to any in order to match the cache server configuration.

By default the WCCP communication between the router and cache servers is unencrypted. If you are concerned about attackers sniffing the information in the WCCP stream you can use the following command to enable hash- based authentication of the WCCP traffic. You must enable authentication on the router and the cache engines and all must have the same password.

config system wccp edit 1

set authentication enable set password <password>

end


Having trouble configuring your Fortinet hardware or have some questions you need answered? Check Out The Fortinet Guru Youtube Channel! Want someone else to deal with it for you? Get some consulting from Fortinet GURU!

Example caching HTTP sessions on port 80 and HTTPS sessions on port 443 using WCCP

Example caching HTTP sessions on port 80 and HTTPS sessions on port 443 using WCCP

This example configuration is the same as thatdescribed in Example caching HTTP sessions on port 80 using WCCP on page 2948 except that WCCP now also cached HTTPS traffic on port 443. To cache HTTP and HTTPS traffic the WCCP service group must have a service ID in the range 51 to 255 and you must specify port 80 and 443 and protocol 6 in the service group configuration of the WCCP client.

Also the security policy on the WCCP_srv that accepts sessions from the internal network to be cached must accept HTTP and HTTPS sessions.


Configuring the WCCP server (WCCP_srv)

Use the following steps to configure WCCP_srv as the WCCP server for the example network. The example steps only describe the WCCP-related configuration.


To configure WCCP_srv as a WCCP server

1. Add a port2 to port1 security policy that accepts HTTP traffic on port 80 and HTTPS traffic on port 443 and is configured for WCCP:

config firewall policy edit 0

set srtintf port2 set dstintf port1 set srcaddr all set dstaddr all set action accept

set schedule always

set service HTTP HTTPS

set wccp enable set nat enable

end

2. Add another port2 to port1 security policy to allow all other traffic to connect to the Internet.

config firewall policy edit 0

set srtintf port2 set dstintf port1 set srcaddr all set dstaddr all set action accept

set schedule always set service ANY

set nat enable end

3. Move this policy below the WCCP policy in the port2 to port1 policy list.

4. Enable WCCP on the port5 interface.

config system interface edit port5

set wccp enable end

5. Add a WCCP service group with service ID 90 (can be any number between 51 and 255).

config system wccp edit 90

set router-id 10.51.101.100

set server-list 10.51.101.0 255.255.255.0 end

6. Add a firewall address and security policy to allow the WCCP_client to connect to the internet.

config firewall address edit WCCP_client_addr

set subnet 10.51.101.10 end

config firewall policy edit 0

set srtintf port5 set dstintf port1

set srcaddr WCCP_client_addr set dstaddr all

set action accept set schedule always set service ANY

set nat enable end


Configuring the WCCP client (WCCP_client)

Use the following steps to configure WCCP_client as the WCCP client for the example network. The example steps only describe the WCCP-related configuration.


To configure WCCP_client as a WCCP client

1. Configure WCCP_client to operate as a WCCP client.

config system settings

set wccp-cache-engine enable end


You cannot enter the wccp-cache-engine enable command if you have already added a WCCP service group. When you enter this command an interface named w.<vdom_name> is added to the FortiGate configuration (for example w.root). All traffic redirected from a WCCP router is considered to be received at this interface of the FortiGate unit operating as a WCCP client. A default route to this interface with lowest priority is added.

2. Enable WCCP on the port1 interface.

config system interface edit port1

set wccp enable

end

3. Add a WCCP service group with service ID 90. This service group also specifies to cache sessions on ports 80 and

443 (for HTTP and HTTPS) and protocol number 6.

config system wccp edit 90

set cache-id 10.51.101.10

set router-list 10.51.101.100 ports 80 443

set protocol 6 end


Having trouble configuring your Fortinet hardware or have some questions you need answered? Check Out The Fortinet Guru Youtube Channel! Want someone else to deal with it for you? Get some consulting from Fortinet GURU!

WCCP configuration overview

WCCP configuration overview

To configure WCCP you must create a service group that includes WCCP servers and clients. WCCP servers intercept sessions to be cached (for example, sessions from users browsing the web from a private network). To intercept sessions to be cached the WCCP server must include a security policy that accepts sessions to be cached and WCCP must be enabled in this security policy.

The server must have an interface configured for WCCP communication with WCCP clients. That interface sends and receives encapsulated GRE traffic to and from WCCP clients. The server must also include a WCCP service group that includes a service ID and the addresses of the WCCP clients as well as other WCCP configuration options.

To use a FortiGate unit as a WCCP client, the FortiGate unit must be set to be a WCCP client (or cache engine). You must also configure an interface on the client for WCCP communication. The client sends and receives encapsulated GRE traffic to and from the WCCP server using this interface.

The client must also include a WCCP service group with a service ID that matches a service ID on the server. The client service group also includes the IP address of the servers in the service group and specifies the port numbers and protocol number of the sessions that will be cached on the client.

When the client receives sessions from the server on its WCCP interface, it either returns cached content over the WCCP interface or connects to the destination web servers using the appropriate interface depending on the client routing configuration. Content received from web servers is then cached by the client and returned to the WCCP server over the WCCP link. The server then returns the received content to the initial requesting user web browser.

Finally you may also need to configure routing on the server and client FortiGate units and additional security policies may have to be added to the server to accept sessions not cached by WCCP.


Example caching HTTP sessions on port 80 using WCCP

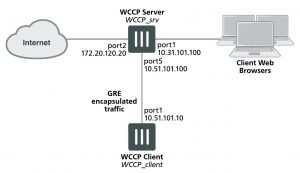
In this example configuration (shown below), a FortiGate unit with host name WCCP_srv is operating as an Internet firewall for a private network is also configured as a WCCP server. The port1 interface of WCCP_srv is connected to the Internet and the port2 interface is connected to the internal network.

All HTTP traffic on port 80 that is received at the port2 interface of WCCP_srv is accepted by a port2 to port1 security policy with WCCP enabled. All other traffic received at the port2 interface is allowed to connect to the Internet by adding a general port2 to port1 security policy below the HTTP on port 80 security policy.

A WCCP service group is added to WCCP_srv with a service ID of 0 for caching HTTP traffic on port 80. The port5 interface of WCCP_srv is configured for WCCP communication.

A second FortiGate unit with host name WCCP_client is operating as a WCCP client. The port1 interface of WCCP_client is connected to port5 of WCCP_srv and is configured for WCCP communication.


WCCP_client is configured to cache HTTP traffic because it also has a WCCP service group with a service ID of 0.

WCCP_client connects to the Internet through WCCP_srv. To allow this, a port5 to port1 security policy is added to WCCP_srv.


FortiGate WCCP server and client configuration

Configuring the WCCP server (WCCP_srv)

Use the following steps to configure WCCP_srv as the WCCP server for the example network. The example steps only describe the WCCP-related configuration.


To configure WCCP_srv as a WCCP server

1. Add a port2 to port1 security policy that accepts HTTP traffic on port 80 and is configured for WCCP:

config firewall policy edit 0

set srtintf port2 set dstintf port1 set srcaddr all set dstaddr all set action accept

set schedule always set service HTTP

set wccp enable set nat enable

end

2. Add another port2 to port1 security policy to allow all other traffic to connect to the Internet.

config firewall policy edit 0

set srtintf port2 set dstintf port1 set srcaddr all set dstaddr all set action accept

set schedule always set service ANY

set nat enable end

3. Move this policy below the WCCP policy in the port2 to port1 policy list.

4. Enable WCCP on the port5 interface.

config system interface edit port5

set wccp enable end

5. Add a WCCP service group with service ID 0.

config system wccp edit 0

set router-id 10.51.101.100

set server-list 10.51.101.0 255.255.255.0 end

6. Add a firewall address and security policy to allow the WCCP_client to connect to the internet.

config firewall address edit WCCP_client_addr

set subnet 10.51.101.10

end

config firewall policy edit 0

set srtintf port5 set dstintf port1

set srcaddr WCCP_client_addr set dstaddr all

set action accept set schedule always set service ANY

set nat enable end


Configuring the WCCP client (WCCP_client)

Use the following steps to configure WCCP_client as the WCCP client for the example network. The example steps only describe the WCCP-related configuration.


To configure WCCP_client as a WCCP client

1. Configure WCCP_client to operate as a WCCP client.

config system settings

set wccp-cache-engine enable end


You cannot enter the wccp-cache-engine enable command if you have already added a WCCP service group. When you enter this command an interface named w.<vdom_name> is added to the FortiGate configuration (for example w.root). All traffic redirected from a WCCP router is considered to be received at this interface of the FortiGate unit operating as a WCCP client. A default route to this interface with lowest priority is added.

2. Enable WCCP on the port1 interface.

config system interface edit port1

set wccp enable

end


3. Add a WCCP service group with service ID 0.

config system wccp edit 0

set cache-id 10.51.101.10

set router-list 10.51.101.100

end


Having trouble configuring your Fortinet hardware or have some questions you need answered? Check Out The Fortinet Guru Youtube Channel! Want someone else to deal with it for you? Get some consulting from Fortinet GURU!

Other WCCP service group options

Other WCCP service group options

In addition to using WCCP service groups to define the types of traffic to be cached by WCCP the following options are available for servers and clients.


Server configuration options

The server configuration must include the router-id, which is the WCCP server IP address. This is the IP address of the interface that the server uses to communicate with WCCP clients.

The group-address is used for multicast WCCP configurations to specify the multicast addresses of the clients.

The server-list defines the IP addresses of the WCCP clients that the server can connect to. Often the server list can be the address of the subnet that contains the WCCP clients.

The authentication option enables or disables authentication for the WCCP service group. Authentication must be enabled on all servers and clients in a service group and members of the group must have the same password.

The forward-method option specifies the protocol used for communication between the server and clients. The default forwarding method is GRE encapsulation. If required by your network you can also select to use unencapsulated layer-2 packets instead of GRE or select any to allow both. The return-method allows you to specify the communication method from the client to the server. Both GRE and layer-2 are supported.

The assignment-method determines how the server load balances sessions to the clients if there are multiple clients. Load balancing can be done using hashing or masking.


Client configuration options

The client configuration includes the cache-id which is the IP address of the FortiGate interface of the client that communicates with WCCP server. The router-list option is the list of IP addresses of the WCCP servers in the WCCP service group.

The ports option lists the port numbers of the sessions to be cached by the client and the protocol sets the protocol number of the sessions to be cached. For TCP sessions the protocol is 6.

The service-type option can be auto, dynamic or standard. Usually you would not change this setting.

The client configuration also includes options to influence load balancing including the primary-hash, priority, assignment-weight and assignment-bucket-format.


Having trouble configuring your Fortinet hardware or have some questions you need answered? Check Out The Fortinet Guru Youtube Channel! Want someone else to deal with it for you? Get some consulting from Fortinet GURU!