Category Archives: FortiOS 5.4 Handbook

The complete handbook for FortiOS 5.4

WCCP service groups, service numbers, service IDs and well known services

WCCP service groups, service numbers, service IDs and well known services

A FortiGate unit configured as a WCCP server or client can include multiple server or client configurations. Each of these configurations is called a WCCP service group. A service group consists of one or more WCCP servers (or routers) and one or more WCCP clients working together to cache a specific type of traffic. The service group configuration includes information about the type of traffic to be cached, the addresses of the WCCP clients and servers and other information about the service.

A service group is identified with a numeric WCCP service ID (or service number) in the range 0 to 255. All of the servers and clients in the same WCCP service group must have service group configurations with the same WCCP service ID.

The value of the service ID provides some information about the type of traffic to be cached by the service group. Service IDs in the range 0 to 50 are reserved for well known services. A well known service is any service that is defined by the WCCP standard as being well known. Since the service is well known, just the service ID is required to identify the traffic to be cached.

Even though the well known service ID range is 0 to 50, at this time only one well known service has been defined. Its service ID 0, which is used for caching HTTP (web) traffic.

So to configure WCCP to cache HTTP sessions you can add a service group to the WCCP router and WCCP clients with a service ID of 0. No other information about the type of traffic to cache needs to be added to the service group.

Since service IDs 1 to 50 are reserved for well know services and since these services are not defined yet, you should not add service groups with IDs in the range 1 to 50.

FortiOS does allow you to add service groups with IDs between 1 and 50. Since these service groups have not been assigned well known services, however, they will not cache any sessions. Service groups with IDs 51 to 255 allow you to set the port num- bers and protocol number of the traffic to be cached. So you can use service groups with IDs 51 to 255 to cache different kinds of traffic based on port numbers and pro- tocol number of the traffic. Service groups 1 to 50; however, do not allow you to set port numbers or protocol numbers so cannot be used to cache any traffic.

To cache traffic other than HTTP traffic you must add service groups with IDs in the range 51 to 255. These service group configurations must include the port numbers and protocol number of the traffic to be cached. It is the port and protocol number configuration in the service group that determines what traffic will be cached by WCCP.


Example WCCP server and client configuration for caching HTTP sessions (service ID = 0)

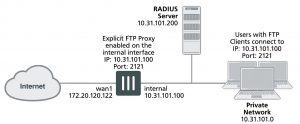
Enter the following command to add a WCCP service group to a WCCP server that caches HTTP sessions. The IP address of the server is 10.31.101.100 and the WCCP clients are on the 10.31.101.0 subnet. The service ID of this service group is 0.

config system wccp edit 0

set router-id 10.31.101.100

set server-list 10.31.101.0 255.255.255.0 end

Enter the following commands to configure a FortiGate unit to operate as a WCCP client and add a service group that configures the client to cache HTTP sessions. The IP address of the server is 10.31.101.100 and IP address of this WCCP clients is 10.31.101.1 subnet. The service ID of this service group is 0.

config system settings

set wccp-cache-engine enable end


config system wccp edit 0

set cache-id 10.31.101.1

set router-list 10.31.101.100 end


You cannot enter the wccp-cache-engine enable command if you have already added a WCCP service group. When you enter this command an interface named w.<vdom_name> is added to the FortiGate configuration (for example w.root). All traffic redirected from a WCCP router is considered to be received at this interface of the FortiGate unit operating as a WCCP client. A default route to this interface with lowest priority is added.

Example WCCP server and client configuration for caching HTTPS sessions

Enter the following command to add a service group to a WCCP server that caches HTTPS content on port 443 and protocol 6. The IP address of the server is 10.31.101.100 and the WCCP clients are on the 10.31.101.0 subnet. The service ID of this service group is 80.

config system settings

set wccp-cache-engine enable end


config system wccp edit 80

set router-id 10.31.101.100

set server-list 10.31.101.0 255.255.255.0 set ports 443

set protocol 6 end

Enter the following commands to configure a FortiGate unit to operate as a WCCP client and add a service group that configures client to cache HTTPS sessions on port 443 and protocol 6. The IP address of the server is 10.31.101.100 and IP address of this WCCP clients is 10.31.101.1 subnet. The service ID of this service group must be 80 to match the service ID added to the server.


config system settings

set wccp-cache-engine enable end


config system wccp edit 80

set cache-id 10.31.101.1

set router-list 10.31.101.100 set ports 443

set protocol 6 end


Example WCCP server and client configuration for caching HTTP and HTTPS sessions

You could do this by configuring two WCCP service groups as described in the previous examples. Or you could use the following commands to configure one service group for both types of traffic. The example also caches HTTP sessions on port 8080.

Enter the following command to add a service group to a WCCP server that caches HTTP sessions on ports 80 and 8080 and HTTPS sessions on port 443. Both of these protocols use protocol number 6. The IP address of the server is 10.31.101.100 and the WCCP clients are on the 10.31.101.0 subnet. The service ID of this service group is 90.

config system wccp edit 90

set router-id 10.31.101.100

set server-list 10.31.101.0 255.255.255.0

set ports 443 80 8080 set protocol 6

end

Enter the following commands to configure a FortiGate unit to operate as a WCCP client and add a service group that configures client to cache HTTP sessions on port 80 and 8080 and HTTPS sessions on port 443. The IP address of the server is 10.31.101.100 and IP address of this WCCP clients is 10.31.101.1 subnet. The service ID of this service group must be 90 to match the service ID added to the server.


config system settings

set wccp-cache-engine enable end

config system wccp edit 90

set cache-id 10.31.101.1

set router-list 10.31.101.100 set ports 443 80 8080

set protocol 6 end


Having trouble configuring your Fortinet hardware or have some questions you need answered? Check Out The Fortinet Guru Youtube Channel! Want someone else to deal with it for you? Get some consulting from Fortinet GURU!

FortiGate WCCP

FortiGate WCCP

The Web Cache Communication Protocol (WCCP) can be used to provide web caching with load balancing and fault tolerance. In a WCCP configuration, a WCCP server receives HTTP requests from user’s web browsers and redirects the requests to one or more WCCP clients. The clients either return cached content or request new content from the destination web servers before caching it and returning it to the server which in turn returns the content to the original requestor. If a WCCP configuration includes multiple WCCP clients, the WCCP server load balances traffic among the clients and can detect when a client fails and failover sessions to still operating clients. WCCP is described by the Web Cache Communication Protocol Internet draft.


The sessions that are cached by WCCP depend on the configuration of the WCCP clients. If the client is a FortiGate unit, you can configure the port numbers and protocol number of the sessions to be cached. For example, to cache HTTPS traffic on port 443 the WCCP client port must be set to 443 and protocol must be set to

6. If the WCCP client should also cache HTTPS traffic on port 993 the client ports option should include both port 443 and 993.

On a FortiGate unit, WCCP sessions are accepted by a security policy before being cached. If the security policy that accepts sessions that do not match the port and protocol settings in the WCCP clients the traffic is dropped.

WCCP is configured per-VDOM. A single VDOM can operate as a WCCP server or client (not both at the same time). FortiGate units are compatible with third-party WCCP clients and servers. If a FortiGate unit is operating as an Internet firewall for a private network, you can configure it to cache and serve some or all of the web traffic on the private network using WCCP by adding one or more WCCP clients, configuring WCCP server settings on the FortiGate unit and adding WCCP security policies that accept HTTP session from the private network.

FortiGate units support WCCPv1 and WCCPv2. A FortiGate unit in NAT/Route or transparent mode can operate as a WCCP server. To operate as a WCCP client a FortiGate unit must be in NAT/Route mode. FortiGate units communicate between WCCP servers and clients over UDP port 2048. This communication can be encapsulated in a GRE tunnel or just use layer 2 forwarding.

A WCCP server can also be called a WCCP router. A WCCP client can also be called a WCCP cache engine.


Having trouble configuring your Fortinet hardware or have some questions you need answered? Check Out The Fortinet Guru Youtube Channel! Want someone else to deal with it for you? Get some consulting from Fortinet GURU!

Explicit FTP proxy sessions and user limits

Explicit FTP proxy sessions and user limits

FTP clients do not open large numbers of sessions with the explicit FTP proxy. Most sessions stay open for a short while depending on how long a user is connected to an FTP server and how large the file uploads or downloads are. So unless you have large numbers of FTP users, the explicit FTP proxy should not be adding large numbers of sessions to the session table.

Explicit FTP proxy sessions and user limits are combined with explicit web proxy session and user limits. For information about explicit proxy session and user limits, see Explicit web proxy sessions and user limits on page 2930.


Having trouble configuring your Fortinet hardware or have some questions you need answered? Check Out The Fortinet Guru Youtube Channel! Want someone else to deal with it for you? Get some consulting from Fortinet GURU!

Example users on an internal network connecting to FTP servers on the Internet through the explicit FTP with RADIUS authentication and virus scanning

Example users on an internal network connecting to FTP servers on the Internet through the explicit FTP with RADIUS authentication and virus scanning

This example describes how to configure the explicit FTP proxy for the example network shown below. In this example, users on the internal network connect to the explicit FTP proxy through the Internal interface with IP address 10.31.101.100. The explicit web proxy is configured to use port 2121 so to connect to an FTP server on the Internet users must first connect to the explicit FTP proxy using IP address 10.31.101.100 and port 2121.


Example explicit FTP proxy network topology

In this example, explicit FTP proxy users must authenticate with a RADIUS server before getting access to the proxy. To apply authentication, the security policy that accepts explicit FTP proxy traffic includes an identity based policy that applies per session authentication to explicit FTP proxy users and includes a user group with the RADIUS server in it. The identity based policy also applies UTM virus scanning and DLP.


General configuration steps

This section breaks down the configuration for this example into smaller procedures. For best results, follow the procedures in the order given:

1. Enable the explicit FTP proxy and change the FTP port to 2121.

2. Enable the explicit FTP proxy on the internal interface.

3. Add a RADIUS server and user group for the explicit FTP proxy.

4. Add a user identity security policy for the explicit FTP proxy.

5. Enable antivirus and DLP features for the identity-based policy.


Configuring the explicit FTP proxy – web-based manager

Use the following steps to configure the explicit FTP proxy from FortiGate web-based manager.


To enable and configure the explicit FTP proxy

1. Go to Network > Explicit Proxy > Explicit FTP Proxy Options and change the following settings:


Enable Explicit FTP Proxy       Select.

Listen on Interface                   No change. This field will eventually show that the explicit web proxy is enabled for the Internal interface.

FTP Port                                     2121

Default Firewall Policy

ActioDeny

2. Select Apply.


To enable the explicit FTP proxy on the Internal interface

1. Go to Network > Interfaces, edit the Internal interface and select Enable Explicit FTP Proxy.


To add a RADIUS server and user group for the explicit FTP proxy

1. Go to User & Device > RADIUS Servers.

2. Select Create New to add a new RADIUS server:


Name                                           RADIUS_1

Primary Server Name/IP           10.31.101.200

Primary Server Secret              RADIUS_server_secret

3. Go to User > User > User Groups and select Create New.


Name                                           Explict_proxy_user_group

Type                                            Firewall

Remote groups                         RADIUS_1

Group Name                              ANY

4. Select OK.


To add a security policy for the explicit FTP proxy

1. Go to Policy & Objects > Addresses and select Create New.

2. Add a firewall address for the internal network:


Address Name                           Internal_subnet

Type                                            Subnet

Subnet / IP Range                     10.31.101.0

Interface                                     Any

3. Go to Policy & Objects > Explicit Proxy Policy and select Create New.

4. Configure the explicit FTP proxy security policy.


Explicit Proxy Type                  FTP

Source Address                        Internal_subnet

Outgoing Interface                   wan1

Destination Address                 all

Action                                         AUTHENTICATE

5. Under Configure Authentication Rules select Create New to add an authentication rule:


Groups                                       Explicit_policy

Users                                          Leave blank

Schedule                                    always

6. Turn on Antivirus and Web Filter and select the default profiles for both.

7. Select the default proxy options profile.

8. Select OK.

9. Make sure Enable IP Based Authentication is not selected and Default Authentication Method is set to Basic.

10. Select OK.


Configuring the explicit FTP proxy – CLI

Use the following steps to configure the example explicit web proxy configuration from the CLI.


To enable and configure the explicit FTP proxy

1. Enter the following command to enable the explicit FTP proxy and set the TCP port that proxy accepts FTP

connections on to 2121.

config ftp-proxy explicit set status enable

set incoming-port 2121

set sec-default-action deny end


To enable the explicit FTP proxy on the Internal interface

1. Enter the following command to enable the explicit FTP proxy on the internal interface.

config system interface edit internal

set explicit-ftp-proxy enable

end


To add a RADIUS server and user group for the explicit FTP proxy

1. Enter the following command to add a RADIUS server:

config user radius edit RADIUS_1

set server 10.31.101.200

set secret RADIUS_server_secret

end

2. Enter the following command to add a user group for the RADIUS server.

config user group

edit Explicit_proxy_user_group set group-type firewall

set member RADIUS_1

end


To add a security policy for the explicit FTP proxy

1. Enter the following command to add a firewall address for the internal subnet:

config firewall address edit Internal_subnet

set type iprange

set start-ip 10.31.101.1 set end-ip 10.31.101.255

end

2. Enter the following command to add the explicit FTP proxy security policy:

config firewall explicit-proxy-policy edit 0

set proxy ftp

set dstintf wan1

set srcaddr Internal_subnet set dstaddr all

set action accept

set identity-based enable set ipbased disable

set active-auth-method basic config identity-based-policy

edit 0

set groups Explicit_Proxy_user_group set schedule always

set utm-status enable set av-profile default

set profile-protocol-options default end

end


Testing and troubleshooting the configuration

You can use the following steps to verify that the explicit FTP proxy configuration is working as expected. These steps use a command line FTP client.


To test the explicit web proxy configuration

1. From a system on the internal network start an FTP client and enter the following command to connect to the FTP

proxy:

ftp 10.31.101.100

The explicit FTP proxy should respond with a message similar to the following:

Connected to 10.31.101.100.

220 Welcome to Fortigate FTP proxy

Name (10.31.101.100:user):

2. At the prompt enter a valid username and password for the RADIUS server followed by a user name for an FTP server on the Internet and the address of the FTP server. For example, if a valid username and password on the RADIUS server is ex_name and ex_pass and you attempt to connect to an FTP server at ftp.example.com with user name s_name, enter the following at the prompt:

Name (10.31.101.100:user):ex_name:ex_pass:s_name@ftp.example.com

3. You should be prompted for the password for the account on the FTP server.

4. Enter the password and you should be able to connect to the FTP server.

5. Attempt to explore the FTP server file system and download or upload files.


6. To test UTM functionality, attempt to upload or download an ECAR test file. Or upload or download a tex file containing text that would be matched by the DLP sensor.


For eicar test files, go to http://eicar.org.


Having trouble configuring your Fortinet hardware or have some questions you need answered? Check Out The Fortinet Guru Youtube Channel! Want someone else to deal with it for you? Get some consulting from Fortinet GURU!

Security profiles, threat weight, device identification, and the explicit FTP proxy

Security profiles, threat weight, device identification, and the explicit FTP proxy

You can apply antivirus, data leak prevention (DLP), and SSL/SSH inspection to explicit FTP proxy sessions. Security profiles are applied by selecting them in an explicit FTP proxy policy or an authentication rule in an FTP proxy security policy.

Traffic accepted by explicit FTP proxy policies contributes to threat weight data. The explicit FTP proxy is not compatible with device identification.

Explicit FTP proxy options and SSL/SSH inspection

Since the traffic accepted by the explicit FTP proxy is known to be FTP and since the ports are already known by the proxy, the explicit FTP proxy does not use the FTP port proxy options settings.

When adding UTM features to an FTP proxy security policy, you must select a proxy options profile. In most cases you can select the default proxy options profile. You could also create a custom proxy options profile.

The explicit FTP proxy supports the following proxy options:

  • Block Oversized File and oversized file limit


The explicit FTP proxy does not support the following protocol options:

  • Client comforting


Explicit FTP proxy sessions and antivirus

For explicit FTP proxy sessions, the FortiGate unit applies antivirus scanning to FTP file GET and PUT requests. The FortiGate unit starts virus scanning a file in an FTP session when it receives a file in the body of an FTP request.

Flow-based virus scanning is not available for explicit FTP proxy sessions. Even if the FortiGate unit is configured to use flow-based antivirus, explicit FTP proxy sessions use the regular virus database.


Having trouble configuring your Fortinet hardware or have some questions you need answered? Check Out The Fortinet Guru Youtube Channel! Want someone else to deal with it for you? Get some consulting from Fortinet GURU!

Restricting the outgoing source IP address of the explicit FTP proxy

Restricting the outgoing source IP address of the explicit FTP proxy

You can use the following command to restrict the source address of outgoing FTP proxy packets to a single IP address. The IP address that you specify must be the IP address of an interface that the explicit FTP proxy is enabled on. You might want to use this option if the explicit FTP proxy is enabled on an interface with multiple IP addresses.


For example, to restrict the outgoing packet source address to 172.20.120.100:

config ftp-proxy explicit

set outgoing-ip 172.20.120.100 end


Having trouble configuring your Fortinet hardware or have some questions you need answered? Check Out The Fortinet Guru Youtube Channel! Want someone else to deal with it for you? Get some consulting from Fortinet GURU!

Restricting the IP address of the explicit FTP proxy

Restricting the IP address of the explicit FTP proxy

You can use the following command to restrict access to the explicit FTP proxy using only one IP address. The IP address that you specify must be the IP address of an interface that the explicit FTP proxy is enabled on. You might want to use this option if the explicit FTP proxy is enabled on an interface with multiple IP addresses.

For example, to require uses to connect to the IP address 10.31.101.100 to connect to the explicit FTP proxy:

config ftp-proxy explicit

set incoming-ip 10.31.101.100

end


Having trouble configuring your Fortinet hardware or have some questions you need answered? Check Out The Fortinet Guru Youtube Channel! Want someone else to deal with it for you? Get some consulting from Fortinet GURU!

How to use the explicit FTP proxy to connect to an FTP server

How to use the explicit FTP proxy to connect to an FTP server

To connect to an FTP server using the explicit FTP proxy, users must run an FTP client and connect to the IP address of a FortiGate interface on which the explicit FTP proxy is enabled. This connection attempt must use the configured explicit FTP proxy port number (default 21).

The explicit FTP proxy is not compatible with using a web browser as an FTP client. To use web browsers as FTP clients configure the explicit web proxy to accept FTP sessions.

The following steps occur when a user starts an FTP client to connect to an FTP server using the explicit FTP proxy. Any RFC-compliant FTP client can be used. This example describes using a command-line FTP client. Some FTP clients may require a custom FTP proxy connection script.

1. The user enters a command on the FTP client to connect to the explicit FTP proxy.


For example, if the IP address of the FortiGate interface on which the explicit FTP proxy is enabled is 10.31.101.100, enter:

ftp 10.31.101.100

2. The explicit FTP proxy responds with a welcome message and requests the user’s FTP proxy user name and password and a username and address of the FTP server to connect to:

Connected to 10.31.101.100.

220 Welcome to Fortigate FTP proxy

Name (10.31.101.100:user):

You can change the message by editing the FTP Explicit Banner Message replacement message.

3. At the prompt the user enters their FTP proxy username and password and a username and address for the FTP server. The FTP server address can be a domain name or numeric IP address. This information is entered using the following syntax:

<proxy-user>:<proxy-password>:<server-user>@<server-address>

For example, if the proxy username and password are p-name and p-pass and a valid username for the FTP server is s-name and the server’s IP address is ftp.example.com the syntax would be:

p-name:p-pass:s-name@ftp.example.com

If the FTP proxy accepts anonymous logins p-name and p-pass can be any char- acters.

4. The FTP proxy forwards the connection request, including the user name, to the FTP server.

5. If the user name is valid for the FTP server it responds with a password request prompt.

6. The FTP proxy relays the password request to the FTP client.

7. The user enters the FTP server password and the client sends the password to the FTP proxy.

8. The FTP proxy relays the password to the FTP server.

9. The FTP server sends a login successful message to the FTP proxy.

10. The FTP proxy relays the login successful message to the FTP client.

11. The FTP client starts the FTP session.


All commands entered by the client are relayed by the proxy to the server. Replies from the server are relayed back to the FTP client.


Explicit FTP proxy session

From a simple command line FTP client connecting to an the previous sequence could appear as follows:

ftp 10.31.101.100 21

Connected to 10.31.101.100.

220 Welcome to Fortigate FTP proxy

Name (10.31.101.100:user): p-name:p-pass:s-name@ftp.example.com

331 Please specify the password. Password: s-pass

230 Login successful. Remote system type is UNIX

Using binary mode to transfer files. ftp>


General explicit FTP proxy configuration steps

You can use the following general steps to configure the explicit FTP proxy.


To enable the explicit FTP proxy – web-based manager:

1. Go to Network > Explicit Proxy > Explicit FTP Proxy Options. Select Enable Explicit FTP Proxy to turn on the explicit FTP proxy.

2. Select Apply.


The Default Firewall Policy Action is set to Deny and requires you to add a explicit FTP proxy policy to allow access to the explicit FTP proxy. This configuration is recommended and is a best practice because you can use policies to control access to the explicit FTP proxy and also apply security features and authentication.

3. Go to Network > Interfaces and select one or more interfaces for which to enable the explicit web proxy. Edit the interface and select Enable Explicit FTP Proxy.

Enabling the explicit FTP proxy on an interface connected to the Internet is a security risk because anyone on the Internet who finds the proxy could use it to hide their source address. If you enable the proxy on such an interface make sure authentication is required to use the proxy.


4. Go to Policy & Objects > Explicit Proxy Policy and select Create New and set the Explicit Proxy Type to FTP.


You can add multiple explicit FTP proxy policies.

5. Configure the policy as required to accept the traffic that you want to be processed by the explicit FTP proxy.


The source address of the policy should match client source IP addresses. The firewall address selected as the source address cannot be assigned to a FortiGate interface. The Interface field of the firewall address must be blank or it must be set to Any.

The destination address of the policy should match the IP addresses of FTP servers that clients are connecting to. The destination address could be all to allow connections to any FTP server.

If Default Firewall Policy Action is set to Deny, traffic sent to the explicit FTP proxy that is not accepted by an explicit FTP proxy policy is dropped. If Default Firewall Policy Action is set to Allow then all FTP proxy sessions that don’t match a policy are allowed.

For example the following explicit FTP proxy policy allows users on an internal network to access FTP servers on the Internet through the wan1 interface of a FortiGate unit.


Explicit Proxy Type                  FTP

Source Address                        Internal_subnet

Outgoing Interface                   wan1

Destination Address                 all

Schedule                                    always

Action                                         ACCEPT


The following explicit FTP proxy policy requires users on an internal network to authenticate with the FortiGate unit before accessing FTP servers on the Internet through the wan1 interface.


Explicit Proxy Type                  FTP

Source Address                        Internal_subnet

Outgoing Interface                   wan1

Destination Address                 all

Action                                         AUTHENTICATE


6. Select Create New to add an Authentication Rule and configure the rule as follows:

Groups                                       Proxy-Group

Source Users                             (optional)

Schedule                                    always


7. Add security profiles as required and select OK.

8. You can add multiple authentication rules to apply different authentication for different user groups and users and also apply different security profiles and logging settings for different users.

9. Select OK.


To enable the explicit FTP proxy – CLI:

1. Enter the following command to turn on the explicit FTP proxy. This command also changes the explicit FTP proxy port to 2121.

config ftp-proxy explicit set status enable

set incoming-port 2121 end

The default explicit FTP proxy configuration has sec-default-action set to deny and requires you to add a security policy to allow access to the explicit FTP proxy.


2. Enter the following command to enable the explicit FTP proxy for the internal interface.


config system interface edit internal

set explicit-ftp-proxy enable end

end


3. Use the following command to add a firewall address that matches the source address of users who connect to the explicit FTP proxy.

config firewall address edit Internal_subnet

set type iprange

set start-ip 10.31.101.1 set end-ip 10.31.101.255

end

The source address for a ftp-proxy security policy cannot be assigned to a FortiGate unit interface.


4. Use the following command to add an explicit FTP proxy policy that allows all users on the internal subnet to use the explicit FTP proxy for connections through the wan1 interface to the Internet.

config firewall explicit-proxy-policy edit 0

set proxy ftp

set dstintf wan1

set scraddr Internal_subnet set dstaddr all

set action accept set schedule always

end


5. Use the following command to add an explicit FTP proxy policy that allows authenticated users on the internal subnet to use the explicit FTP proxy for connections through the wan1 interface to the Internet.

config firewall explicit-proxy-policy edit 0

set proxy ftp

set dstintf wan1

set scraddr Internal_subnet

set dstaddr Fortinet-web-sites set action accept

set schedule always

set identity-based enable config identity-based-policy

edit 1

set groups Proxy-group set schedule always

end

end


Having trouble configuring your Fortinet hardware or have some questions you need answered? Check Out The Fortinet Guru Youtube Channel! Want someone else to deal with it for you? Get some consulting from Fortinet GURU!