How to use the explicit FTP proxy to connect to an FTP server
To connect to an FTP server using the explicit FTP proxy, users must run an FTP client and connect to the IP address of a FortiGate interface on which the explicit FTP proxy is enabled. This connection attempt must use the configured explicit FTP proxy port number (default 21).
The explicit FTP proxy is not compatible with using a web browser as an FTP client. To use web browsers as FTP clients configure the explicit web proxy to accept FTP sessions.
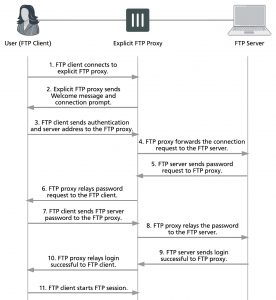
The following steps occur when a user starts an FTP client to connect to an FTP server using the explicit FTP proxy. Any RFC-compliant FTP client can be used. This example describes using a command-line FTP client. Some FTP clients may require a custom FTP proxy connection script.
1. The user enters a command on the FTP client to connect to the explicit FTP proxy.
For example, if the IP address of the FortiGate interface on which the explicit FTP proxy is enabled is 10.31.101.100, enter:
ftp 10.31.101.100
2. The explicit FTP proxy responds with a welcome message and requests the user’s FTP proxy user name and password and a username and address of the FTP server to connect to:
Connected to 10.31.101.100.
220 Welcome to Fortigate FTP proxy
Name (10.31.101.100:user):
You can change the message by editing the FTP Explicit Banner Message replacement message.
3. At the prompt the user enters their FTP proxy username and password and a username and address for the FTP server. The FTP server address can be a domain name or numeric IP address. This information is entered using the following syntax:
<proxy-user>:<proxy-password>:<server-user>@<server-address>
For example, if the proxy username and password are p-name and p-pass and a valid username for the FTP server is s-name and the server’s IP address is ftp.example.com the syntax would be:
p-name:p-pass:s-name@ftp.example.com
If the FTP proxy accepts anonymous logins p-name and p-pass can be any char- acters.
4. The FTP proxy forwards the connection request, including the user name, to the FTP server.
5. If the user name is valid for the FTP server it responds with a password request prompt.
6. The FTP proxy relays the password request to the FTP client.
7. The user enters the FTP server password and the client sends the password to the FTP proxy.
8. The FTP proxy relays the password to the FTP server.
9. The FTP server sends a login successful message to the FTP proxy.
10. The FTP proxy relays the login successful message to the FTP client.
11. The FTP client starts the FTP session.
All commands entered by the client are relayed by the proxy to the server. Replies from the server are relayed back to the FTP client.
Explicit FTP proxy session
From a simple command line FTP client connecting to an the previous sequence could appear as follows:
ftp 10.31.101.100 21
Connected to 10.31.101.100.
220 Welcome to Fortigate FTP proxy
Name (10.31.101.100:user): p-name:p-pass:s-name@ftp.example.com
331 Please specify the password. Password: s-pass
230 Login successful. Remote system type is UNIX
Using binary mode to transfer files. ftp>
General explicit FTP proxy configuration steps
You can use the following general steps to configure the explicit FTP proxy.
To enable the explicit FTP proxy – web-based manager:
1. Go to Network > Explicit Proxy > Explicit FTP Proxy Options. Select Enable Explicit FTP Proxy to turn on the explicit FTP proxy.
2. Select Apply.
The Default Firewall Policy Action is set to Deny and requires you to add a explicit FTP proxy policy to allow access to the explicit FTP proxy. This configuration is recommended and is a best practice because you can use policies to control access to the explicit FTP proxy and also apply security features and authentication.
3. Go to Network > Interfaces and select one or more interfaces for which to enable the explicit web proxy. Edit the interface and select Enable Explicit FTP Proxy.
Enabling the explicit FTP proxy on an interface connected to the Internet is a security risk because anyone on the Internet who finds the proxy could use it to hide their source address. If you enable the proxy on such an interface make sure authentication is required to use the proxy.
4. Go to Policy & Objects > Explicit Proxy Policy and select Create New and set the Explicit Proxy Type to FTP.
You can add multiple explicit FTP proxy policies.
5. Configure the policy as required to accept the traffic that you want to be processed by the explicit FTP proxy.
The source address of the policy should match client source IP addresses. The firewall address selected as the source address cannot be assigned to a FortiGate interface. The Interface field of the firewall address must be blank or it must be set to Any.
The destination address of the policy should match the IP addresses of FTP servers that clients are connecting to. The destination address could be all to allow connections to any FTP server.
If Default Firewall Policy Action is set to Deny, traffic sent to the explicit FTP proxy that is not accepted by an explicit FTP proxy policy is dropped. If Default Firewall Policy Action is set to Allow then all FTP proxy sessions that don’t match a policy are allowed.
For example the following explicit FTP proxy policy allows users on an internal network to access FTP servers on the Internet through the wan1 interface of a FortiGate unit.
Explicit Proxy Type FTP
Source Address Internal_subnet
Outgoing Interface wan1
Destination Address all
Schedule always
Action ACCEPT
The following explicit FTP proxy policy requires users on an internal network to authenticate with the FortiGate unit before accessing FTP servers on the Internet through the wan1 interface.
Explicit Proxy Type FTP
Source Address Internal_subnet
Outgoing Interface wan1
Destination Address all
Action AUTHENTICATE
6. Select Create New to add an Authentication Rule and configure the rule as follows:
Groups Proxy-Group
Source Users (optional)
Schedule always
7. Add security profiles as required and select OK.
8. You can add multiple authentication rules to apply different authentication for different user groups and users and also apply different security profiles and logging settings for different users.
9. Select OK.
To enable the explicit FTP proxy – CLI:
1. Enter the following command to turn on the explicit FTP proxy. This command also changes the explicit FTP proxy port to 2121.
config ftp-proxy explicit set status enable
set incoming-port 2121 end
The default explicit FTP proxy configuration has sec-default-action set to deny and requires you to add a security policy to allow access to the explicit FTP proxy.
2. Enter the following command to enable the explicit FTP proxy for the internal interface.
config system interface edit internal
set explicit-ftp-proxy enable end
end
3. Use the following command to add a firewall address that matches the source address of users who connect to the explicit FTP proxy.
config firewall address edit Internal_subnet
set type iprange
set start-ip 10.31.101.1 set end-ip 10.31.101.255
end
The source address for a ftp-proxy security policy cannot be assigned to a FortiGate unit interface.
4. Use the following command to add an explicit FTP proxy policy that allows all users on the internal subnet to use the explicit FTP proxy for connections through the wan1 interface to the Internet.
config firewall explicit-proxy-policy edit 0
set proxy ftp
set dstintf wan1
set scraddr Internal_subnet set dstaddr all
set action accept set schedule always
end
5. Use the following command to add an explicit FTP proxy policy that allows authenticated users on the internal subnet to use the explicit FTP proxy for connections through the wan1 interface to the Internet.
config firewall explicit-proxy-policy edit 0
set proxy ftp
set dstintf wan1
set scraddr Internal_subnet
set dstaddr Fortinet-web-sites set action accept
set schedule always
set identity-based enable config identity-based-policy
edit 1
set groups Proxy-group set schedule always
end
end