Category Archives: FortiOS 5.4 Handbook

The complete handbook for FortiOS 5.4

The FortiGate explicit FTP proxy

The FortiGate explicit FTP proxy

You can use the FortiGate explicit FTP proxy to enable explicit FTP proxying on one or more FortiGate interfaces. The explicit web and FTP proxies can be operating at the same time on the same or on different FortiGate interfaces.

Explicit FTP proxies are configured for each VDOM when multiple VDOMs are enabled.

In most cases you would configure the explicit FTP proxy for users on a network by enabling the explicit FTP proxy on the FortiGate interface connected to that network. Users on the network would connect to and authenticate with the explicit FTP proxy before connecting to an FTP server. In this case the IP address of the explicit FTP proxy is the IP address of the FortiGate interface on which the explicit FTP proxy is enabled.

Enabling the explicit FTP proxy on an interface connected to the Internet is a security risk because anyone on the Internet who finds the proxy could use it to hide their source address.

If the FortiGate unit is operating in Transparent mode, users would configure their browsers to use a proxy server with the FortiGate unit management IP address.

The FTP proxy receives FTP sessions to be proxied at FortiGate interfaces with the explicit FTP proxy enabled. The FTP proxy uses FortiGate routing to route sessions through the FortiGate unit to a destination interface. Before a session leaves the exiting interface, the explicit FTP proxy changes the source addresses of the session packets to the IP address of the exiting interface. When the FortiGate unit is operating in Transparent mode the explicit web proxy changes the source addresses to the management IP address.


Example explicit FTP proxy topology

To allow anyone to anonymously log into explicit FTP proxy and connect to any FTP server you can set the explicit FTP proxy default firewall proxy action to accept. When you do this, users can log into the explicit FTP proxy with any username and password.

In most cases you would want to use explicit proxy policies to control explicit FTP proxy traffic and apply security features, access control/authentication, and logging. You can do this by keeping the default explicit FTP proxy firewall policy action to deny and then adding explicit FTP proxy policies. In most cases you would also want users to authenticate with the explicit FTP proxy. By default an anonymous FTP login is required. Usually you would add authentication to explicit FTP proxy policies. Users can then authenticate with the explicit FTP proxy according to users or user groups added to the policies. User groups added to explicit FTP proxy policies can use any authentication method supported by FortiOS including the local user database and RADIUS and other remote servers.

If you leave the default firewall policy action set to deny and add explicit FTP proxy policies, all connections to the explicit FTP proxy must match an or else they will be dropped. Sessions that are accepted are processed according to the ftp-proxy security policy settings.

You can also change the explicit FTP proxy default firewall policy action to accept and add explicit FTP proxy policies. If you do this, sessions that match explicit FTP proxy policies are processed according to the policy settings. Connections to the explicit FTP proxy that do not match an explicit FTP proxy policy are allowed and the users can authenticate with the proxy anonymously.

There are some limitations to the security features that can be applied to explicit FTP proxy sessions. See Security profiles, threat weight, device identification, and the explicit FTP proxy on page 2938.

You cannot configure IPsec, SSL VPN, or Traffic shaping for explicit FTP proxy traffic. Explicit FTP proxy policies can only include firewall addresses not assigned to a FortiGate unit interface or with interface set to any. (On the web-based manager you must set the interface to Any. In the CLI you must unset the associated- interface.)


Having trouble configuring your Fortinet hardware or have some questions you need answered? Check Out The Fortinet Guru Youtube Channel! Want someone else to deal with it for you? Get some consulting from Fortinet GURU!

Explicit web proxy sessions and user limits

Explicit web proxy sessions and user limits

Web browsers and web servers open and close multiple sessions with the explicit web proxy. Some sessions open and close very quickly. HTTP 1.1 keepalive sessions are persistent and can remain open for long periods of time. Sessions can remain on the explicit web proxy session list after a user has stopped using the proxy (and has, for example, closed their browser). If an explicit web proxy session is idle for more than 3600 seconds it is torn down by the explicit web proxy. See RFC 2616 for information about HTTP keepalive/persistent HTTP sessions.

This section describes proxy sessions and user limits for both the explicit web proxy and the explicit FTP proxy. Session and user limits for the two proxies are counted and calculated together. However, in most cases if both proxies are active there will be many more web proxy sessions than FTP proxy sessions.

The FortiGate unit adds two sessions to its session table for every explicit proxy session started by a web browser and every FTP session started by an FTP client. An entry is added to the session table for the session from the web browser or client to the explicit proxy. All of these sessions have the same destination port as the explicit web proxy port (usually 8080 for HTTP and 21 for FTP). An entry is also added to the session table for the session between the exiting FortiGate interface and the web or FTP server destination of the session. All of these sessions have a FortiGate interface IP address and the source address of the session and usually have a destination port of 80 for HTTP and 21 for FTP.

Proxy sessions that appear in FortiView do not include the Policy ID of the web-proxy or ftp-proxy security policy that accepted them. However, the explicit proxy sessions include a destination port that matches the explicit proxy port number (usually 8080 for the web proxy and 21 for the FTP proxy). The proxied sessions from the FortiGate unit have their source address set to the IP address of the FortiGate unit interface that the sessions use to connect to their destinations (for example, for connections to the Internet the source address would be the IP address of the FortiGate interface connected to the Internet).

FortiOS limits the number of explicit proxy users. This includes both explicit FTP proxy and explicit web proxy users. The number of users varies by FortiGate model from as low as 10 to up to 18000 for high end models. You cannot raise this limit.

If your FortiGate unit is configured for multiple VDOMs you can go to System > Global Resources to view the maximum number of Concurrent explicit proxy users and optionally reduce the limit. You can also use the following command:

config global

config system resource-limits set proxy 50

end end

To limit the number of explicit proxy users for a VDOM, from the web-based manager enable multiple VDOMs and go to System > VDOM and edit a VDOM or use the following command to change the number of explicit web proxy users for VDOM_1:

config global

config system vdom-property edit VDOM_1

set proxy 25

end end

You can use the diagnose wad user list command to view the number of explicit web proxy users. Users may be displayed with this command even if they are no longer actively using the proxy. All idle sessions time out after 3600 seconds.

You can use the command diagnose wad user clear to clear current explicit proxy users. You can also use the command diagnose wad user clear <user-name> to clear individual users. This means delete information about all users and force them re-authenticate.

Users that authenticate with explicit web-proxy or ftp-proxy security policies do not appear in the Monitor > Firewall Monitor list and selecting Deauthenticate All Users has no effect on explicit proxy users.

How the number of concurrent explicit proxy users is determined depends on their authentication method:

  • For session-based authenticated users, each authenticated user is counted as a single user. Since multiple users can have the same user name, the proxy attempts to identify users according to their authentication membership (based upon whether they were authenticated using RADIUS, LADAP, FSAE, local database etc.). If a user of one session has the same name and membership as a user of another session, the explicit proxy assumes this is one user.
  • For IP Based authentication, or no authentication, or if no web-proxy security policy has been added, the source IP address is used to determine a user. All sessions from a single source address are assumed to be from the same user.

The explicit proxy does not limit the number of active sessions for each user. As a result the actual explicit proxy session count is usually much higher than the number of explicit web proxy users. If an excessive number of explicit web proxy sessions is compromising system performance you can limit the amount of users if the FortiGate unit is operating with multiple VDOMs.


Having trouble configuring your Fortinet hardware or have some questions you need answered? Check Out The Fortinet Guru Youtube Channel! Want someone else to deal with it for you? Get some consulting from Fortinet GURU!

Preventing the explicit web proxy from changing source addresses

Preventing the explicit web proxy from changing source addresses

By default in NAT/Route mode the explicit web proxy changes the source address of packets leaving the FortiGate to the IP address of the FortiGate interface that the packets are exiting from. In Transparent mode the source address is changed to the management IP.

This configuration hides the IP addresses of clients and allows packets to return to the FortiGate unit interface without having to route packets from clients. You can use the following command to configure the explicit web proxy to keep the original client’s source IP address:

config firewall explicit-proxy-policy edit 0

set proxy web

set transparent enable end


Example users on an internal network browsing the Internet through the explicit web proxy with web caching, RADIUS authentication, web filtering, and virus scanning

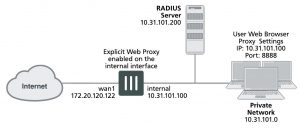
This example describes how to configure the explicit web proxy for the example network shown below. In this example, users on the internal network connect to the explicit web proxy through the Internal interface of the FortiGate unit. The explicit web proxy is configured to use port 8888 so users must configure their web browser proxy settings to use port 8888 and IP address 10.31.101.100.


Example explicit web proxy network topology

Explicit web proxy users must authenticate with a RADIUS server before getting access to the proxy. The explicit proxy policy that accepts explicit web proxy traffic applies per session authentication and includes a RADIUS server user group. The authentication rule also applies web filtering and virus scanning.


General configuration steps

This section breaks down the configuration for this example into smaller procedures. For best results, follow the procedures in the order given:

1. Enable the explicit web proxy for HTTP and HTTPS and change the HTTP and HTTPS ports to 8888.

2. Enable the explicit web proxy on the internal interface.

3. Add a RADIUS server and user group for the explicit web proxy.

4. Add an authentication explicit proxy policy. Enable web caching. Add an authentication rule and enable antivirus and web filtering.


Configuring the explicit web proxy – web-based manager

Use the following steps to configure the explicit web proxy.


To enable and configure the explicit web proxy

1. Go to System > Feature Select and turn on the Explicit Proxy feature.

2. Go to Network > Explicit Proxy and change the following settings:


Enable Explicit Web Proxy      Select HTTP/HTTPS.

Listen on Interfaces                 No change. This field will eventually show that the explicit web proxy is enabled for the Internal interface.

HTTP Port                                  8888

HTTPS Port                                0

Realm                                         You are authenticating with the explicit web proxy.

Default Firewall Policy

ActioDeny

3. Select Apply.


To enable the explicit web proxy on the Internal interface

1. Go to Network > Interfaces.

2. Edit the internal interface.

3. Select Enable Explicit Web Proxy.

4. Select OK.


To add a RADIUS server and user group for the explicit web proxy

1. Go to User & Device > RADIUS Servers and select Create New to add a new RADIUS server:

Name                                           RADIUS_1

Primary Server Name/IP           10.31.101.200

Primary Server Secret              RADIUS_server_secret

2. Select OK.

3. Go to User & Device > User Groups and select Create New to add a new user group.

Name                                           Explict_proxy_user_group

Type                                            Firewall

Remote Groups                         RADIUS_1

Group Name                              Any

4. Select OK.


To add an explicit proxy policy

1. Go to Policy & Objects > Addresses and select Create New.

2. Add a firewall address for the internal network:


Category                                     Address

Name                                           Internal_subnet

Type                                            Subnet / IP Range

Subnet / IP Range                     10.31.101.0

Interface                                     Any

3. Go to Policy & Objects > Explicit Proxy Policy and select Create New.

4. Configure the explicit web proxy policy.

Explicit Proxy Type                  Web

Source Address                        Internal_subnet

Outgoing Interface                   wan1

Destination Address                 all

Action                                         AUTHENTICATE

5. Under Configure Authentication Rules select Create New to add an authentication rule:


Groups                                       Explicit_policy

Source User(s)                          Leave blank

Schedule                                    always

6. Turn on Antivirus and Web Filter and select the default profiles for both.

7. Select the default proxy options profile.

8. Select OK.

9. Make sure Enable IP Based Authentication is not selected.

10. Turn on Web Cache.

11. Select OK.


Configuring the explicit web proxy – CLI

Use the following steps to configure the example explicit web proxy configuration from the CLI.


To enable the explicit web proxy on the Internal interface

1. Enter the following command to enable the explicit web proxy on the internal interface.

config system interface edit internal

set explicit-web-proxy enable

end


To enable and configure the explicit web proxy

1. Enter the following command to enable the explicit web proxy and set the TCP port that proxy accepts HTTP and

HTTPS connections on to 8888.

config web-proxy explicit set status enable

set http-incoming-port 8888 set https-incoming-port 8888

set realm “You are authenticating with the explicit web proxy” set sec-default-action deny

end


To add a RADIUS server and user group for the explicit web proxy

1. Enter the following command to add a RADIUS server:

config user radius edit RADIUS_1

set server 10.31.101.200

set secret RADIUS_server_secret

end

2. Enter the following command to add a user group for the RADIUS server.

config user group

edit Explicit_proxy_user_group set group-type firewall

set member RADIUS_1

end


To add a security policy for the explicit web proxy

1. Enter the following command to add a firewall address for the internal subnet:

config firewall address edit Internal_subnet

set type iprange

set start-ip 10.31.101.1 set end-ip 10.31.101.255

end

2. Enter the following command to add the explicit web proxy security policy:

config firewall explicit-proxy-policy edit 0

set proxy web

set dstintf wan1

set srcaddr Internal_subnet set dstaddr all

set action accept

set service webproxy set webcache enable

set identity-based enable set ipbased disable

end

set active-auth-method basic config identity-based-policy

edit 0

set groups Explicit_Proxy_user_group set schedule always

set utm-status enable set av-profile default

set webfilter-profile default

set profile-protocol-options default end


Testing and troubleshooting the configuration

You can use the following steps to verify that the explicit web proxy configuration is working as expected:


To test the explicit web proxy configuration

1. Configure a web browser on the internal subnet to use a web proxy server at IP address 10.31.101.100 and port 8888.

2. Browse to an Internet web page.

The web browser should pop up an authentication window that includes the phrase that you added to the Realm option.

3. Enter the username and password for an account on the RADIUS server.

If the account is valid you should be allowed to browse web pages on the Internet.

4. Close the browser and clear its cache and cookies.

5. Restart the browser and connect to the Internet.

You could also start a second web browser on the same PC. Or you could start a new instance of the same browser as long as the browser asks for a user name and password again.

You should have to authenticate again because identity-based policies are set to session-based authentication.

6. If this basic functionality does not work, check your FortiGate and web browser configuration settings.

7. Browse to a URL on the URL filter list and confirm that the web page is blocked.

8. Browse to http://eicar.org and attempt to download an anti-malware test file.

The antivirus configuration should block the file.

Sessions for web-proxy security policies do not appear on the Top Sessions dashboard widget and the count column for security policies does not display a count for explicit web proxy security policies.

9. You can use the following command to display explicit web proxy sessions

get test wad 60

IP based users:

Session based users:

user:0x9c20778, username:User1, vf_id:0, ref_cnt:9


Total allocated user:1

Total user count:3, shared user quota:50, shared user count:3

This command output shows one explicit proxy user with user name User1 authenticated using session-based authentication.


Having trouble configuring your Fortinet hardware or have some questions you need answered? Check Out The Fortinet Guru Youtube Channel! Want someone else to deal with it for you? Get some consulting from Fortinet GURU!

Changing HTTP headers

Changing HTTP headers

You can create explicit web proxy profiles that can add, remove and change HTTP headers. The explicit web proxy profile can be added to a web explicit proxy policy and will be applied to all of the HTTP traffic accepted by that policy.


You can change the following HTTP headers:

  • client-ip
  • via header for forwarded requests
  • via header for forwarded responses
  • x-forwarded-for
  • front-end-https


For each of these headers you can set the action to:

  • Pass to forward the traffic without changing the header
  • Add to add the header
  • Remove to remove the header

You can also configure how the explicit web proxy handles custom headers. The proxy can add or remove custom headers from requests or responses. If you are adding a header you can specify the content to be included in the added header.


Create web proxy profiles from the CLI:

config web-proxy profile edit <name>

set header-client-ip {add | pass | remove} set header-via-request {add | pass | remove} set header-via-response {add | pass | remove}

set header-x-forwarded-for {add | pass | remove}

set header-front-end-https {add | pass | remove}

config headers edit <id>

set action {add-to-request | add-to-response | remove-from-request |

remove-from-response}

set content <string>

set name <name>

end

end


Use the following command to add a web proxy profile to an explicit proxy policy:

config firewall explicit-proxy-policy edit <id>

set webproxy-profile <name>

end


Having trouble configuring your Fortinet hardware or have some questions you need answered? Check Out The Fortinet Guru Youtube Channel! Want someone else to deal with it for you? Get some consulting from Fortinet GURU!

Explicit web proxy firewall address URL patterns

Explicit web proxy firewall address URL patterns

You can add URL pattern addresses and address groups to control the destination URLs that explicit proxy users can connect to. To add a URL pattern to go to Policy & Objects > Addresses, select Create New and set the Type to URL Pattern (Explicit Proxy). Add a URL or URL pattern that defines the URL or URLs that explicit proxy users should be limited to. Set the Interface to any.


For example to limit access to a single website:

www.fortinet.com


To limit access to websites from the same domain:

google.com


To limit access to a part of a website:

www.apple.com/ipad/


To add a URL pattern group, create several URL pattern addresses then go to Policy & Objects > Addresses, select Create New > Group and add URL patterns to the address group.

Then when creating explicit web proxy policies, select the URL pattern addresses or groups as the destination address.


URL patterns and HTTPS scanning

For HTTPS traffic, URL patterns can only be matched up to the root path. For example, consider the following URL pattern:

www.apple.com/ipad/


If a proxy user browses using HTTP, this URL pattern limits their access the iPad pages of www.apple.com. However, if a proxy user browses using HTTPS, they will be able to access all pages on www.apple.com.


Having trouble configuring your Fortinet hardware or have some questions you need answered? Check Out The Fortinet Guru Youtube Channel! Want someone else to deal with it for you? Get some consulting from Fortinet GURU!

Web Proxy firewall services and service groups

Web Proxy firewall services and service groups

Configure web proxy services by selecting Explicit Proxy when configuring a service. Web proxy services can be selected in a explicit web proxy policy when adding one from the CLI. If you add a policy from the web-based manager the service is set to the webproxy service. The webproxy service should be used in most cases, it matches with any traffic with any port number. However, if you have special requirements, such as using a custom protocol type or a reduced port range or need to add an IP/FQDN to an explicit proxy service you can create custom explicit web proxy services.

Web proxy services are similar to standard firewall services. You can configure web proxy services to define one or more protocols and port numbers that are associated with each web proxy service. Web proxy services can also be grouped into web proxy service groups.

One way in which web proxy services differ from firewall services is the protocol type you can select. The following protocol types are available:

  • ALL
  • CONNECT
  • FTP
  • HTTP
  • SOCKS-TCP
  • SOCKS-UDP

To add a web proxy service go to Policy & Objects > Services and select Create New. Set Service Type to Explicit Proxy and configure the service as required. To add a web proxy service from the CLI enter:

config firewall service custom edit my-socks-service

set explicit-proxy enable set category Web Proxy

set protocol SOCKS-TCP

set tcp-portrange 3450-3490 end


To add a web proxy service group go to Policy & Objects > Services and select Create New > Service Group. Set Type to Explicit Proxy and add web proxy services to the group as required. To add a web proxy service group from the CLI enter:

config firewall service group edit web-group

set explicit-proxy enable

set member webproxy my-socks-service end


Having trouble configuring your Fortinet hardware or have some questions you need answered? Check Out The Fortinet Guru Youtube Channel! Want someone else to deal with it for you? Get some consulting from Fortinet GURU!

Security profiles, threat weight, device identification, and the explicit web proxy

Security profiles, threat weight, device identification, and the explicit web proxy

You can apply all security profiles to explicit web proxy sessions. This includes antivirus, web filtering, intrusion protection (IPS), application control, data leak prevention (DLP), and SSL/SSH inspection. Security profiles are applied by selecting them in an explicit web proxy policy or in authentication rules added to web proxy policies.

Traffic accepted by explicit web proxy policies contributes to threat weight data. The explicit web proxy is not compatible with device identification.

Since the traffic accepted by the explicit web proxy is known to be either HTTP, HTTPS, or FTP over HTTP and since the ports are already known by the proxy, the explicit web proxy does not use all of the SSL/SSH inspection options. The explicit web proxy does support the following proxy options:

  • Enable chunked bypass
  • HTTP oversized file action and threshold


The explicit web proxy does not support the following proxy options:

  • Client comforting
  • Server comforting
  • Monitor content information from dashboard. URLs visited by explicit web proxy users are not added to dashboard usage and log and archive statistics widgets.

For explicit web proxy sessions, the FortiGate unit applies antivirus scanning to HTTP POST requests and HTTP responses. The FortiGate unit starts virus scanning a file in an HTTP session when it receives a file in the body of an HTML request. The explicit web proxy can receive HTTP responses from either the originating web server or the FortiGate web cache module.


Having trouble configuring your Fortinet hardware or have some questions you need answered? Check Out The Fortinet Guru Youtube Channel! Want someone else to deal with it for you? Get some consulting from Fortinet GURU!

Explicit web proxy authentication

Explicit web proxy authentication

You can add authentication to explicit web proxy policies to control access to the explicit web proxy and to identify users and apply different UTM features to different users.

Authentication of web proxy sessions uses HTTP basic and digest authentication as described in RFC 2617 (HTTP Authentication: Basic and Digest Access Authentication) and prompts the user for credentials from the browser allowing individual users to be identified by their web browser instead of IP address. HTTP authentication allows the FortiGate unit to distinguish between multiple users accessing services from a shared IP address.

You can also select IP-based authentication to authenticate users according to their source IP address in the same way as normal firewall policies.


IPBased authentication

IP-based authentication applies authentication by source IP address. For the explicit web proxy, IP authentication is compatible with basic, digest, NTLM, FSSO, or RSSO authentication methods. Once a user authenticates, all sessions to the explicit web proxy from that user’s IP address are assumed to be from that user and are accepted until the authentication timeout ends or the session times out.

This method of authentication is similar to standard (non-web proxy) firewall authentication and may not produce the desired results if multiple users share IP addresses (such as in a network that uses virtualization solutions or includes a NAT device between the users and the explicit web proxy).

To configure IP-based authentication, add an explicit web proxy security policy, set the Action to AUTHENTICATION, and select Enable IP Based Authentication is selected.

Use the following CLI command to add IP-based authentication to a web proxy security policy. IP-based authentication is selected by setting ip-based to enable.

config firewall explicit-proxy-policy edit 0

set proxy web

set scraddr User_network set dstintf port1

set dstaddr all set action accept

set identity-based enable set ip-based enable

config identity-based-policy edit 0

set groups Internal_users set users dwhite rlee

set schedule always end


Per session authentication

If you don’t select IP Based the explicit web proxy applies HTTP authentication per session. This authentication is browser-based. When a user enters a user name and password in their browser to authenticate with the explicit web proxy, this information is stored by the browser in a session cookie. Each new session started by the same web browser uses the session cookie for authentication. When the session cookie expires the user has to re- authenticate. If the user starts another browser on the same PC or closes and then re-opens their browser they have to authenticate again.

Since the authentication is browser-based, multiple clients with the same IP address can authenticate with the proxy using their own credentials. HTTP authentication provides authentication for multiple user sessions from the same source IP address. This can happen if there is a NAT device between the users and the FortiGate unit. HTTP authentication also supports authentication for other configurations that share one IP address among multiple users. These includes Citrix products and Windows Terminal Server and other similar virtualization solutions.

To configure per session authentication, add a explicit web proxy policy, set the Action to AUTHENTICATE, and make sure Enable IP Based Authentication is not selected.

Use the following CLI command to add per session authentication to a security policy. Per session authentication is selected by setting ip-based to disable.

config firewall explicit-proxy-policy edit 0

set proxy web

set scraddr User_network set dstintf port1

set dstaddr all set action accept

set identity-based enable set ip-based disable

config identity-based-policy edit 0

set groups Internal_users set users dwhite rlee

set schedule always end

end


Per session HTTP authentication


Transaction-based authentication

Multiple HTTP transactions (request/response) may be pipelined in the same TCP connection. Typically, all HTTP transactions of a TCP connection are considered as belonging to the same user. However, some devices (e.g., load balancers) may send HTTP transactions of different users to the same TCP connection and to explicit

proxy. In order to support this deployment case, transaction-based authentication can be implemented to require each HTTP transaction to be authenticated separately.

To implement transaction-based authentication in the CLI:

config firewall explicit-proxy-policy edit <id>

set transaction-based enable next

end


Having trouble configuring your Fortinet hardware or have some questions you need answered? Check Out The Fortinet Guru Youtube Channel! Want someone else to deal with it for you? Get some consulting from Fortinet GURU!