Category Archives: FortiGate

Other explicit web proxy options

Other explicit web proxy options

You can change the following explicit web proxy options as required by your configuration.


HTTP port, HTTPS port, FTP port, PAC port

The TCP port that web browsers use to connect to the explicit proxy for HTTP, HTTPS, FTP and PAC services. The default port is 8080 for all services. By default HTTPS, FTP. and PAC use the same port as HTTP. You can change any of these ports as required. Users configuring their web browsers to use the explicit web proxy should add the same port numbers to their browser configurations.


Proxy FQDN             Enter the fully qualified domain name (FQDN) for the proxy server. This is the domain name to enter into browsers to access the proxy server.


Max HTTP request length

Enter the maximum length of an HTTP request in Kbytes. Larger requests will be rejec- ted.


Max HTTP mes- sage length

Enter the maximum length of an HTTP message in Kbytes. Larger messages will be rejected.


Configuring an external IP address for the IPv4 explicit web proxy

You can use the following command to set an external IP address (or pool) that will be used by the explicit web proxy policy.

config web-proxy explicit set status enable

set outgoing-ip <ip1> <ip2> … <ipN>

end


Configuring an external IP address for the IPv6 explicit web proxy

You can use the following command to set an external IP address (or pool) that will be used by the explicit web proxy policy.

config web-proxy explicit set status enable

set outgoing-ipv6 <ip1> <ip2> … <ipN>

end


Restricting the IP address of the IPv4 explicit web proxy

You can use the following command to restrict access to the explicit web proxy using only one IP address. The IP address that you specify must be the IP address of an interface that the explicit HTTP proxy is enabled on. You might want to use this option if the explicit FTP proxy is enabled on an interface with multiple IP addresses.

For example, to require uses to connect to the IP address 10.31.101.100 to connect to the explicit HTTP proxy:

config web-proxy explicit

set incoming-ip 10.31.101.100 end


Restricting the outgoing source IP address of the IPv4 explicit web proxy

You can use the following command to restrict the source address of outgoing web proxy packets to a single IP address. The IP address that you specify must be the IP address of an interface that the explicit HTTP proxy is enabled on. You might want to use this option if the explicit HTTP proxy is enabled on an interface with multiple IP addresses.


For example, to restrict the outgoing packet source address to 172.20.120.100:

config http-proxy explicit

set outgoing-ip 172.20.120.100 end


Restricting the IP address of the explicit IPv6 web proxy

You can use the following command to restrict access to the IPv6 explicit web proxy to use only one IP6 IP address. The IPv6 address that you specify must be the IPv6 address of an interface that the explicit HTTP proxy is enabled on. You might want to use this option if the explicit web proxy is enabled on an interface with multiple IPv6 addresses.

For example, to require uses to connect to the IPv6 address 2001:db8:0:2::30 to connect to the explicit IPv6 HTTP proxy:

config web-proxy explicit

set incoming-ipv6 2001:db8:0:2::30 end


Restricting the outgoing source IP address of the IPv6 explicit web proxy

You can use the following command to restrict the source address of outgoing web proxy packets to a single IPv6 address. The IP address that you specify must be the IPv6 address of an interface that the explicit HTTP proxy is enabled on. You might want to use this option if the explicit HTTP proxy is enabled on an interface with multiple IPv6 addresses.


For example, to restrict the outgoing packet source address to 2001:db8:0:2::50:

config http-proxy explicit

set outgoing-ipv6 2001:db8:0:2::50 end


Having trouble configuring your Fortinet hardware or have some questions you need answered? Check Out The Fortinet Guru Youtube Channel! Want someone else to deal with it for you? Get some consulting from Fortinet GURU!

Unknown HTTP version

Unknown HTTP version

You can select the action to take when the proxy server must handle an unknown HTTP version request or message. Set unknown HTTP version to Reject or Best Effort. Best Effort attempts to handle the HTTP traffic as best as it can. Reject treats known HTTP traffic as malformed and drops it. The Reject option is more secure.


Authentication realm

You can enter an authentication realm to identify the explicit web proxy. The realm can be any text string of up to 63 characters. If the realm includes spaces enclose it in quotes. When a user authenticates with the explicit web proxy the HTTP authentication dialog includes the realm so you can use the realm to identify the explicitly web proxy for your users.


Implementing Botnet features

The option scan-botnet-connections can be added to an explicit proxy policy.


CLI Syntax:

config firewall explicit-proxy-policy

edit <policy_id>

set scan-botnet-connections [disable|block|monitor]

end


where:

  • disable means do not scan connections to botnet servers.
  • block means block connections to botnet servers.
  • monitor means log connections to botnet servers.

Having trouble configuring your Fortinet hardware or have some questions you need answered? Check Out The Fortinet Guru Youtube Channel! Want someone else to deal with it for you? Get some consulting from Fortinet GURU!

Proxy auto-config (PAC) configuration

Proxy auto-config (PAC) configuration

A proxy auto-config (PAC) file defines how web browsers can choose a proxy server for receiving HTTP content. PAC files include the FindProxyForURL(url, host) JavaScript function that returns a string with one or more access method specifications. These specifications cause the web browser to use a particular proxy server or to connect directly.

To configure PAC for explicit web proxy users, you can use the port that PAC traffic from client web browsers use to connect to the explicit web proxy. explicit web proxy users must configure their web browser’s PAC proxy settings to use the PAC port.


PAC File Content

You can edit the default PAC file from the web-based manager or use the following command to upload a custom PAC file:

config web-proxy explicit

set pac-file-server-status enable set pac-file-data <pac_file_str>

end

Where <pac_file_str> is the contents of the PAC file. Enter the PAC file text in quotes. You can copy the contents of a PAC text file and paste the contents into the CLI using this option. Enter the command followed by two sets of quotes then place the cursor between the quotes and paste the file content.

The maximum PAC file size is 256 kbytes. If your FortiGate unit is operating with multiple VDOMs each VDOM has its own PAC file. The total amount of FortiGate memory available to store all of these PAC files 2 MBytes. If this limit is reached you will not be able to load any additional PAC files.

You can use any PAC file syntax that is supported by your users’s browsers. The FortiGate unit does not parse the PAC file.

To use PAC, users must add an automatic proxy configuration URL (or PAC URL) to their web browser proxy configuration. The default FortiGate PAC file URL is:

http://:/

For example, if the interface with the explicit web proxy has IP address 172.20.120.122, the PAC port is the same as the default HTTP explicit web proxy port (8080) and the PAC file name is proxy.pac the PAC file URL would be:

http://172.20.120.122:8080/proxy.pac

From the CLI you can use the following command to display the PAC file URLs:

get web-proxy explicit


Having trouble configuring your Fortinet hardware or have some questions you need answered? Check Out The Fortinet Guru Youtube Channel! Want someone else to deal with it for you? Get some consulting from Fortinet GURU!

Explicit proxy firewall address types

Explicit proxy firewall address types

Explicit proxy firewall address types improve granularity over header matching for explicit web proxy policies. You can enable this option using the Show in Address List button on the Address and Address Group New/Edit forms under Policy & Objects > Addresses.


The following address types are available:

  • URL Pattern – destination address
  • Host Regex Match – destination address
  • URL Category – destination address (URL filtering)
  • HTTP Method – source address
  • User Agent – source address
  • HTTP Header – source address
  • Advanced (Source) – source address (combines User Agent, HTTP Method, and HTTP Header)
  • Advanced (Destination) – destination address (combines Host Regex Match and URL Category)

Having trouble configuring your Fortinet hardware or have some questions you need answered? Check Out The Fortinet Guru Youtube Channel! Want someone else to deal with it for you? Get some consulting from Fortinet GURU!

The FortiGate explicit web proxy

The FortiGate explicit web proxy

You can use the FortiGate explicit web proxy to enable explicit proxying of IPv4 and IPv6 HTTP, and HTTPS traffic one or more FortiGate interfaces. The explicit web proxy also supports proxying FTP sessions from a web browser and proxy auto-config (PAC) to provide automatic proxy configurations for explicit web proxy users. From the CLI you can also configure the explicit web proxy to support SOCKS sessions from a web browser.

The explicit web and FTP proxies can be operating at the same time on the same or on different FortiGate interfaces.

If explicit web proxy options are not visible on the web-based manager, go to Syste> Feature Select and turn on Explicit Proxy.

In most cases you would configure the explicit web proxy for users on a network by enabling the explicit web proxy on the FortiGate interface connected to that network. Users on the network would configure their web browsers to use a proxy server for HTTP and HTTPS, FTP, or SOCKS and set the proxy server IP address to the IP address of the FortiGate interface connected to their network. Users could also enter the PAC URL into their web browser PAC configuration to automate their web proxy configuration using a PAC file stored on the FortiGate unit.

Enabling the explicit web proxy on an interface connected to the Internet is a security risk because anyone on the Internet who finds the proxy could use it to hide their source address.

If the FortiGate unit is operating in Transparent mode, users would configure their browsers to use a proxy server with the FortiGate management IP address.

If the FortiGate unit is operating with multiple VDOMs the explicit web proxy is configured for each VDOM. The web proxy receives web browser sessions to be proxied at FortiGate interfaces with the explicit web proxy enabled. The web proxy uses FortiGate routing to route sessions through the FortiGate unit to a destination interface. Before a session leaves the exiting interface, the explicit web proxy changes the source addresses of the session packets to the IP address of the exiting interface. When the FortiGate unit is operating in Transparent mode the explicit web proxy changes the source addresses to the management IP address. You can configure the explicit web proxy to keep the original client IP address. See Preventing the explicit web proxy from changing source addresses on page 2925.


For more information about explicit web proxy sessions, see Explicit web proxy sessions and user limits on page 2930.


Having trouble configuring your Fortinet hardware or have some questions you need answered? Check Out The Fortinet Guru Youtube Channel! Want someone else to deal with it for you? Get some consulting from Fortinet GURU!

Example reverse proxy web caching and SSL offloading for an Internet web server using a static one-to-one virtual IP

Example reverse proxy web caching and SSL offloading for an Internet web server using a static one-to-one virtual IP

This section describes configuring SSL offloading for a reverse proxy web caching configuration using a static one-to-one firewall virtual IP (VIP). While the static one-to-one configuration described in this example is valid, its also common to change the destination port of the unencrypted HTTPS traffic to a commonly used HTTP port such as 8080 using a port forwarding virtual IP.


Network topology and assumptions

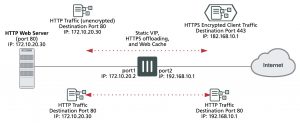
In this configuration, clients on the Internet use HTTP and HTTPS to browse to a web server that is behind a FortiGate unit. A policy added to the FortiGate unit forwards the HTTP traffic to the web server. The policy also offloads HTTPS decryption and encryption from the web server so the web server only sees HTTP traffic.

The FortiGate unit also caches HTTP and HTTPS pages from the web server so when users access cached pages the web server does not see the traffic. Replies to HTTPS sessions are encrypted by the FortiGate unit before returning to the clients.

In this configuration, the FortiGate unit is operating as a web cache in reverse proxy mode. Reverse proxy caches can be placed directly in front of a web server. Web caching on the FortiGate unit reduces the number of requests that the web server must handle, therefore leaving it free to process new requests that it has not serviced before.


Using a reverse proxy configuration:

  • avoids the capital expense of additional web servers by increasing the capacity of existing servers
  • serves more requests for static content from web servers
  • serves more requests for dynamic content from web servers
  • reduces operating expenses including the cost of bandwidth required to serve content
  • accelerates the response time of web servers and of page download times to end users.


When planning a reverse proxy implementation, the web server’s content should be written so that it is “cache aware” to take full advantage of the reverse proxy cache.

In reverse proxy mode, the FortiGate unit functions more like a web server for clients on the Internet. Replicated content is delivered from the proxy cache to the external client without exposing the web server or the private network residing safely behind the firewall.

In this example, the site URL translates to IP address 192.168.10.1, which is the port2 IP address of the FortiGate unit. The port2 interface is connected to the Internet.

This example assumes that all HTTP traffic uses port 80 and all HTTPS traffic uses port 443.

The FortiGate unit includes the web server CA and an SSL server configuration for IP address 172.10.20.30 and port to 443. The name of the file containing the CA is Rev_Proxy_Cert_1.crt.

The destination address of incoming HTTP and HTTPS sessions is translated to the IP address of the web server using a static one-to-one virtual IP that performs destination address translation (DNAT) for the HTTP packets. The DNAT translates the destination address of the packets from 192.168.10.1 to 172.10.20.30 but does not change the destination port number.

When the SSL server on the FortiGate unit decrypts the HTTPS packets their destination port is changed to port 80.

Reverse proxy web caching and SSL offloading for an Internet web server using static one-to-one virtual IPs

General configuration steps

This section breaks down the configuration for this example into smaller procedures. For best results, follow the procedures in the order given:

1. Configure the FortiGate unit as a reverse proxy web cache server.

2. Configure the FortiGate unit for SSL offloading of HTTPS traffic.

3. Add an SSL server to offload SSL encryption and decryption for the web server.

Also note that if you perform any additional actions between procedures, your configuration may have different results.


Configuration steps – web-based manager


To configure the FortiGate unit as a reverse proxy web cache server

1. Go to Policy & Objects > Virtual IPs and select Create New to add a static NAT virtual IP that translates destination IP addresses from 192.168.10.1 to 172.10.20.30 (and does not translate destination ports):


VIP Type                                     IPv4 VIP

Name                                           Reverse_proxy_VIP

Interface                                     port2

Type                                            Static NAT

Source Address Filter              Do not select.

External IP Address/Range     192.168.10.1

Mapped IP Address/Range      172.10.20.30

Port Forwarding                        Do not select.

2. Select OK.

3. Go to Policy & Objects > IPv4 Policy and select Create New to add a port2 to port1 security policy that accepts HTTP and HTTPS traffic from the Internet.


Do not select security profiles. Set the destination address to the virtual IP. You do not have to enable NAT.


Incoming Interface                   port2

Source Address                        all

Outgoing Interface                   port1

Destination Address                 Reverse_proxy_VIP

Schedule                                    always

Service                                       HTTP HTTPS

Action                                         ACCEPT

4. Turn on Web Cache.

5. Select OK.

6. From the CLI enter the following command to add HTTPS web caching to the security policy


Assume the index number of the policy is 5.

config firewall policy edit 5

set webcache-https ssl-server end


To configure the FortiGate unit to offload SSL encryption and cache HTTPS content

1. Go to System > Certificates and select Import to import the web server’s CA.


For Type, select Local Certificate. Select the Browse button to locate the file (example file name: Rev_Proxy_ Cert_1.crt).


The certificate key size must be 1024 or 2048 bits. 4096-bit keys are not supported.

2. Select OK to import the certificate.

3. From the CLI, enter the following command to add the SSL server and to add the server’s certificate to the SSL server.


The SSL server ip must match the destination address of the SSL traffic after being translated by the virtual IP (172.10.20.30) and the SSL server port must match the destination port of the SSL traffic (443). The SSL server operates in half mode since it performs a single-step conversion (HTTPS to HTTP or HTTP to HTTPS).

config wanopt ssl-server edit rev_proxy_server set ip 172.10.20.30

set port 443

set ssl-mode half

set ssl-cert Rev_Proxy_Cert_1

end


Configuration steps – CLI


To configure the FortiGate unit as a reverse proxy web cache server

1. Enter the following command to add a static NAT virtual IP that translates destination IP addresses from

192.168.10.1 to 172.10.20.30 (and does not translate destination ports):

config firewall vip

edit Reverse_proxy_VIP set extintf port2 set type static-nat

set extip 192.168.10.1

set mappedip 172.10.20.30 end

2. Enter the following command to add a port2 to port1 security policy that accepts HTTP and HTTPS traffic from the

Internet. Enable web caching and HTTPS web caching.


Do not select security profiles. Set the destination address to the virtual IP. You do not have to enable NAT.

config firewall policy edit 0

set srcintf port2 set srcaddr all set dstintf port1

set dstaddr Reverse_proxy_VIP

set schedule always

set service HTTP HTTPS

set action accept set webcache enable

set webcache-https ssl-server end


To add an SSL server to offload SSL encryption and decryption for the web server

1. Place a copy of the web server’s CA (file name Rev_Proxy_Cert_1.crt) in the root folder of a TFTP server.

2. Enter the following command to import the web server’s CA from a TFTP server. The IP address of the TFTP server is 10.31.101.30:

execute vpn certificate local import tftp Rev_Proxy_Cert_1.crt 10.31.101.30

The certificate key size must be 1024 or 2048 bits. 4096-bit keys are not supported.

3. From the CLI, enter the following command to add the SSL server.


The SSL server ip must match the destination address of the SSL traffic after being translated by the virtual IP (172.10.20.30) and the SSL server port must match the destination port of the SSL traffic (443). The SSL server operates in half mode since it performs a single-step conversion (HTTPS to HTTP or HTTP to HTTPS).

config wanopt ssl-server edit rev_proxy_server set ip 172.10.20.30

set port 443

set ssl-mode half

set ssl-cert Rev_Proxy_Cert_1 end

4. Configure other ssl-server settings that you may require for your configuration.


Having trouble configuring your Fortinet hardware or have some questions you need answered? Check Out The Fortinet Guru Youtube Channel! Want someone else to deal with it for you? Get some consulting from Fortinet GURU!

Monitoring Web caching performance

Monitoring Web caching performance

The web cache monitor shows the percentage of web cache requests that retrieved content from the cache (hits) and the percentage that did not receive content from the cache (misses). A higher the number of hits usually indicates that the web cache is being more effective at reducing WAN traffic.

The web cache monitor also shows a graph of web traffic on the WAN and LAN. A lower WAN line on the graph indicates the web cache is reducing traffic on the WAN. The web cache monitor also displays the total number of web requests processed by the web cache.

To view the web cache monitor, go to Monitor > Cache Monitor.


Web cache monitor


Having trouble configuring your Fortinet hardware or have some questions you need answered? Check Out The Fortinet Guru Youtube Channel! Want someone else to deal with it for you? Get some consulting from Fortinet GURU!

Forwarding URLs to forwarding servers and exempting web sites from web caching

Forwarding URLs to forwarding servers and exempting web sites from web caching

You can go to Network > Explicit Proxy and use the URL match list to forward URL patterns to forwarding servers and create a list of URLs that are exempt from web caching.


Forwarding URLs and URL patterns to forwarding servers

As part of configuring the explicit web proxy you can configure proxy chaining by adding web proxy forwarding servers. See “Proxy chaining (web proxy forwarding servers) “.

You can then use the URL match list to always forward explicit web proxy traffic destined for configured URLs or URL patterns to one of these forwarding servers. For example, you might want to forward all traffic for a specific country to a proxy server located in that country.

To forward traffic destined for a URL to a forwarding server that you have already added, go to Networ> Explicit Proxy and select Create New. Add a name for the URL match entry and enter the URL or URL pattern. You can use wildcards such as * and ? and you can use a numeric IP address. Select Forward to Server and select a web proxy forwarding server from the list.

You can also exempt the URL or URL pattern from web caching.

Use the following command to forward all .ca traffic to a proxy server and all .com traffic to another proxy server.

config web-proxy url-match edit “com”

set forward-server “server-commercial” set url-pattern “com”

next

edit “ca”

set forward-server “server-canada” set url-pattern “ca”

next

edit “www.google.ca

set cache-exemption enable

set url-pattern “www.google.ca” next

end


Exempting web sites from web caching

You may want to exempt some URLs from web caching for a number of reasons. For example, if your users access websites that are not compatible with FortiGate web caching you can add the URLs of these web sites to the web caching exempt list. You can add URLs and numeric IP addresses to the web cache exempt list.

You can also add URLs to the web cache exempt list by going to Network > Explicit Proxy and selecting Create New. Add a URL pattern to be exempt and select Exempt from Cache.

You can also add URLs and addresses to be exempt from the CLI. Enter the following command to add www.example.com to the web cache exempt list.

config web-proxy url-match

set cache-exemption enable

set url-pattern www.example.com end


Having trouble configuring your Fortinet hardware or have some questions you need answered? Check Out The Fortinet Guru Youtube Channel! Want someone else to deal with it for you? Get some consulting from Fortinet GURU!