Example Adding secure tunneling to an active-passive WAN optimization configuration

Example Adding secure tunneling to an active-passive WAN optimization configuration

This example shows how to configure two FortiGate units for active-passive WAN optimization with secure tunneling. The same authentication group is added to both FortiGate units. The authentication group includes a password (or pre-shared key) and has Peer Acceptance set to Accept any Peer. An active policy is added to the client-side FortiGate unit and a passive policy to the server-side FortiGate unit. The active policy includes a profile that performs secure tunneling, optimizes HTTP traffic, and uses Transparent Mode and byte caching.

The authentication group is named AuthSecure-Tunnel and the password for the pre-shared key is 2345678. The topology for this example is shown below. This example includes web-based manager configuration steps followed by equivalent CLI configuration steps. For information about secure tunneling, see Secure tunneling on page 2864.


Network topology and assumptions

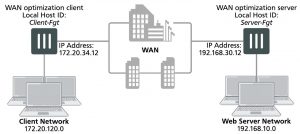
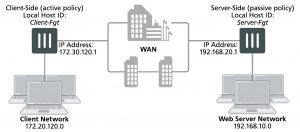
This example configuration includes a client-side FortiGate unit called Client-net with a WAN IP address of 172.30.120.1.This unit is in front of a network with IP address 172.20.120.0. The server-side FortiGate unit is called Web-servers and has a WAN IP address of 192.168.20.1. This unit is in front of a web server network with IP address 192.168.10.0.


Example active-passive WAN optimization and secure tunneling topology

General configuration steps

This section breaks down the configuration for this example into smaller procedures. For best results, follow the procedures in the order given:

1. Configure the client-side FortiGate unit:

  • Add peers.
  • Add an authentication group.
  • Add an active WAN optimization policy.

2. Configure the server-side FortiGate unit.

  • Add peers.
  • Add the same authentication group
  • Add a passive WAN optimization policy that applies application control.
  • Add a WAN optimization tunnel policy.

Also note that if you perform any additional actions between procedures, your configuration may have different results.


Configuring WAN optimization with secure tunneling – web-based manager

Use the following steps to configure the example WAN optimization configuration from the client-side and server- side FortiGate unit web-based manager. (CLI steps follow.)


To configure the client-side FortiGate unit

1. Go to WAN Opt. & Cache > Peers and enter a Local Host ID for the client-side FortiGate unit:


Local Host ID                            Client-Fgt

2. Select Apply to save your setting.

3. Select Create New and add a Peer Host ID and the IP Address for the server-side FortiGate unit:


Peer Host ID                               Server-Fgt

IP Address                                 192.168.20.1

4. Select OK.

5. Go to WAN Opt. & Cache > Authentication Groups and select Create New to add the authentication group to be used for secure tunneling:


Name                                           Auth-Secure-Tunnel

Authentication Method            Pre-shared key

Password                                   2345678

Peer Acceptance                       Accept Any Peer

6. Select OK.

7. Go to WAN Opt. & Cache > Profiles and select Create New to add a WAN optimization profile that enables secure tunneling and includes the authentication group:


Name                                           Secure-wan-op-pro

Transparent Mode                    Select

Authentication Group              Auth-Secure-tunnel

8. Select the HTTP protocol, select Secure Tunneling and Byte Caching and set the Port to 80.

9. Select OK.

10. Go to Policy & Objects > Addresses and select Create New to add a firewall address for the client network.


Category                                     Address

Name                                           Client-Net

Type                                            Subnet

Subnet / IP Range                     172.20.120.0/24

Interface                                     port1

11. Select Create New to add a firewall address for the web server network.


Category                                     Address

Address Name                           Web-Server-Net

Type                                            Subnet

Subnet / IP Range                     192.168.10.0/24

Interface                                     port2

12. Go to Policy & Objects > IPv4 Policy and select Create New to add an active WAN optimization security policy:


Incoming Interface                   port1

Source Address                        Client-Net

Outgoing Interface                   port2

Destination Address                 Web-Server-Net

Schedule                                    always

Service                                       HTTP

Action                                         ACCEPT

13. Turn on WAN Optimization and configure the following settings:


WAN Optimization                    active

Profile                                         Secure-wan-opt-pro

14. Select OK.


To configure the server-side FortiGate unit

1. Go to WAN Opt. & Cache > Peers and enter a Local Host ID for the server-side FortiGate unit:


Local Host ID                            Server-Fgt

2. Select Apply to save your setting.

3. Select Create New and add a Peer Host ID and the IP Address for the client-side FortiGate unit:

Peer Host ID                               Client-Fgt

IP Address                                 172.30.120.1

4. Select OK.

5. Go to WAN Opt. & Cache > Authentication Groups and select Create New and add an authentication group to be used for secure tunneling:

Name                                           Auth-Secure-Tunnel

Authentication Method            Pre-shared key

Password                                   2345678

Peer Acceptance                       Accept Any Peer

6. Select OK.

7. Go to Policy & Objects > Addresses and select Create New to add a firewall address for the client network.

Category                                     Address

Name                                           Client-Net

Type                                            Subnet

Subnet / IP Range                     172.20.120.0/24

Interface                                     port1

8. Select Create New to add a firewall address for the web server network.

Category                                     Address

Address Name                           Web-Server-Net

Type                                            Subnet

Subnet / IP Range                     192.168.10.0/24

Interface                                     port2

9. Select OK.

10. Select Create New to add a passive WAN optimization policy that applies application control.

Incoming Interface                   port2

Source Address                        Client-Net

Outgoing Interface                   port1

Destination Address                 Web-Server-Net

Schedule                                    always

Service                                       ALL

Action                                         ACCEPT

11. Turn on WAN Optimization and configure the following settings:

WAN Optimization                    passive

Passive Option                          default

12. Select OK.

13. From the CLI enter the following command to add a WAN optimization tunnel explicit proxy policy.

configure firewall explicit-proxy-policy edit 0

set proxy wanopt set dstintf port1 set srcaddr all set dstaddr all set action accept

set schedule always set service ALL

next end


Having trouble configuring your Fortinet hardware or have some questions you need answered? Check Out The Fortinet Guru Youtube Channel! Want someone else to deal with it for you? Get some consulting from Fortinet GURU!

Example Active-passive WAN optimization

Example Active-passive WAN optimization

In active-passive WAN optimization you add an active WAN optimization policy to the client-side FortiGate unit and you add a WAN optimization tunnel policy and a passive WAN optimization policy to the server-side FortiGate unit.

The active policy accepts the traffic to be optimized and sends it down the WAN optimization tunnel to the server- side FortiGate unit. The active policy can also apply security profiles and other features to traffic before it exits the client-side FortiGate unit.

A tunnel explicit proxy policy on the sever-side FortiGate unit allows the server-side FortiGate unit to form a WAN optimization tunnel with the client-side FortiGate unit. The passive WAN optimization policy is required because of the active policy on the client-side FortiGate unit. You can also use the passive policy to apply WAN optimization transparent mode and features such as security profiles, logging, traffic shaping and web caching to the traffic before it exits the server-side FortiGate unit.


Network topology and assumptions

On the client-side FortiGate unit this example configuration includes a WAN optimization profile that optimizes CIFS, HTTP, and FTP traffic and an active WAN optimization policy. The active policy also applies virus scanning to the WAN optimization traffic.

On the server-side FortiGate unit, the passive policy applies application control to the WAN optimization traffic.

In this example, WAN optimization transparent mode is selected in the WAN optimization profile and the passive WAN optimization policy accepts this transparent mode setting. This means that the optimized packets maintain their original source and destination addresses. As a result, routing on the client network must be configured to route packets for the server network to the client-side FortiGate unit. Also the routing configuration on the server network must be able to route packets for the client network to the server-side FortiGate unit.


Example active-passive WAN optimization topology

General configuration steps

This section breaks down the configuration for this example into smaller procedures. For best results, follow the procedures in the order given:

1. Configure the client-side FortiGate unit:

  • Add peers.
  • Add a WAN optimization profile to optimize CIFS, FTP, and HTTP traffic.
  • Add firewall addresses for the client and web server networks.
  • Add an active WAN optimization policy.
  1. 2. Configure the server-side FortiGate unit by:
  • Add peers.
  • Add firewall addresses for the client and web server networks.
  • Add a passive WAN optimization policy.
  • Add a WAN optimization tunnel policy.


Configuring basic active-passive WAN optimization – web-based manager

Use the following steps to configure the example WAN optimization configuration from the client-side and server- side FortiGate unit web-based manager.


To configure the client-side FortiGate unit

1. Go to WAN Opt. & Cache > Peers and enter a Local Host ID for the client-side FortiGate unit:


Local Host ID                            Client-Fgt

2. Select Apply.

3. Select Create New and add a Peer Host ID and the IP Address for the server-side FortiGate unit:


Peer Host ID                               Server-Fgt

IP Address                                 192.168.20.1

4. Select OK.

5. Go to WAN Opt. & Cache > Profiles and select Create New to add a WAN optimization profile to optimize CIFS, HTTP, and FTP traffic:


Name                                           Custom-wan-opt-pro

Transparent Mode                    Select

6. Select the CIFS protocol, select Byte Caching and set the Port to 445.

7. Select the FTP protocol, select Byte Caching and set the Port to 21.

8. Select the HTTP protocol, select Byte Caching and set the Port to 80.

9. Select OK.

10. Go to Policy & Objects > Addresses and select Create New to add an address for the client network.


Category                                     Address

Address Name                           Client-Net

Type                                            IP Range

Subnet / IP Range                     172.20.120.100-172.20.120.200

Interface                                     port1

11. Select Create New to add an address for the web server network.

Category                                     Address

Address Name                           Web-Server-Net

Type                                            Subnet

Subnet / IP Range                     192.168.10.0/24

Interface                                     port2

12. Go to Policy & Objects > IPv4 Policy and select Create New to add an active WAN optimization security policy:

Incoming Interface                   port1

Source Address                        Client-Net

Outgoing Interface                   port2

Destination Address                 Web-Server-Net

Schedule                                    always

Service                                       HTTP FTP SMB

Action                                         ACCEPT

13. Turn on WAN Optimization and configure the following settings:

WAN Optimization                    active

Profile                                         Custom-wan-opt-pro

14. Turn on Antivirus and select the default antivirus profile.

15. Select OK.


To configure the server-side FortiGate unit

1. Go to WAN Opt. & Cache > Peers and enter a Local Host ID for the server-side FortiGate unit:


Local Host ID                            Server-Fgt

2. Select Apply.

3. Select Create New and add a Peer Host ID and the IP Address for the client-side FortiGate unit:


Peer Host ID                               Client-Fgt

IP Address                                 172.30.120.1

4. Select OK.

5. Go to Policy & Objects > Addresses and select Create New to add an address for the client network.


Category                                     Address

Address Name                           Client-Net

Type                                            IP Range

Subnet / IP Range                     172.20.120.100-172.20.120.200

Interface                                     port1

6. Select Create New to add a firewall address for the web server network.


Category                                     Address

Address Name                           Web-Server-Net

Type                                            Subnet

Subnet / IP Range                     192.168.10.0/24

Interface                                     port2

7. Select OK.

8. Select Policy & Objects > IPv4 Policy and select Create New to add a passive WAN optimization policy that applies application control.


Incoming Interface                   port2

Source Address                        Client-Net

Outgoing Interface                   port1

Destination Address                 Web-Server-Net

Schedule                                    always

Service                                       ALL

Action                                         ACCEPT

9. Turn on WAN Optimization and configure the following settings:


WAN Optimization                    passive

Passive Option                          default

10. Select OK.

11. From the CLI enter the following command to add a WAN optimization tunnel explicit proxy policy.

configure firewall explicit-proxy-policy edit 0

set proxy wanopt set dstintf port1 set srcaddr all set dstaddr all set action accept

set schedule always set service ALL

next end


Having trouble configuring your Fortinet hardware or have some questions you need answered? Check Out The Fortinet Guru Youtube Channel! Want someone else to deal with it for you? Get some consulting from Fortinet GURU!

WAN Opt Configuration examples

WAN Opt Configuration examples

This chapter provides the basic examples to illustrate WAN optimization configurations introduced in the previous chapters.


Example Basic manual (peer-to-peer) WAN optimization configuration

In a manual (peer to peer) configuration the WAN optimization tunnel can be set up between one client-side FortiGate unit and one server-side FortiGate unit. The peer ID of the server-side FortiGate unit is added to the client-side WAN optimization policy. When the client-side FortiGate unit initiates a tunnel with the server-side FortiGate unit, the packets that initiate the tunnel include information that allows the server-side FortiGate unit to determine that it is a manual tunnel request. The server-side FortiGate unit does not require a WAN optimization profile; you just need to add the client peer host ID and IP address to the server-side FortiGate unit peer list and from the CLI an explicit proxy policy to accept WAN optimization tunnel connections.

In a manual WAN optimization configuration, you create a manual WAN optimization security policy on the client- side FortiGate unit. To do this you must use the CLI to set wanopt-detection to off and to add the peer host ID of the server-side FortiGate unit to the WAN optimization security policy.


Network topology and assumptions

This example configuration includes a client-side FortiGate unit called Client-Fgt with a WAN IP address of

172.20.34.12. This unit is in front of a network with IP address 172.20.120.0. The server-side FortiGate unit is called Server_Fgt with a WAN IP address of 192.168.30.12. This unit is in front of a web server network with IP address 192.168.10.0.

This example customizes the default WAN optimization profile on the client-side FortiGate unit and adds it to the WAN optimization policy. You can also create a new WAN optimization profile.


Example manual (peer-to-peer) topology

General configuration steps

This section breaks down the configuration for this example into smaller procedures. For best results, follow the procedures in the order given:

1. Configure the client-side FortiGate unit:

  • Add peers.
  • Configure the default WAN optimization profile to optimize HTTP traffic.
  • Add a manual WAN optimization security policy.

2. Configure the server-side FortiGate unit:

  • Add peers.
  • Add a WAN optimization tunnel policy.


Configuring basic peer-to-peer WAN optimization – web-based manager

Use the following steps to configure the example configuration from the web-based manager.


To configure the client-side FortiGate unit

1. Go to WAN Opt. & Cache > Peers and enter a Local Host ID for the client-side FortiGate unit:


Local Host ID                            Client-Fgt

2. Select Apply.

3. Select Create New and add the server-side FortiGate unit Peer Host ID and IP Address for the server-side FortiGate:

Peer Host ID                               Server-Fgt

IP Address                                 192.168.30.12

4. Select OK.

5. Go to Policy & Objects > Addresses and select Create New to add a firewall address for the client network.

Category                                     Address

Name                                           Client-Net

Type                                            Subnet

Subnet / IP Range                     172.20.120.0/24

Interface                                     port1

6. Select Create New to add a firewall address for the web server network.

Category                                     Address

Name                                           Web-Server-Net

Type                                            Subnet

Subnet / IP Range                     192.168.10.0/24

Interface                                     port2

7. Go to WAN Opt. & Cache > Profiles and edit the default profile.

8. Select Transparent Mode.

9. Under Protocol, select HTTP and for HTTP select Byte Caching. Leave the HTTP Port set to 80.

10. Select Apply to save your changes.

11. Go to Policy & Objects > IPv4 Policy and add a WAN optimization security policy to the client-side FortiGate unit that accepts traffic to be optimized:

Incoming Interface                   port1

Source Address                        all

Outgoing Interface                   port2

Destination Address                 all

Schedule                                    always

Service                                       ALL

Action                                         ACCEPT

12. Select Enable WAN Optimization and configure the following settings:

Enable WAN Optimization       active

Profile                                         default

13. Select OK.

14. Edit the policy from the CLI to turn off wanopt-detection, add the peer ID of the server-side FortiGate unit, and the default WAN optimization profile. The following example assumes the ID of the policy is 5:

config firewall policy edit 5

set wanopt-detection off set wanopt-peer Server-Fgt set wanopt-profile default

end

When you set the detection mode to off the policy becomes a manual mode WAN optimization policy. On the web-based manager the WAN optimization part of the policy changes to the following:

Enable WAN Optimization       Manual (Profile: default, Peer: Peer-Fgt-2)


To configure the server-side FortiGate unit

1. Go to WAN Opt. & Cache > Peers and enter a Local Host ID for the server-side FortiGate unit:

Local Host ID                            Server-Fgt

2. Select Apply.

3. Select Create New and add a Peer Host ID and the IP Address for the client-side FortiGate unit:


Peer Host ID                               Client-Fgt

IP Address                                 172.20.34.12

4. Select OK.

5. Enter the following CLI command to add an explicit proxy policy to accept WAN optimization tunnel connections.

configure firewall explicit-proxy-policy edit 0

set proxy wanopt set dstintf port1 set srcaddr all set dstaddr all set action accept

set schedule always set service ALL

next end


Having trouble configuring your Fortinet hardware or have some questions you need answered? Check Out The Fortinet Guru Youtube Channel! Want someone else to deal with it for you? Get some consulting from Fortinet GURU!

Monitoring WAN optimization peer performance

Monitoring WAN optimization peer performance

The WAN optimization peer monitor lists all of the WAN optimization peers that a FortiGate unit can perform WAN optimization with. These include peers manually added to the configuration as well as discovered peers.

The monitor lists each peer’s name, IP address, and peer type. The peer type indicates whether the peer was manually added or discovered. To show WAN optimization performance, for each peer the monitor lists the percent of traffic reduced by the peer in client-side WAN optimization configurations and in server-side configurations (also called gateway configurations).

To view the peer monitor, go to WAN Opt. & Cache > Peer Monitor.


Having trouble configuring your Fortinet hardware or have some questions you need answered? Check Out The Fortinet Guru Youtube Channel! Want someone else to deal with it for you? Get some consulting from Fortinet GURU!

Secure tunneling

Secure tunneling

You can configure WAN optimization rules to use AES-128bit-CBC SSL to encrypt the traffic in the WAN optimization tunnel. WAN optimization uses FortiASIC acceleration to accelerate SSL decryption and encryption of the secure tunnel. Peer-to-peer secure tunnels use the same TCP port as non-secure peer-to-peer tunnels (TCP port 7810).

To use secure tunneling, you must select Enable Secure Tunnel in a WAN optimization rule and add an authentication group. The authentication group specifies the certificate or pre-shared key used to set up the secure tunnel. The Peer Acceptance setting of the authentication group does not affect secure tunneling.

The FortiGate units at each end of the secure tunnel must have the same authentication group with the same name and the same configuration, including the same pre-shared key or certificate. To use certificates you must install the same certificate on both FortiGate units.

For active-passive WAN optimization you can select Enable Secure Tunnel only in the active rule. In peer-to- peer WAN optimization you select Enable Secure Tunnel in the WAN optimization rule on both FortiGate units.

For information about active-passive and peer-to-peer WAN optimization, see Manual (peer-to-peer) and active- passive WAN optimization on page 2844

For a secure tunneling configuration example, see Example Adding secure tunneling to an active-passive WAN optimization configuration on page 2880.


Having trouble configuring your Fortinet hardware or have some questions you need answered? Check Out The Fortinet Guru Youtube Channel! Want someone else to deal with it for you? Get some consulting from Fortinet GURU!

How FortiGate units process tunnel requests for peer authentication

How FortiGate units process tunnel requests for peer authentication

When a client-side FortiGate unit attempts to start a WAN optimization tunnel with a peer server-side FortiGate unit, the tunnel request includes the following information:

  • the client-side local host ID
  • the name of an authentication group, if included in the rule that initiates the tunnel
  • if an authentication group is used, the authentication method it specifies: pre-shared key or certificate
  • the type of tunnel (secure or not).

For information about configuring the local host ID, peers and authentication groups, see Configuring peers on page 2861 and Configuring authentication groups on page 2862.

The authentication group is optional unless the tunnel is a secure tunnel. For more information, see Secure tunneling on page 2864.

If the tunnel request includes an authentication group, the authentication will be based on the settings of this group as follows:

  • The server-side FortiGate unit searches its own configuration for the name of the authentication group in the tunnel request. If no match is found, the authentication fails.
  • If a match is found, the server-side FortiGate unit compares the authentication method in the client and server authentication groups. If the methods do not match, the authentication fails.
  • If the authentication methods match, the server-side FortiGate unit tests the peer acceptance settings in its copy of the authentication group.
  • If the setting is Accept Any Peer, the authentication is successful.
  • If the setting is Specify Peer, the server-side FortiGate unit compares the client-side local host ID in the tunnel request with the peer name in the server-side authentication group. If the names match, authentication is successful. If a match is not found, authentication fails.
  • If the setting is Accept Defined Peers, the server-side FortiGate unit compares the client-side local host ID in the tunnel request with the server-side peer list. If a match is found, authentication is successful. If a match is not found, authentication fails.

If the tunnel request does not include an authentication group, authentication will be based on the client-side local host ID in the tunnel request. The server-side FortiGate unit searches its peer list to match the client-side local host ID in the tunnel request. If a match is found, authentication is successful. If a match is not found, authentication fails.

If the server-side FortiGate unit successfully authenticates the tunnel request, the server-side FortiGate unit sends back a tunnel setup response message. This message includes the server-side local host ID and the authentication group that matches the one in the tunnel request.

The client-side FortiGate unit then performs the same authentication procedure as the server-side FortiGate unit did. If both sides succeed, tunnel setup continues.


Configuring peers

When you configure peers, you first need to add the local host ID that identifies the FortiGate unit for WAN optimization and then add the peer host ID and IP address of each FortiGate unit with which a FortiGate unit can create WAN optimization tunnels.


To configure WAN optimization peers – web-based manager:

1. Go to WAN Opt. & Cache > Peers.

2. For Local Host ID, enter the local host ID of this FortiGate unit and select Apply. If you add this FortiGate unit as a peer to another FortiGate unit, use this ID as its peer host ID.

The local or host ID can contain up to 25 characters and can include spaces.

3. Select Create New to add a new peer.

4. For Peer Host ID, enter the peer host ID of the peer FortiGate unit. This is the local host ID added to the peer FortiGate unit.

5. For IP Address, add the IP address of the peer FortiGate unit. This is the source IP address of tunnel requests sent by the peer, usually the IP address of the FortiGate interface connected to the WAN.

6. Select OK.


To configure WAN optimization peers – CLI:

In this example, the local host ID is named HQ_Peer and has an IP address of 172.20.120.100. Three peers are added, but you can add any number of peers that are on the WAN.

1. Enter the following command to set the local host ID to HQ_Peer.

config wanopt settings set host-id HQ_peer

end

2. Enter the following commands to add three peers.

config wanopt peer edit Wan_opt_peer_1

set ip 172.20.120.100 next

edit Wan_opt_peer_2

set ip 172.30.120.100 next

edit Wan_opt_peer_3

set ip 172.40.120.100 end


Configuring authentication groups

You need to add authentication groups to support authentication and secure tunneling between WAN optimization peers.

To perform authentication, WAN optimization peers use a certificate or a pre-shared key added to an authentication group so they can identify each other before forming a WAN optimization tunnel. Both peers must have an authentication group with the same name and settings. You add the authentication group to a peer-to- peer or active rule on the client-side FortiGate unit. When the server-side FortiGate unit receives a tunnel start request from the client-side FortiGate unit that includes an authentication group, the server-side FortiGate unit finds an authentication group in its configuration with the same name. If both authentication groups have the same certificate or pre-shared key, the peers can authenticate and set up the tunnel.

Authentication groups are also required for secure tunneling.

To add authentication groups, go to WAN Opt. & Cache > Authentication Groups.


To add an authentication group – web-based manager:

Use the following steps to add any kind of authentication group. It is assumed that if you are using a local certificate to authenticate, it is already added to the FortiGate unit

1. Go to WAN Opt. & Cache > Authentication Groups.

2. Select Create New.

3. Add a Name for the authentication group.

You will select this name when you add the authentication group to a WAN optimization rule.

4. Select the Authentication Method.

Select Certificate if you want to use a certificate to authenticate and encrypt WAN optimization tunnels. You must select a local certificate that has been added to this FortiGate unit. (To add a local certificate, go to Syste> Certificates.) Other FortiGate units that participate in WAN optimization tunnels with this FortiGate unit must have an authentication group with the same name and certificate.

Select Preshared key if you want to use a pre-shared key or password to authenticate and encrypt WAN optimization tunnels. You must add the Password (or pre-shared key) used by the authentication group. Other FortiGate units that participate in WAN optimization tunnels with this FortiGate unit must have an authentication group with the same name and password. The password must contain at least 6 printable characters and should be known only by network administrators. For optimum protection against currently known attacks, the key should consist of a minimum of 16 randomly chosen alphanumeric characters.

5. Configure Peer Acceptance for the authentication group.

Select Accept Any Peer if you do not know the peer host IDs or IP addresses of the peers that will use this authentication group. This setting is most often used for WAN optimization with the FortiClient application or with FortiGate units that do not have static IP addresses, for example units that use DHCP.

Select Accept Defined Peers if you want to authenticate with peers added to the peer list only.

Select Specify Peer and select one of the peers added to the peer list to authenticate with the selected peer only.

6. Select OK.

7. Add the authentication group to a WAN optimization rule to apply the authentication settings in the authentication group to the rule.


To add an authentication group that uses a certificate- CLI:

Enter the following command to add an authentication group that uses a certificate and can authenticate all peers added to the FortiGate unit configuration.

In this example, the authentication group is named auth_grp_1 and uses a certificate named Example_ Cert.

config wanopt auth-group edit auth_grp_1

set auth-method cert set cert Example_Cert set peer-accept defined

end


To add an authentication group that uses a pre-shared key – CLI:

Enter the following command to add an authentication group that uses a pre-shared key and can authenticate only the peer added to the authentication group.

In this example, the authentication group is named auth_peer, the peer that the group can authenticate is named Server_net, and the authentication group uses 123456 as the pre-shared key. In practice you should use a more secure pre-shared key.

config wanopt auth-group edit auth_peer

set auth-method psk set psk 123456

set peer-accept one set peer Server_net

end


To add an authentication group that accepts WAN optimization connections from any peer – web-based manager

Add an authentication group that accepts any peer for situations where you do not have the Peer Host IDs or IP Addresses of the peers that you want to perform WAN optimization with. This setting is most often used for WAN optimization with the FortiClient application or with FortiGate units that do not have static IP addresses, for example units that use DHCP. An authentication group that accepts any peer is less secure than an authentication group that accepts defined peers or a single peer.

The example below sets the authentication method to Preshared key. You must add the same password to all FortiGate units using this authentication group.

1. Go to WAN Opt. & Cache > Authentication Groups.

2. Select Create New to add a new authentication group.

3. Configure the authentication group:

Name                                           Specify any name.

Authentication Method            Pre-shared key

Password                                   Enter a pre-shared key.

Peer Acceptance                       Accept Any Peer


To add an authentication group that accepts WAN optimization connections from any peer – CLI:

In this example, the authentication group is named auth_grp_1. It uses a certificate named WAN_Cert and accepts any peer.

config wanopt auth-group edit auth_grp_1

set auth-method cert set cert WAN_Cert

set peer-accept any end


Having trouble configuring your Fortinet hardware or have some questions you need answered? Check Out The Fortinet Guru Youtube Channel! Want someone else to deal with it for you? Get some consulting from Fortinet GURU!

Can Greylisting be used in an active-active High availability FortiMail enviroment

Received the below question regarding Greylisting in an Active – Active HA environment. The answer is below as well!
Can Greylisting be used in an active/active High availability enviroment (with 2 mx records pointing to 2 fortimails)?
 
I mean:
When an email comes and gets greylisted by fortimail#1, if the second attempt  comes to the other fortimail (fortimail#2)
what happens? It will be graylisted again?
 
So we have this scenarios:
 
Hope 1)        mail comes,                        gets greylisted                  FM1       mx1       –
Hope 2)        mail comes again,            is cleared                             FM1       mx1       –
Hope 3)        mail passes
 
 
Hope 1)        mail comes,                        gets greylisted                  FM1       mx1       –
Hope 2)        mail comes again,            gets greylisted                  FM2       mx2       –
Hope 3)        mail comes again,            is cleared                             FM1       mx1       –              or FM2                  mx2
 
What will haped in scenario 2 ?  
Will email be delivered always?
 
 
What will happen if we have 3 or 4 or more fortimails?
 
Hope 1)        mail comes,                        gets greylisted                  FM1       mx1       –
Hope 2)        mail comes again,            gets greylisted                  FM2       mx2       –
Hope 3)        mail comes again,            gets greylisted                  FM3       mx3       –
Hope 4)        mail comes again,            gets greylisted                  FM4       mx4       –
 
Sender gives up????
My response is as follows:
No, it is not recommended to use grey listing in active/active deployments.  Grey listing data is not shared, at this time.
Sucks, hopefully they will make it available in future versions of the FortiMail FortiOS

Having trouble configuring your Fortinet hardware or have some questions you need answered? Check Out The Fortinet Guru Youtube Channel! Want someone else to deal with it for you? Get some consulting from Fortinet GURU!

Peers and authentication groups

Peers and authentication groups

All communication between WAN optimization peers begins with one WAN optimization peer (or client-side FortiGate unit) sending a WAN optimization tunnel request to another peer (or server-side FortiGate unit). During this process, the WAN optimization peers identify and optionally authenticate each other.


Basic WAN optimization peer requirements

WAN optimization requires the following configuration on each peer. For information about configuring local and peer host IDs, see Configuring peers on page 2861.

  • The peer must have a unique host ID.
  • Unless authentication groups are used, peers authenticate each other using host ID values. Do not leave the local host ID at its default value.
  • The peer must know the host IDs and IP addresses of all of the other peers that it can start WAN optimization tunnels with. This does not apply if you use authentication groups that accept all peers.
  • All peers must have the same local certificate installed on their FortiGate units if the units authenticate by local certificate. Similarly, if the units authenticate by pre-shared key (password), administrators must know the password. The type of authentication is selected in the authentication group. This applies only if you use authentication groups.


Accepting any peers

Strictly speaking, you do not need to add peers. Instead you can configure authentication groups that accept any peer. However, for this to work, both peers must have the same authentication group (with the same name) and both peers must have the same certificate or pre-shared key.

Accepting any peer is useful if you have many peers or if peer IP addresses change. For example, you could have many travelling FortiClient peers with IP addresses that are always changing as the users travel to different customer sites. This configuration is also useful if you have FortiGate units with dynamic external IP addresses (using DHCP or PPPoE). For most other situations, this method is not recommended and is not a best practice as it is less secure than accepting defined peers or a single peer. For more information, see Configuring authentication groups on page 2862.


Having trouble configuring your Fortinet hardware or have some questions you need answered? Check Out The Fortinet Guru Youtube Channel! Want someone else to deal with it for you? Get some consulting from Fortinet GURU!