Other Security Profiles considerations
The following topics are included in this section:
- Security Profiles and Virtual domains (VDOMs)
- Conserve mode
- SSL content scanning and inspection
- Using wildcards and Perl regular expressions
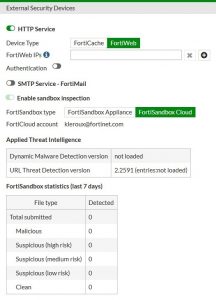
- Adding External Security Devices
- CPU allocation and tuning commands to survive reboot
Security Profiles and Virtual domains (VDOMs)
If you enable virtual domains (VDOMs) on your FortiGate unit, all Security Profiles configuration is limited to the VDOM in which you configure it.
While configuration is not shared, the various databases used by Security Profiles features are shared. The FortiGuard antivirus and IPS databases and database updates are shared. The FortiGuard web filter and spam filter features contact the FortiGuard distribution network and access the same information when checking email for spam and web site categories and classification.
Conserve mode
FortiGate units perform all Security Profiles processing in physical RAM. Since each model has a limited amount of memory, conserve mode is activated when the remaining free memory is nearly exhausted or the AV proxy has reached the maximum number of sessions it can service. While conserve mode is active, the AV proxy does not accept new sessions.
A warning will appear in the top bar of the FortiGate, regardless of which page in the FortiGate GUI you are on.
The AV proxy
Most content inspection the FortiGate unit performs requires that the files, email messages, URLs, and web pages be buffered and examined as a whole. The AV proxy performs this function, and because it may be buffering many files at the same time, it uses a significant amount of memory. Conserve mode is designed to prevent all the component features of the FortiGate unit from trying to use more memory than it has. Because the AV proxy uses so much memory, conserve mode effectively disables it in most circumstances. As a result, the content inspection features that use the AV proxy are also disabled in conserve mode.
All of the Security Profiles features use the AV proxy with the exception of IPS, application control, DoS as well as flow-based antivirus, DLP, and web filter scanning. These features continue to operate normally when the FortiGate unit enters conserve mode.
Entering and exiting conserve mode
A FortiGate unit will enter conserve mode because it is nearly out of physical memory, or because the AV proxy has reached the maximum number of sessions it can service. The memory threshold that triggers conserve mode varies by model, but it is about 20% free memory. When memory use rises to the point where less than 20% of the physical memory is free, the FortiGate unit enters conserve mode.
The FortiGate unit will leave conserve mode only when the available physical memory exceeds about 30%. When exiting conserve mode, all new sessions configured to be scanned with features requiring the AV proxy will be scanned as normal, with the exception of a unit configured with the one-shot option.
Conserve mode effects
What happens when the FortiGate unit enters conserve mode depends on how you have av-failopen configured. There are four options:
off
The off setting forces the FortiGate unit to stop all traffic that is configured for content inspection by Security Profiles features that use the AV proxy. New sessions are not allowed but current sessions continue to be processed normally unless they request more memory. Sessions requesting more memory are terminated.
For example, if a security policy is configured to use antivirus scanning, the traffic it permits is blocked while in conserve mode. A policy with IPS scanning enabled continues as normal. A policy with both IPS and antivirus scanning is blocked because antivirus scanning requires the AV proxy.
Use the off setting when security is more important than a loss of access while the problem is rectified.
pass
The pass setting allows traffic to bypass the AV proxy and continue to its destination. Since the traffic is bypassing the proxy, no Security Profiles scanning that requires the AV proxy is performed. Security Profiles scanning that does not require the AV proxy continues normally.
Use the pass setting when access is more important than security while the problem is rectified. Pass is the default setting.
one–shot
The one-shot setting is similar to pass in that traffic is allowed when conserve mode is active. The difference is that a system configured for one-shot will force new sessions to bypass the AV proxy even after it leaves conserve mode. The FortiGate unit resumes use of the AV proxy only when the av-failopen setting is changed or the unit is restarted.
idledrop
The idledrop setting will recover memory and session space by terminating all the sessions associated with the host that has the most sessions open. The FortiGate may force this session termination a number of times, until enough memory is available to allow it to leave conserve mode.
The idledrop setting is primarily designed for situations in which malware may continue to open sessions until the AV proxy cannot accept more new sessions, triggering conserve mode. If your FortiGate unit is operating near capacity, this setting could cause the termination of valid sessions. Use this option with caution.
Configuring the av-failopen command
You can configure the av-failopen command using the CLI.
config system global
set av-failopen {off | pass | one-shot | idledrop}
end
The default setting is pass.
SSL content scanning and inspection
If your FortiGate model supports SSL content scanning and inspection, you can apply antivirus scanning, web filtering, FortiGuard Web Filtering, and email filtering to encrypted traffic. You can also apply DLP and DLP archiving to HTTPS, IMAPS, POP3S, and SMTPS traffic. To perform SSL content scanning and inspection, the FortiGate unit does the following:
- intercepts and decrypts HTTPS, IMAPS, POP3S, SMTPS, and FTPS sessions between clients and servers (FortiGate SSL acceleration speeds up decryption)
- applies content inspection to decrypted content, including:
- HTTPS, IMAPS, POP3S, and SMTPS Antivirus, DLP, and DLP archiving
- HTTPS web filtering and FortiGuard web filtering
- IMAPS, POP3S, and SMTPS email filtering
- encrypts the sessions and forwards them to their destinations.
FortiGate SSL content scanning and inspection packet flow
Setting up certificates to avoid client warnings
To use SSL content scanning and inspection, you need to set up and use a certificate that supports it. FortiGate SSL content scanning and inspection intercepts the SSL keys that are passed between clients and servers during SSL session handshakes and then substitutes spoofed keys. Two encrypted SSL sessions are set up, one between the client and the FortiGate unit, and a second one between the FortiGate unit and the server. Inside the FortiGate unit the packets are decrypted.
While the SSL sessions are being set up, the client and server communicate in clear text to exchange SSL session keys. The session keys are based on the client and server certificates. The FortiGate SSL decrypt/encrypt process intercepts these keys and uses a built-in signing CA certificate named Fortinet_CA_SSLProxy to create keys to send to the client and the server. This signing CA certificate is used only by the SSL decrypt/encrypt process. The SSL decrypt/encrypt process then sets up encrypted SSL sessions with the client and server and uses these keys to decrypt the SSL traffic to apply content scanning and inspection.
You may use a different user-configurable CA to sign the SSL server certificate if CA verification fails. This will propogate the security alert back to the client even after deep-inspection.
Some client programs (for example, web browsers) can detect this key replacement and will display a security warning message. The traffic is still encrypted and secure, but the security warning indicates that a key substitution has occurred.
You can stop these security warnings by importing the signing CA certificate used by the server into the FortiGate unit SSL content scanning and inspection configuration. Then the FortiGate unit creates keys that appear to come from the server and not the FortiGate unit.
You can add one signing CA certificate for SSL content scanning and inspection. The CA certificate key size must be 1024 or 2048 bits. 4096-bit keys are not supported for SSL content scanning and encryption.
You can replace the default signing CA certificate, Fortinet_CA_SSLProxy, with another signing CA certificate. To do this, you need the signing CA certificate file, the CA certificate key file, and the CA certificate password.
To add a signing CA certificate for SSL content scanning and inspection
1. Obtain a copy of the signing CA certificate file, the CA certificate key file, and the password for the CA certificate.
2. Go to System > Certificates and select Import.
3. Set Type to Certificate.
4. For Certificate file, use the Browse button to select the signing CA certificate file.
5. For Key file, use the Browse button to select the CA certificate key file.
6. Enter the CA certificate Password.
7. Select OK.
The CA certificate is added to the Local Certificates list. In this example the signing CA certificate name is Example_CA. This name comes from the certificate file and key file name. If you want the certificate to have a different name, change these file names.
8. Add the imported signing CA certificate to the SSL content scanning and inspection configuration. Use the following CLI command if the certificate name is Example_CA.
config firewall ssl setting set caname Example_CA
end
The Example_CA signing CA certificate will now be used by SSL content scanning and inspection for establishing encrypted SSL sessions.
Exceptions
Periodically, you will come across situations where SSL and certificates will interfer with the smooth operation of an application or website. For instance, there is a popular application called Dropbox that does not work when deep SSL inspection is enabled. The reason for this is that the trusted certificate authority that is recognized by Dropbox is imbedded in the software and Dropbox cannot be reconfigured to recognize the FortiGate certificates that are used when deep SSL inspection is implemented.
One way to by-pass the deep inspection for Dropbox is to add dropbox.com to a local category in Web Filter and add that local category to the ftgd-wf-ssl-exempt list in the Web Filter profile. This way any connections with dropbox.com will be exempt from deep SSL inspection.
Whenever an exception is found, the reason that it causes an issue will have to be determined in order to figure out a way to accommodate that application or website.
Configuring packet logging options
You can use a number of CLI commands to further configure packet logging.
Limiting memory use
When logging to memory, you can define the maximum amount of memory used to store logged packets.
config ips settings
set packet-log-memory 256 end
The acceptable range is from 64 to 8192 kilobytes. This command affects only logging to memory.
Limiting disk use
When logging to the FortiGate unit internal hard disk, you can define the maximum amount of space used to store logged packets.
config ips settings
set ips-packet-quota 256 end
The acceptable range is from 0 to 4294967295 megabytes. This command affects only logging to disk.
Configuring how many packets are captured
Since the packet containing the signature is sometimes not sufficient to troubleshoot a problem, you can specify how many packets are captured before and after the packet containing the IPS signature match.
config ips settings packet-log-history packet-log-post-attack
end
The packet-log-history command specifies how many packets are captured before and including the one in which the IPS signature is detected. If the value is more than 1, the packet containing the signature is saved in the packet log, as well as those preceding it, with the total number of logged packets equalling the packet-
log-history setting. For example, if packet-log-history is set to 7, the FortiGate unit will save the
packet containing the IPS signature match and the six before it.
The acceptable range for packet-log-history is from 1 to 255. The default is 1.
Setting packet-log-history to a value larger than 1 can affect the performance of the FortiGate unit because network traffic must be buffered. The performance pen- alty depends on the model, the setting, and the traffic load.
The packet-log-post-attack command specifies how many packets are logged after the one in which the IPS signature is detected. For example, if packet-log-post-attack is set to 10, the FortiGate unit will save the ten packets following the one containing the IPS signature match.
The acceptable range for packet-log-post-attack is from 0 to 255. The default is 0.
Using wildcards and Perl regular expressions
Many Security Profiles feature list entries can include wildcards or Perl regular expressions.
For more information about using Perl regular expressions, see http://perldoc.perl.org/perlretut.html.
Regular expression vs. wildcard match pattern
A wildcard character is a special character that represents one or more other characters. The most commonly used wildcard characters are the asterisk (*), which typically represents zero or more characters in a string of characters, and the question mark (?), which typically represents any one character.
In Perl regular expressions, the ‘.’ character refers to any single character. It is similar to the ‘?’ character in wildcard match pattern. As a result:
- example.com not only matches example.com but also examplea.com, exampleb.com, examplec.com, and so on.
To add a question mark (?) character to a regular expression from the FortiGate CLI, enter Ctrl+V followed by ?. To add a single backslash character (\) to a regular expres- sion from the CLI you must add precede it with another backslash character. For example, example\\.com.
To match a special character such as ‘.’ and ‘*’ use the escape character ‘\’. For example:
- To match example.com, the regular expression should be: example\.com
In Perl regular expressions, ‘*’ means match 0 or more times of the character before it, not 0 or more times of any character. For example:
- exam*.com matches exammmm.com but does not match example.com
To match any character 0 or more times, use ‘.*’ where ‘.’ means any character and the ‘*’ means 0 or more times. For example, the wildcard match pattern exam*.com should therefore be exam.*\.com.
Word boundary
In Perl regular expressions, the pattern does not have an implicit word boundary. For example, the regular expression “test” not only matches the word “test” but also any word that contains “test” such as “atest”, “mytest”, “testimony”, “atestb”. The notation “\b” specifies the word boundary. To match exactly the word “test”, the expression should be \btest\b.
Case sensitivity
Regular expression pattern matching is case sensitive in the web and Email Filter filters. To make a word or phrase case insensitive, use the regular expression /i. For example, /bad language/i will block all instances of “bad language”, regardless of case.
Perl regular expression formats
The following table lists and describes some example Perl regular expressions.
Perl regular expression formats
Expression Matches
abc “abc” (the exact character sequence, but anywhere in the string)
^abc “abc” at the beginning of the string
abc$ “abc” at the end of the string
a|b Either “a” or “b”
^abc|abc$ The string “abc” at the beginning or at the end of the string
ab{2,4}c “a” followed by two, three or four “b”s followed by a “c”
ab{2,}c “a” followed by at least two “b”s followed by a “c”
ab*c “a” followed by any number (zero or more) of “b”s followed by a “c”
ab+c “a” followed by one or more b’s followed by a c
ab?c “a” followed by an optional “b” followed by a” c”; that is, either “abc” or ”ac”
a.c “a” followed by any single character (not newline) followed by a” c “
a\.c “a.c” exactly
[abc] Any one of “a”, “b” and “c”
[Aa]bc Either of “Abc” and “abc”
[abc]+ Any (nonempty) string of “a”s, “b”s and “c”s (such as “a”, “abba”, ”acbabcacaa”)
[^abc]+ Any (nonempty) string which does not contain any of “a”, “b”, and “c” (such as “defg”)
\d\d Any two decimal digits, such as 42; same as \d{2}
Expression Matches
/i Makes the pattern case insensitive. For example, /bad language/i blocks any instance of bad language regardless of case.
\w+ A “word”: A nonempty sequence of alphanumeric characters and low lines (under- scores), such as foo and 12bar8 and foo_1
100\s*mk The strings “100” and “mk” optionally separated by any amount of white space (spaces, tabs, newlines)
abc\b “abc” when followed by a word boundary (for example, in “abc!” but not in “abcd”)
perl\B “perl” when not followed by a word boundary (for example, in “perlert” but not in “perl stuff”)
\x Tells the regular expression parser to ignore white space that is neither preceded by a backslash character nor within a character class. Use this to break up a regular expres- sion into (slightly) more readable parts.
Used to add regular expressions within other text. If the first character in a pattern is forward slash ‘/’, the ‘/’ is treated as the delimiter. The pattern must contain a second
/x ‘/’. The pattern between ‘/’ will be taken as a regular expressions, and anything after the second ‘/’ will be parsed as a list of regular expression options (‘i’, ‘x’, etc). An error occurs if the second ‘/’ is missing. In regular expressions, the leading and trailing space is treated as part of the regular expression.
Examples of regular expressions
Block any word in a phrase
/block|any|word/
Block purposely misspelled words
Spammers often insert other characters between the letters of a word to fool spam blocking software.
/^.*v.*i.*a.*g.*r.*o.*$/i
/cr[eéèêë][\+\-\*=<>\.\,;!\?%&§@\^°\$£€\{\}()\[\]\|\\_01]dit/i
Block common spam phrases
The following phrases are some examples of common phrases found in spam messages.
/try it for free/i
/student loans/i
/you’re already approved/i
/special[\+\-\*=<>\.\,;!\?%&~#§@\^°\$£€\{\}()\[\]\|\\_1]offer/i