Configuring VRRP
To configure VRRP you must configure two or more FortiGate interfaces or routers with the same virtual router ID and IP address. Then these FortiGate units or routers can automatically join the same VRRP group. You must also assign priorities to each of the FortiGate units or routers in the VRRP group. One of the FortiGate units or routers must have the highest priority to become the master. The other FortiGate units or routers in the group are assigned lower priorities and become backup units. All of the units in the VRRP group should have different priorities. If the master unit fails, VRRP automatically fails over to the remaining unit in the group with the highest priority.
You configure VRRP from the FortiGate CLI by adding a VRRP virtual router to a FortiGate interface. You can add VRRP virtual routers to multiple FortiGate interfaces and you can add more than one virtual router to the same interface.
Example VRRP configuration: two FortiGate units in a VRRP group
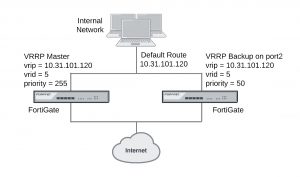
This example includes a VRRP group consisting of two FortiGate units that connect an internal network to the Internet. As shown below, the internal network’s default route is 10.31.101.120.
The FortiGate port2 interfaces connect to the internal network. A VRRP virtual router is added to each FortiGate unit’s port2 interface. The virtual router IP address is 10.31.101.120 (the internal network’s default route) and the virtual router’s ID is 5. The VRRP priority of the master unit is set to 255 and the VRRP priority of the backup unit is 50. The port2 interface of each FortiGate unit should have an IP address that is different from the virtual router IP address and the port2 interface IP addresses should be different from each other.
This example also includes enabling the VRRP virtual MAC address on both FortiGate unit port2 interfaces so that the VRRP group uses the VRRP virtual MAC address.
Example VRRP configuration with two FortiGate units
To configure the FortiGate units for VRRP
1. Select one of the FortiGate units to be the VRRP master and the other to be the backup unit.
2. From the master unit’s CLI, enter the following command to enable the VRRP virtual MAC address on the port2 interface and add the VRRP virtual router to the port2 interface:
config system interface edit port2
set vrrp-virtual-mac enable config vrrp
edit 5
set vrip 10.31.101.120 set priority 255
end
end
3. From the backup unit’s CLI, enter the following command to enable the VRRP virtual MAC address on the port2 interface and add the VRRP virtual router to the port2 interface:
config system interface edit port2
set vrrp-virtual-mac enable config vrrp
edit 5
set vrip 10.31.101.120 set priority 50
end
end