FortiClient Profiles
This section describes the FortiClient Profiles endpoint protection features and configuration.
You must first enable this feature. Go to System > Feature Select and enable End–point Control.
This will reveal the Security Profiles > FortiClient Profiles menu item.
The following topics are included in this section:
- Endpoint protection overview
- Configuring endpoint protection
- Configuring endpoint registration over a VPN
- Modifying the endpoint protection replacement messages
- Monitoring endpoints
Endpoint protection overview
Endpoint Protection enforces the use of up-to-date FortiClient Endpoint Security software on endpoints (workstation computers and mobile devices). It pushes a FortiClient profile to the FortiClient application, specifying security settings, including:
- Real-time antivirus protection – on or off
- FortiClient web category filtering based on web filters defined in a FortiGate Web Filter profile
- FortiClient Application Control (application firewall) using application sensors defined in the FortiGate Application Control profile
The FortiClient profile can also:
- Create VPN configurations
- Install CA certificates
- Upload logs to FortiAnalyzer or FortiManager
- Enable use of FortiManager for client software/signature update
- Enable a dashboard banner
- Enable client-based logging while on-net
- Output a mobile configuration profile (.mobileconfig file for iOS)
User experience
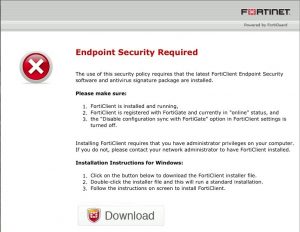
When using a web browser, the user of a non-compliant endpoint receives a replacement message HTML page from the FortiGate unit. The message explains that the user needs to install FortiClient Endpoint Security and provides a link to do so. The user cannot continue until the FortiClient software is installed.
For information about modifying the replacement page, see Modifying the endpoint protection replacement messages on page 2159.
Default FortiClient non-compliance message for Windows
After installing FortiClient Endpoint Security, the user will receive an invitation to register with the FortiGate unit. If the user accepts the invitation, the FortiClient profile is sent to the device’s FortiClient application. Now the user is compliant and can connect to the network. FortiClient Endpoint Security registered with a FortiGate unit does not need to be separately licensed with FortiGuard.
The FortiGate unit can also register endpoints who connect over the Internet through a VPN. The user can accept an invitation to register with the FortiGate unit. See Endpoint protection overview on page 2151.
FortiGate endpoint registration limits
To view the number of endpoints that are registered and the total that can be registered, go to Dashboard. Under License Information, find FortiClient. You will see a line like “Clients Registered 4 of 10”. This means that there are four registered endpoints and a total of ten are allowed.
When the registration limit is reached, the next FortiClient-compatible device will not be able to register with the FortiGate unit. The user sees a message in FortiClient application about this. The FortiClient profile is not sent to client and the client cannot connect through the FortiGate unit.
For all FortiGate models, the maximum number of registered endpoints is ten. For all models except 20C, you can purchase an endpoint license to increase this capacity:
To add an endpoint license – web-based manager
1. Go to Dashboard.
2. In the License Information widget, under FortiClient, select Enter License, enter the license key, and select
OK.
Maximum registered endpoints with endpoint license
| Model type | Max Registered Endpoints |
|
30 to 90 series |
200 |
|
100 to 300 series |
600 |
|
500 to 800 series, VM1, VM2 |
2 000 |
|
1000 series, VM4 |
8 000 |
|
3000 to 5000 series, VM8 |
20 000 |
Configuring endpoint protection
Endpoint Protection requires that all hosts connecting to an interface have the FortiClient Endpoint Security application installed. Make sure that all endpoints behind the interface are able to install this application. Currently, FortiClient Endpoint Security is available for Microsoft Windows (2000 and later), Apple (Mac OS X and later), and Android devices only.
By default, the FortiGuard service provides the FortiClient installer. If you prefer to host it on your own server, see Changing the FortiClient installer download location, below. To set up Endpoint Protection, complete the following:
- Create a FortiClient Profile or use the default profile. See Creating a FortiClient profile on page 2153. Enable the application sensor and web category filtering profiles that you want to use.
- Configure the FortiGate unit to support endpoint registration using FortiHeartBeat (under Network > Interfaces, allow FortiHeartBeat admission control).
- Optionally, enforce FortiClient registration. See Enforcing FortiClient registration on page 2156.
- Optionally, configure application sensors and web filter profiles as needed to monitor or block applications.
- Optionally, modify the Endpoint NAC Download Portal replacement messages (one per platform). See Modifying the endpoint protection replacement messages on page 2159.
Creating a FortiClient profile
The default FortiClient profile has only AntiVirus, Web Filter, and VPN options enabled. You can modify this profile or create your own FortiClient profiles, including settings for iOS and Android devices.
It is possible for more than one profile to be assigned to a device type. As with security policies, clients are matched to FortiClient profiles in the order that the profiles appear in the list.
To create a FortiClient profile – web-based manager
1. If you will use the Application Firewall feature, go to Security Profiles > Application Control to create the Application Sensors that you will need.
2. If you will use Web Category Filtering, go to Security Profiles > Web Filter to create the Web Filter Profile that you will need.
3. Go to Security Profiles > FortiClient Profiles.
If there is only the default FortiClient profile, it will be displayed and ready to edit. At the top right of the page you can select or create other profiles.
4. Select Create New or select an existing profile and Edit it.
5. In Assign Profile To, select the device groups, user groups, and users to which this FortiClient profile applies.
This is not available for the default profile.
6. Configure the FortiClient Profile under the following tabs: Security, VPN, Advanced, and Mobile:
| Security option Description |
|
AntiVirus |
| Realtime Protection Enable to configure AV options, including Scan File Downloads, Block malicious websites, and Block attack channels. |
| Scheduled Scan Enable to configure the following:
Type: Select from Quick, Full, or Custom. Schedule: Select from Daily, Weekly, or Monthly. Time: Select when the scan should take place. |
| Excluded Paths Enable to add paths you wish to be excluded from AV scanning. |
| Web Filter |
| Profile Select which Web Filter Profile you wish to use. |
| Client Side when On- Select to enable client side web filtering when the device is On-Net.
Net |
| Application Firewall |
| Application Control Select which Application Control Sensor you wish to use.
list |
| Monitor unknown Enable to monitor any applications that do not fall into any Application
applications Control categories. |
VPN option Description
VPN
Client
VPN Provisioning
Enable to configure the FortiClient VPN client, and enter the VPN con- figuration details.
VPN option Description
Allow user defined VPN
Enable to accept VPN tunnels for specific users.
VPN before Windows logon
Enable to establish the VPN connection before logging in to Windows.
| Advanced option Description |
|
Install CA Certificates Enable to force the FortiClient endpoint to download CA Certificates from the FortiGate. |
| Disable Unregister Enable to prevent managed endpoints from unregistering.
Option |
| Upload Logs to Enable to determine where FortiClient will upload its logs. Same as Sys-
FortiAnalyzer tem will send the logs as configured via Log & Report > Log Settings. Select Specify to upload them elsewhere. |
| FortiManager updates Enable to download client signature updates from FortiManager from spe- cified IP addresses. Also, you can Failover to FDN when FortiManager
is not available. |
| Dashboard Banner Enable to display the dashboard banner. |
| Client-based Logging Enable to always save logs on the client. Logs can be viewed with the
when On-Net FortiClient Console. |
| Single Sign-on Mobil- Enable to configure a specific server with a pre-shared key for SSO.
ity Agent |
| Mobile option Description |
|
iOS |
| Web Filter Select which Web Filter Profile you wish to use, and select Client Side when On-Net to enable client side web filtering when the iOS device is On-Net. |
| Client Enable to configure the FortiClient VPN client, and enter the VPN con-
VPN Provisioning figuration details. |
| Distribute Con- Enable to select and upload a ‘.mobileconfig’ file that will be distributed to
figuration Profile iOS devices. |
| Android |
Mobile option Description
Web Filter Select which Web Filter Profile you wish to use, and select Client Side when On-Net to enable client side web filtering when the Android device is On-Net.
Client VPN Provisioning
Enable to configure the FortiClient VPN client, and enter the VPN con- figuration details.
7. Select Apply.
To create a FortiClient profile – CLI:
This example creates a profile for Windows and Mac computers.
config endpoint-control profile edit ep-profile1
set device-groups mac windows-pc config forticlient-winmac-settings
set forticlient-av enable set forticlient-wf enable
set forticlient-wf-profile default end
end
To install CA certificates – CLI:
config endpoint-control profile edit <profile>
config forticlient-winmac-settings
set install-ca-certificate [enable | disable]
end next
end
Enforcing FortiClient registration
When you enable FortiHeartBeat on an interface, the option to enforce FortiClient registration becomes available. Devices connecting to that interface are forced to register to the FortiGate and install FortiClient before gaining access to network services.
The following example includes editing the default FortiClient Profile to enforce realtime antivirus protection and malicious website blocking.
To enforce FortiClient registration on the internal interface – web-based manager:
1. On the FortiGate, go to System > Feature Select and make sure that Endpoint Control is enabled.
2. Go to Network > Interfaces and edit the internal interface.
3. Under Restrict Access, enable FortiHeartBeat.
4. Under Admission Control, enable Enforce FortiHeartBeat for all FortiClients.
Optionally, you can also Exempt Sources and/or Exempt Destinations/Services. If you were to exempt a source device, that device would not require FortiClient registration to access network services or the Internet.
5. Go to Security Profiles > FortiClient Profiles.
6. Under the Security tab, enable Realtime Protection, Scan File Downloads, Block malicious websites, and Block attack channels.
Changing the FortiClient installer download location
By default, FortiClient installers are downloaded from the FortiGuard network. You can also host these installers on a server for your users to download. In that case, you must configure FortiOS with this custom download location. For example, to set the download location to a customer web server with address custom.example.com, enter the following command:
config endpoint-control settings set download-location custom
set download-custom-link “http://custom.example.com” end
Storing FortiClient configuration files
Advanced FortiClient configuration files of up to 32k may be stored:
1. Enable the advanced FortiClient configuration option in the endpoint profile:
config endpoint-control profile edit “default”
set forticlient-config-deployment enable set fct-advanced-cfg enable
set fct-advanced-cfg-buffer “hello” set forticlient-license-timeout 1 set netscan-discover-hosts enable
next end
2. Export the configuration from FortiClient (xml format).
3. Copy the contents of the configuration file and paste in the advanced FortiClient configuration box.
If the configure file is greater than 32k, you need to use the following CLI:
config endpoint-control profile edit <profile>
config forticlient-winmac-settings config extra-buffer-entries
edit <entry_id>
set buffer xxxxxx next
end end
next end
Configuring endpoint registration over a VPN
FortiGate units can register FortiClient-equipped endpoints over either an interface-based IPsec VPN or a tunnel- mode SSL VPN. After the user authenticates, the FortiGate unit sends the FortiClient application the IP address and port to be used for registration. If the user accepts the FortiGate invitation to register, registration proceeds and the FortiClient profile is downloaded to the client.
Users without FortiClient Endpoint Security connecting to the SSL VPN through a browser are redirected to a captive portal to download and install the FortiClient software.
Endpoint registration on an IPsec VPN
You can enable endpoint registration when you configure the FortiClient VPN or you can enable it on an existing FortiClient VPN.
To enable endpoint registration while configuring the VPN
- l Enable Allow Endpoint Registration on the Policy & Routing page of the VPN Wizard when creating the FortiClient VPN.
This is only available when Template Type is set to Remote Access with a FortiCli- ent Remote Device Type.
To enable endpoint registration on an existing VPN
1. Go to Network > Interfaces and edit the VPN’s tunnel interface.
The tunnel is a virtual interface under the physical network interface.
2. In Admission Control, enable FortiHeartBeat.
Optionally, you can also enable Enforce FortiHeartBeat for all FortiClients. This forces endpoints to register with FortiClient before they have network access.
3. Select OK.
Endpoint registration on an SSL VPN
To enable endpoint registration on the SSL VPN
1. Go to VPN > SSL-VPN Settings.
2. In Tunnel Mode Client Settings, make sure Allow Endpoint Registration is enabled.
3. Select Apply.
4. Go to Network > Interfaces and edit the ssroot interface.
5. In Admission Control, enable FortiHeartBeat.
Optionally, you can also enable Enforce FortiHeartBeat for all FortiClients. This forces endpoints to register with FortiClient before they have network access.
6. Select OK.
This procedure does not include all settings needed to configure a working SSL VPN.
Synchronizing endpoint registrations
To support roaming users in a network with multiple FortiGate units, you need to configure synchronization of the endpoint registration databases between the units. The registered endpoints are then recognized on all of the FortiGate units. This is configured in the CLI. For example, to synchronize this FortiGate unit’s registered endpoint database with another unit named other1 at IP address 172.20.120.4, enter:
config endpoint-control forticlient-registration-sync edit other1
set peer-ip 172.20.120.4 end
Modifying the endpoint protection replacement messages
If the security policy has Redirect all non-compliant/unregistered FortiClient compatible devices to a captive portal enabled, users of non-compliant devices are redirected to a captive portal that is defined by the Endpoint NAC Download Portal replacement message. There are different portals for Android, iOS, Mac, Windows, Quarantine, and “other” devices.
To modify the the endpoint protection replacement messages
1. Go to System > Replacement Messages and select Extended View.
2. In the Endpoint Control section select the message that you want to edit.
The replacement message and its HTML code appear in a split screen in the lower half of the page.
3. Modify the text as needed and select Save.
Monitoring endpoints
Go to Monitor > FortiClient Monitor to monitor endpoints.