Antivirus concepts

Antivirus concepts

The word “antivirus” refers to a group of features that are designed to prevent unwanted and potentially malicious files from entering your network. These features all work in different ways, which include checking for a file size, name, or type, or for the presence of a virus or grayware signature.

The antivirus scanning routines your FortiGate unit uses are designed to share access to the network traffic. This way, each individual feature does not have to examine the network traffic as a separate operation, and the overhead is reduced significantly. For example, if you enable file filtering and virus scanning, the resources used to complete these tasks are only slightly greater than enabling virus scanning alone. Two features do not require twice the resources.

Antivirus scanning examines files for viruses, worms, trojans, and other malware. The antivirus scan engine has a database of virus signatures it uses to identify infections. If the scanner finds a signature in a file, it determines that the file is infected and takes the appropriate action.


Malware Threats


Viruses

Viruses are self replicating code that install copies of themselves into other programs, data files for boot sectors of storage devices. Virus can often carry a “payload” which performs some undesirable function. These functions can include but are not limited to:

  • Stealing drive space
  • Stealing cpu cycles
  • Accessing private information
  • Corrupting data
  • Digital defacement or vandalism
  • Spamming contact lists


Worms

A worm is a piece of standalone computer code that replicates itself in order to spread to other computers. It normally uses a computer network to spread itself, using security vulnerabilities on the target computer or network to propagate. Unlike a virus, it does not attach itself to an existing file. Even is there is no payload, worms consume resources such as bandwidth and storage space just through their act of replication.


Trojan horses

A Trojan horse, or Trojan is malware that is defined by its delivery method. Through the use of social engineering, or some other method, the code is installed on a system by a valid user of the system and like the original Trojan horse there is something more than advertised within the software. Trojans, unlike worms or viruses are generally non-self-replicating. The most common payload of a Trojan is the setting up of a “backdoor” control mechanism to the system that it is installed on.


Ransomware

Ransomware is a type of malware that, as the name implies, hold the system ransom until payment of some kind is made. It does this by restricting access to the legitimate owner of the system either by encrypting files or locking the system. Usually, a message of some kind is displayed with the demands. Upon payment a utility or key is sent to the user to unlock the system.


Scareware

Scareware comes in two main flavours; the first tries to convince the user that his computer is invected with some non-existent malware, scaring the user into purchasing the author’s virus removal utility. The utility is nonfunctional or some additional form of malware.

The second form tries to convince the user that the computer has been or is being used for an illegal act such as being part of a bot net or storing child pornography. Again, the objective is to scare the user into paying to cure something that is not really there.


Spyware

Spyware is used by its authors to collect information about the user and its computer without the users knowledge. The end result can be as benign as being better able to target adds, to as criminal as key loggers designed to record account ids and passwords of bank accounts and forward them off to the authors.


Adware

Adware is not malware per se. It is merely any software that produces advertisements in order to generate revenue for its author. While a lot of people find this inconvenient or irritating it is not malware. As such it is not blocked by the antivirus software for being malware. This doesn’t mean that software that has adware built into it will not be block if it does have malware in it.


Botnets

A botnet is a network of Internet connected computers that have been covertly usurped to forward transmissions to other computers on the Internet on behalf of a “master”. These transmission can be merely annoying such as spam or they can critically impact a target as when used to launch a Distributed Denial of Service attack.

Any such computer is referred to as a zombie – in effect, a computer “robot” or “bot” that serves the wishes of some master spam or virus originator. Most computers compromised in this way are home-based.

According to a report from Russian-based Kaspersky Labs, botnets — not spam, viruses, or worms — currently pose the biggest threat to the Internet. A report from Symantec came to a similar conclusion.


Phishing

Phishing is a social engineering technique that is used to obtain sensitive and confidential information by masquerading as a communication from a trusted entity such as a well known institution, company, or website. Usually, the malware is not in the communication itself but in the links within the communication.


Grayware

Grayware programs are unsolicited software programs installed on computers, often without the user’s consent or knowledge. Grayware programs are generally considered an annoyance, but they can also cause system performance problems or be used for malicious purposes.


Scanning Modes

FortiOS has two different mode of scanning for malware. The reasons for the different modes are performance and granularity. In just about everything relating to security there is a constant balancing act going on. As you increase the level of security and comprehensiveness, there is by necessity a decrease in either convenience or performance, sometimes both. The increase in processing to scan for more threats requires more resources; resources that are a finite supply on the hardware. Granularity can sometimes be used to mitigate performance impact by scanning for a smaller subset of traffic but this is only recommended when that smaller subset of traffic is the only traffic going through the firewall.

If the traffic on the device is slight then the impact on the performance will hardly be noticeable, but it the unit is working close to capacity in terms of traffic and there are a lot of files coming through then there might be a noticeable decline in the performance.

While both modes offer significant security, Proxy-based is weighted towards being more thorough and easily configurable, while Flow-based is designed to optimize performance.


Proxy

The most thorough scan requires that the FortiGate unit have the whole file for the scanning procedure. To achieve this, the antivirus proxy buffers the file as it arrives. Once the transmission is complete, the virus scanner examines the file. If no infection is present, it is sent to the destination. If an infection is present, a replacement message is set to the destination.

During the buffering and scanning procedure, the client must wait. With a default configuration, the file is released to the client only after it is scanned. You can enable client comforting in the Proxy Options profile to feed the client a trickle of data to prevent them from thinking the transfer is stalled, and possibly cancelling the download.

Buffering the entire file allows the FortiGate unit to eliminate the danger of missing an infection due to fragmentation because the file is reassembled before examination. Archives can also be expanded and the contents scanned, even if archives are nested.

Since the FortiGate unit has a limited amount of memory, files larger than a certain size do not fit within the memory buffer. The default buffer size is 10 MB. You can use the uncompsizelimit CLI command to adjust the size of this memory buffer.

Files larger than the buffer are passed to the destination without scanning. You can use the Oversize File/Email setting to block files larger than the antivirus buffer if allowing files that are too large to be scanned is an unacceptable security risk.


Flowbased

If your FortiGate unit supports flow-based antivirus scanning, you can select it instead of proxy-based antivirus scanning. The way flow-based antivirus works changed significantly starting with firmware version 5.2.

As packets of a file come into the FortiGate unit, a copy of the packet is cached locally before the packet is allowed to pass through to the recipient. When the last packet of the file arrives, it is also cached but put on hold. Now the entire cached file is delivered to the Antivirus engine for a full scanning, just as it would be if using the proxy-based method, using what ever antivirus database has been configured.

If the file is determined to be infected with malware, the last packet will be dropped and the session is reset. Without all of the packets the file cannot be built by the recipient. When download a file through an HTTP connection (or HTTPS is SSL scanning is enabled), the flow-based feature remembers the last virus result so any subsequent attempts to download the same file will be welcomed by an appropriate blocked message directly, without engaging in the effort of downloading the file.

By using the same engine as the proxy-based method the detection rate is the same for both methods. In terms of performance from the end user’s stand point, the performance of the download will be a lot faster until the last packet and then there will be a slight delay for the scan, but after the determination is made only one packet has to be sent from the firewall to the recipient so the overall speed is faster than the proxy based method.

Another advantage of the flow-based method is that the scanning process does not change the packets as they pass through the FortiGate unit, while proxy-based scanning can change packet details such as sequence numbers. The changes made by proxy-based scanning do not affect most networks.

Additionally, when configuring flow-based virus scanning you can now choose between Quick and Full scan mode. Full mode is the same as flow-based scanning in FortiOS 5.2. Quick mode uses a compact antivirus database and advanced techniques to improve performance. Use the following command to enable quick or full mode in an antivirus profile:

config antivirus profile edit <profile>

set scan-mode [quick | full]

end


Antivirus scanning order

The antivirus scanning function includes various modules and engines that perform separate tasks.


Proxybased antivirus scanning order

The following figure illustrates the antivirus scanning order when using proxy-based scanning. The first check for oversized files/email is to determine whether the file exceeds the configured size threshold. The uncompsizelimit check is to determine if the file can be buffered for file type and antivirus scanning. If the file is too large for the buffer, it is allowed to pass without being scanned. For more information, see the config antivirus service command. The antivirus scan includes scanning for viruses, as well as for grayware and heuristics if they are enabled.

File filtering includes file pattern and file type scans which are applied at different stages in the antivirus process.


Antivirus scanning order when using the normal, extended, or extreme database

If a file fails any of the tasks of the antivirus scan, no further scans are performed. For example, if the file fakefile.EXE is recognized as a blocked file pattern, the FortiGate unit will send the end user a replacement message, and delete or quarantine the file. The unit will not perform virus scan, grayware, heuristics, and file type scans because the previous checks have already determined that the file is a threat and have dealt with it.


Flowbased antivirus scanning order

The following figure illustrates the antivirus scanning order when using flow-based scanning (i.e. the flow-based database). The antivirus scan takes place before any other antivirus-related scan. If file filter is not enabled, the file is not buffered. The antivirus scan includes scanning for viruses, as well as for grayware and heuristics if they are enabled.


Start

FTP,  NNTP, SMTP,

POP3,  IMAP, HTTP traffic

Scanning  stage

Antivirus profile filtering stage

Buffering stage

File message  is buffered

Yes


Oversized threshold checking  stage

Pattern matching stage

Uncompsizelimit threshold checking stage

Type matching stage

Block

Pass file/ email

Passes to next process


Antivirus databases

The antivirus scanning engine relies on a database of virus signatures to detail the unique attributes of each infection. The antivirus scan searches for these signatures, and when one is discovered, the FortiGate unit determines the file is infected and takes action.

All FortiGate units have the normal antivirus signature database but some models have additional databases you can select for use. Which you choose depends on your network and security needs.

Normal   Includes viruses currently spreading as determined by the FortiGuard Global Security Research Team. These viruses are the greatest threat. The Normal database is the default selection and it is available on every FortiGate unit.

ExtendeIncludes the normal database in addition to recent viruses that are no-longer active. These viruses may have been spreading within the last year but have since nearly or completely disappeared.

Extreme    Includes the extended database in addition to a large collection of ‘zoo’ viruses. These are viruses that have not spread in a long time and are largely dormant today. Some zoo viruses may rely on operating systems and hardware that are no longer widely used.

If your FortiGate unit supports extended, extreme, or flow-based virus database definitions, you can select the virus database most suited to your needs.

If you require the most comprehensive antivirus protection, enable the extended virus database. The additional coverage comes at a cost, however, because the extra processing requires additional resources.


To change the antivirus database

Use the CLI to run the following commands:

config antivirus settings set default-db extended

end


Antivirus techniques

The first three antivirus features work in sequence to efficiently scan incoming files and offer your network optimum antivirus protection. The first two features have specific functions, the third, heuristics, protects against new, or previously unknown virus threats.

To ensure that your system is providing the most protection available, all virus definitions and signatures are updated regularly through the FortiGuard antivirus services. These updates can be scheduled as often as on an hourly basis. To configure this feature, go to System > FortiGuard. Under AntiVirus & IPS Scanning, enable Schedule Updates. From here you can set the updates to occur on a consistent weekly, daily, or even hourly basis.


Virus scan

If the file passes the file pattern scan, the FortiGate unit applies a virus scan to it. The virus definitions are kept up-to-date through the FortiGuard Distribution Network (FDN).


Grayware protection

If the file passes the virus scan, it can be checked for grayware.

Grayware scanning is an optional function and must be enabled in the CLI if it is to be scanned for along with other malware. Grayware cannot be scanned for on its own. While done as a separate step, antivirus scanning must be enabled as well.

To enable grayware detection enter the following in the CLI:

config antivirus settings set grayware enable

end


To disable grayware detection enter the following in the CLI:

config antivirus settings set grayware disable

end

Grayware signatures are kept up to date in the same manner as the antivirus definitions.


Heuristics

After an incoming file has passed the grayware scan, it is subjected to the heuristics scan. The FortiGate heuristic antivirus engine, if enabled, performs tests on the file to detect virus-like behavior or known virus indicators. In this way, heuristic scanning may detect new viruses, but may also produce some false positive results. You configure heuristics from the CLI.

To set heuristics, enter the following in the CLI:


config antivirus heuristic

set mode {pass |block |disable}

end

  • “block” enables heuristics and any files determined to be malware are blocked from entering the network.
  • “pass” enables heuristics but any files determined to be malware are still allowed to pass through to the recipient.
  • “disable” turns off heuristics.


FortiGuard Antivirus

The FortiGuard Antivirus services are included in the regular FortiGuard subscription and include automatic updates of antivirus engines and definitions as well as a DNS black list (DNSBL) through the FortiGuard Distribution Network (FDN).

Current information about your subscription and version numbers can be found at System > FortiGuard. This page will also allow the configuration of connections to the FortiGuard Center and how often to check for updates to the antivirus files.


FortiGuard Botnet protection

Protection from having your system being controlled by a botnet is achieved by detecting and blocking connection attempts to known botnets. This feature also includes connections to known phishing sites. The FortiGuard database includes a constantly updated database of known Command and Control (C&C) sites that Botnet clients attempt to connect to, as well as a database of phishing URLs.

To enable Botnet and phishing protection in a DNS Filter profile, enable Block DNS requests to known botnet C&C.

The latest Botnet database is available from FortiGuard. To see the version of the database and display its contents, go to System > FortiGuard > Botnet Definitions. You can also block, monitor, or allow outgoing connections to Botnet sites for each FortiGate interface.

Both the DNS Filter security profile and Botnet protection feature are only available for proxy-based inspection.


Quarantine / Source IP ban

As of FortiOS 5.2, quarantine was a place where traffic content was held in storage where it couldn’t interact with the network or system. This was removed, but the term quarantine was kept to describe keeping selected source IPs from interacting with the network and protected systems. This source IP ban is kept in the kernel rather than in any specific application engine and can be queried by APIs. The features that can use the APIs to access and use the banned source IP addresses are antivirus, DLP, DoS and IPS. Both IPv4 and IPv6 version are included in this feature.


To configure the antivirus profile to add the source IP address of an infected file to the quarantine or list of banned source IP addresses edit the Antivirus profile, in the CLI as follows:


config antivirus profile edit <name of profile>

config nac-quar

set infected quar-src-ip set expiry 5m

end


If the quar-src-ip action is used, the additional variable of expiry time will become available. This variable determines for how long the source IP adddress will be blocked. In the CLI the option is called expiry and the duration is in the format <###d##h##m>. The maximum days value is 364. The maximum hour value is 23 and the maximum minute value is 59. The default is 5 minutes.


FortiSandbox

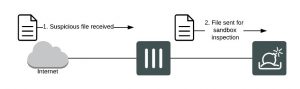
Not every piece of malware has a signature yet. This is especially true of new malware and new variations on existing malware. FortiOS can upload suspicious files to FortiSandbox where the file will be executed and the resulting behavior analyzed for risk. If the file exhibits risky behavior or is found to contain a virus, a new virus signature is created and added to the FortiGuard antivirus signature database. The next time your FortiGate unit updates its antivirus database it will have the new signature.

A file is considered suspicious if it does not contain a known virus and if it has some suspicious characteristics. The suspicious characteristics can change depending on the current threat climate and other factors. Fortinet optimizes how files are uploaded as required.

To configure an Antivirus profile to enable the use of the FortiSandbox check the checkbox next to Send Files to FortiSandbox Cloud for Inspection — this requires you have a FortiCloud account active.

Sending files to the FortiSandbox Cloud does not block files that it uploads. Instead they are used to improve how quickly new threats can be discovered and signatures created for them and added to the FortiGuard antivirus database.

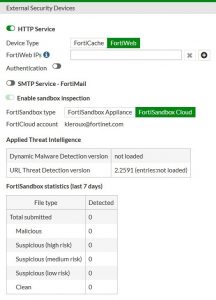
The Advanced Threat Protection dashboard widget shows the number of files that your FortiGate unit has uploaded or submitted to FortiSandbox. To see more information regarding the version of the database and display its contents, go to System > External Security Devices.


Client Comforting

When proxy-based antivirus scanning is enabled, the FortiGate unit buffers files as they are downloaded. Once the entire file is captured, the FortiGate unit scans it. If no infection is found, the file is sent along to the client. The client initiates the file transfer and nothing happens until the FortiGate finds the file clean, and releases it. Users can be impatient, and if the file is large or the download slow, they may cancel the download, not realizing that the transfer is in progress.

The client comforting feature solves this problem by allowing a trickle of data to flow to the client so they can see the file is being transferred. The default client comforting transfer rate sends one byte of data to the client every ten seconds. This slow transfer continues while the FortiGate unit buffers the file and scans it. If the file is infection-free, it is released and the client will receive the remainder of the transfer at full speed. If the file is infected, the FortiGate unit caches the URL and drops the connection. The client does not receive any notification of what happened because the download to the client had already started. Instead, the download stops and the user is left with a partially downloaded file.

If the user tries to download the same file again within a short period of time, the cached URL is matched and the download is blocked. The client receives the Infection cache message replacement message as a notification that the download has been blocked. The number of URLs in the cache is limited by the size of the cache.

Client comforting can send unscanned and therefore potentially infected content to the client. You should only enable client comforting if you are prepared to accept this risk. Keeping the client comforting interval high and the amount low will reduce the amount of potentially infected data that is downloaded.

Client comforting is available for HTTP and FTP traffic. If your FortiGate unit supports SSL content scanning and inspection, you can also configure client comforting for HTTPS and FTPS traffic.


Enable and configure client comforting

1. Go to Security Profiles > Proxy Options.

2. Select a Proxy Options profile and choose Edit, or select Create New to make a new one.

3. Scroll down to the Common Options section and check the box next to Comfort Clients. This will set the option on all of the applicable protocols. The ability to set this feature on a protocol by protocol basis exists in the CLI

4. Select OK or Apply to save the changes.

5. Select this Proxy Options profile in any security policy for it to take effect on all traffic handled by the policy. The default values for Interval and Amount are 10 and 1, respectively. This means that when client comforting takes effect, 1 byte of the file is sent to the client every 10 seconds. You can change these values to vary the amount and frequency of the data transferred by client comforting.


Oversized files and emails

Downloaded files can range from a few Kilobytes to multiple Gigabytes. The problem lies in that a FortiGate doesn’t have the memory to allow for a large number of people downloading large files. Image the memory required for a team of developers to all download the latest Linux OS distribution at once, in addition to the normal requirements of the firewall. Everything would come to a grinding halt the FortiGate tried to store each of those Gibabyte+ files in memory. To give you some piece of mind, the chances of malware being in a large file like those is much smaller than in a smaller single Megabyte file, so the threat is somewhat limited, but you will probably want to use your computers antivirus software to scan those large files after they have been downloaded.

Therefore a threshold must be set to prevent the resources of the system from becoming overloaded. By default the threshold is 10 MB. Any files larger than the threshold will not be scanned for malware. With a maximum file size threshold in place, it must now be determined what is to be done with the files that are larger than threshold. There are only 2 choices; either the file is passed through without being scanned for malware or the file is blocked. The default action for oversized files is to pass them through.

If you wish to block the downloading of files over the threshold, this can be set within the Proxy Option profile found at Security Profiles > Proxy Options, under Common Options.

Check Block Oversized File/Email.

This will reveal an additional option, Threshold (MB). The threshold of the files is set based upon the protocol being used to transfer the file. In the CLI and configuration file, the threshold variable is found in each of the protocol sections within the profile. Changing the value in this field will change the oversize-limit value for all of the protocols.


If you wish to change the oversize-limit value on all of the protocols covered in a Proxy Option profile you have two options.

1. You can go into the CLI and change the value manually within each of the protocol sections.

2. You can use the GUI to temporarily block oversized files, and when configuring it change the threshold to the new value that you want. Apply this setting. Then go back to the profile and turn off the block setting. If you now go into the CLI you will find that the configuration file has retained the new oversize-limit value.

The settings can be found in the CLI by going to:

config firewall profile-protocol-options edit <the name of the profile>


Archive scan depth

The antivirus scanner will open archives and scan the files inside. Archives within other archives, or nested archives, are also scanned to a default depth of twelve nestings. You can adjust the number of nested archives to which the FortiGate unit will scan with the uncompressed-nest-limit CLI command. Further, the limit is configured separately for each traffic type.


Configuring archive scan depth

For example, this CLI command sets the archive scan depth for SMTP traffic to 5. That is, archives within archives will be scanned five levels deep.

config firewall profile-protocol-options

edit “default” config http

set uncompressed-nest-limit 5 end

You can set the nesting limit from 2 to 100.


Scan buffer size

When checking files for viruses, there is a maximum file size that can be buffered. Files larger than this size are passed without scanning. The default size for all FortiGate models is 10 megabytes.

Archived files are extracted and email attachments are decoded before the FortiGate unit determines if they can fit in the scan buffer. For example, a 7 megabyte ZIP file containing a 12 megabyte EXE file will be passed without scanning with the default buffer size. Although the archive would fit within the buffer, the uncompressed file size will not.


Configuring the uncompression buffer

In this example, the uncompressed-oversize-limit CLI command is used to change the scan buffer size to 20 megabytes for files found in HTTP traffic:

config firewall profile-protocol-options

edit “default” config http

set uncompressed-oversize-limit 20 end

The maximum buffer size varies by model. Enter set uncompressed-oversize-limit ? to display the buffer size range for your FortiGate unit.


Windows file sharing (CIFS)

FortiOS supports virus scanning of Windows file sharing traffic. This includes CIFS, SMB, and SAMBA traffic. This feature is applied by enabling SMB scanning in an antivirus profile and then adding this profile to a security policy that accepts CIFS traffic. CIFS virus scanning is available only through flow-based antivirus scanning.

FortiOS flow-based virus scanning can detect the same number of viruses in CIFS/SMB/SAMBA traffic as it can for all supported content protocols.

Note the following about CFIS/SMB/SAMBA virus scanning:

  • Some newer version of SAMBA clients and SMB2 can spread one file across multiple sessions, preventing some viruses from being detected if this occurs.
  • Enabling CIFS/SMB/SAMBA virus scanning can affect FortiGate performance.
  • SMB2 is a new version of SMB that was first partially implemented in Windows Vista.
  • Currently SMB2 is supported by Windows Vista or later, and partly supported by Samba 3.5 and fully support by Samba 3.6.
  • The latest version of SMB2.2 will be introduced with Windows 8.
  • Most clients still use SMB as default setting.


Configuring CIFS/SMB/SAMBA virus scanning

Use the following command to enable CIFS/SMB/SAMBA virus scanning in an antivirus profile:

config antivirus profile edit <smb-profile>

config smb

set options scan end

Then add this antivirus profile to a security policy that accepts the traffic to be virus scanned. In the security policy the service can be set to ANY, SAMBA, or SMB.

config firewall policy edit 0

set service ANY

set utm-status enable

set av-profile <smb-profile>

end


Having trouble configuring your Fortinet hardware or have some questions you need answered? Check Out The Fortinet Guru Youtube Channel! Want someone else to deal with it for you? Get some consulting from Fortinet GURU!

AntiVirus

AntiVirus

This section describes how to configure the antivirus options. From an antivirus profile you can configure the FortiGate unit to apply antivirus protection to HTTP, FTP, IMAP, POP3, SMTP, and NNTP sessions. If your FortiGate unit supports SSL content scanning and inspection, you can also configure antivirus protection for HTTPS, IMAPS, POP3S, SMTPS, and FTPS sessions.

In many cases you can just customize the default antivirus profile and apply it to the security policy that accepts the traffic to be virus scanned. You can also create custom antivirus profiles if want to apply different types of virus protection to different traffic.


The following topics are included in this section:

  • Antivirus concepts
  • Enabling AntiVirus scanning
  • Testing your antivirus configuration
  • Example Scenarios

Having trouble configuring your Fortinet hardware or have some questions you need answered? Check Out The Fortinet Guru Youtube Channel! Want someone else to deal with it for you? Get some consulting from Fortinet GURU!

Security Profiles/lists/sensors

Security Profiles/lists/sensors

A profile is a group of settings that you can apply to one or more firewall policies. Each Security Profile feature is enabled and configured in a profile, list, or sensor. These are then selected in a security policy and the settings apply to all traffic matching the policy. For example, if you create an antivirus profile that enables antivirus scanning of HTTP traffic, and select the antivirus profile in the security policy that allows your users to access the World Wide Web, all of their web browsing traffic will be scanned for viruses.

Because you can use profiles in more than one security policy, you can configure one profile for the traffic types handled by a set of firewall policies requiring identical protection levels and types, rather than repeatedly configuring those same profile settings for each individual security policy.

For example, while traffic between trusted and untrusted networks might need strict protection, traffic between trusted internal addresses might need moderate protection. To provide the different levels of protection, you might configure two separate sets of profiles: one for traffic between trusted networks, and one for traffic between trusted and untrusted networks.


Having trouble configuring your Fortinet hardware or have some questions you need answered? Check Out The Fortinet Guru Youtube Channel! Want someone else to deal with it for you? Get some consulting from Fortinet GURU!

Security Profiles components

Security Profiles components


AntiVirus

Your FortiGate unit stores a virus signature database that can identify more than 15,000 individual viruses. FortiGate models that support additional virus databases are able to identify hundreds of thousands of viruses. With a FortiGuard AntiVirus subscription, the signature databases are updated whenever a new threat is discovered.

AntiVirus also includes file filtering. When you specify files by type or by file name, the FortiGate unit will stop the matching files from reaching your users.

FortiGate units with a hard drive or configured to use a FortiAnalyzer unit can store infected and blocked files for that you can examine later.


Web Filter

Web filtering includes a number of features you can use to protect or limit your users’ activity on the web. FortiGuard Web Filtering is a subscription service that allows you to limit access to web sites. More than 60 million web sites and two billion web pages are rated by category. You can choose to allow or block each of the 77 categories.

URL filtering can block your network users from access to URLs that you specify.

Web content filtering can restrict access to web pages based on words and phrases appearing on the web page itself. You can build lists of words and phrases, each with a score. When a web content list is selected in a web filter profile, you can specify a threshold. If a user attempts to load a web page and the score of the words on the page exceeds the threshold, the web page is blocked.


DNS Filter

Application Control

Although you can block the use of some applications by blocking the ports they use for communications, many applications do not use standard ports to communicate. Application control can detect the network traffic of more than 1000 applications, improving your control over application communication.


Intrusion Protection

The FortiGate Intrusion Protection System (IPS) protects your network against hacking and other attempts to exploit vulnerabilities of your systems. More than 3,000 signatures are able to detect exploits against various operating systems, host types, protocols, and applications. These exploits can be stopped before they reach your internal network.

You can also write custom signatures, tailored to your network.


AntiSpam

FortiGuard Anti-Spam is a subscription service that includes an IP address black list, a URL black list, and an email checksum database. These resources are updated whenever new spam messages are received, so you do not need to maintain any lists or databases to ensure accurate spam detection.

You can use your own IP address lists and email address lists to allow or deny addresses, based on your own needs and circumstances.


Data Leak Prevention

Data Leak Prevention (DLP) allows you to define the format of sensitive data. The FortiGate unit can then monitor network traffic and stop sensitive information from leaving your network. Rules for U.S. social security numbers, Canadian social insurance numbers, as well as Visa, Mastercard, and American Express card numbers are included.


VoIP

The Session Initiation Protocol (SIP) is an IETF application layer signaling protocol used for establishing, conducting, and terminating multiuser multimedia sessions over TCP/IP networks using any media. SIP is often used for Voice over IP (VoIP) calls but can be used for establishing streaming communication between end points.

For more information, see VoIP Solutions: SIP.


ICAP

This module allows for the offloading of certain processes to a separate server so that your FortiGate firewall can optimize its resources and maintain the best level of performance possible.


FortiClient Profiles

FortiClient is a comprehensive endpoint security solutions that extends the power of Fortinet’s Advanced Threat Protection (ATP) to end user devices. 5.4.0 has brought two notable capabilities for the detection of Advanced Persistent Threats (APT), including Botnet Command and Control (C&C) Communications Detection and FortiSandbox integration (Windows only).

For more information, see FortiClient 5.4.0 Administration Guide.


Proxy Options

Proxy Options includes features you can configure for when your FortiGate is operating in proxy mode, including protocol port mapping, block oversized files/emails, and other web and email options.


SSL Inspection

SSL Inspection (otherwise known as Deep Inspection) is used to scan HTTPS traffic in the same way that HTTP traffic can be scanned. This allows the FortiGate to receive and open up the encrypted traffic on behalf of the client, then the traffic is re-encrypted and sent on to its intended destination.

Individual Deep Inspection profiles can be created, depending on the requirements of the policy. Depending on the profile, you can:

  • Configure which CA certificate will be used to descrypt the SSL encrypted traffic
  • Configure which SSL protocols will be inspected
  • Configure which ports will be associated with which SSL protocols for inspection
  • Configure whether or not to allow invalid SSL certificates
  • Configure whether or not SSH traffic will be inspected

Having trouble configuring your Fortinet hardware or have some questions you need answered? Check Out The Fortinet Guru Youtube Channel! Want someone else to deal with it for you? Get some consulting from Fortinet GURU!

Security Profiles overview

Security Profiles overview

Ranging from the FortiGate®-30 series for small businesses to the FortiGate-5000 series for large enterprises, service providers and carriers, the FortiGate line combines a number of security features to protect your network from threats. As a whole, these features, when included in a single Fortinet security appliance, are referred to as Security Profiles. The Security Profiles features your FortiGate model includes are:

  • AntiVirus
  • Web Filter
  • DNS Filter
  • Application Control
  • Cloud Access Security Inspection
  • Intrusion Protection
  • Anti-Spam
  • Data Leak Prevention
  • VoIP
  • ICAP
  • Web Application Firewall
  • FortiClient Profiles
  • Proxy Options
  • SSL Inspection
  • Web Rating Overrides
  • Web Profile Overrides
  • ICAP Servers


FortiOS 5.4 no longer supports FortiClient 5.0.

FortiOS 5.2 can support FortiClient 5.0, but only if the FortiGate upgraded to FortiOS 5.2. Customers need to purchase a FortiClient 5.4 subscription-based FortiClient license.

Firewall policies limit access, and while this and similar features are a vital part of securing your network, they are not covered in this document.


Traffic inspection

When the FortiGate unit examines network traffic one packet at a time for IPS signatures, it is performing traffic analysis. This is unlike content analysis where the traffic is buffered until files, email messages, web pages, and other files are assembled and examined as a whole.

DoS policies use traffic analysis by keeping track of the type and quantity of packets, as well as their source and destination addresses.

Application control uses traffic analysis to determine which application generated the packet.

Although traffic inspection doesn’t involve taking packets and assembling files they are carrying, the packets themselves can be split into fragments as they pass from network to network. These fragments are reassembled by the FortiGate unit before examination.

No two networks are the same and few recommendations apply to all networks. This topic offers suggestions on how you can use the FortiGate unit to help secure your network against content threats.


IPS signatures

IPS signatures can detect malicious network traffic. For example, the Code Red worm attacked a vulnerability in the Microsoft IIS web server. Your FortiGate’s IPS system can detect traffic attempting to exploit this vulnerability. IPS may also detect when infected systems communicate with servers to receive instructions.


IPS recommendations

  • Enable IPS scanning at the network edge for all services.
  • Use FortiClient endpoint IPS scanning for protection against threats that get into your network.
  • Subscribe to FortiGuard IPS Updates and configure your FortiGate unit to receive push updates. This will ensure you receive new IPS signatures as soon as they are available.
  • Your FortiGate unit includes IPS signatures written to protect specific software titles from DoS attacks. Enable the signatures for the software you have installed and set the signature action to Block.
  • You can view these signatures by going to Security Profiles > Intrusion Protection and selecting the [View IPS Signatures] link.
  • Because it is critical to guard against attacks on services that you make available to the public, configure IPS signatures to block matching signatures. For example, if you have a web server, configure the action of web server signatures to Block.


Suspicious traffic attributes

Network traffic itself can be used as an attack vector or a means to probe a network before an attack. For example, SYN and FIN flags should never appear together in the same TCP packet. The SYN flag is used to initiate a TCP session while the FIN flag indicates the end of data transmission at the end of a TCP session.

The FortiGate unit has IPS signatures that recognize abnormal and suspicious traffic attributes. The SYN/FIN combination is one of the suspicious flag combinations detected in TCP traffic by the TCP.BAD.FLAGS signature.

The signatures that are created specifically to examine traffic options and settings, begin with the name of the traffic type they are associated with. For example, signatures created to examine TCP traffic have signature names starting with TCP.


Application control

While applications can often be blocked by the ports they use, application control allows convenient management of all supported applications, including those that do not use set ports.


Application control recommendations

  • Some applications behave in an unusual manner in regards to application control. For more information, see Application considerations on page 2145.
  • By default, application control allows the applications not specified in the application control list. For high security networks, you may want to change this behavior so that only the explicitly allowed applications are permitted.


SSL inspection

Regular web filtering can be circumvented by using https:// instead of http://. By enabling this feature, the FortiGate can filter traffic that is using the HTTPS protocol.


Content inspection and filtering

When the FortiGate unit buffers the packets containing files, email messages, web pages, and other similar files for reassembly before examining them, it is performing content inspection. Traffic inspection, on the other hand, is accomplished by the FortiGate unit examining individual packets of network traffic as they are received.

No two networks are the same and few recommendations apply to all networks. This topic offers suggestions on how you can use the FortiGate unit to help secure your network against content threats. Be sure to understand the effects of the changes before using the suggestions.


AntiVirus

The FortiGate antivirus scanner can detect viruses and other malicious payloads used to infect machines. The FortiGate unit performs deep content inspection. To prevent attempts to disguise viruses, the antivirus scanner will reassemble fragmented files and uncompress content that has been compressed. Patented Compact Pattern Recognition Language (CPRL) allows further inspection for common patterns, increasing detection rates of virus variations in the future.


AntiVirus recommendations

  • Enable antivirus scanning at the network edge for all services.
  • Use FortiClient endpoint antivirus scanning for protection against threats that get into your network.
  • Subscribe to FortiGuard AntiVirus Updates and configure your FortiGate unit to receive push updates. This will ensure you receive new antivirus signatures as soon as they are available.
  • Enable the Extended Virus Database if your FortiGate unit supports it.
  • Examine antivirus logs periodically. Take particular notice of repeated detections. For example, repeated virus detection in SMTP traffic could indicate a system on your network is infected and is attempting to contact other systems to spread the infection using a mass mailer.
  • The builtinpatterns file filter list contains nearly 20 file patterns. Many of the represented files can be executed or opened with a double-click. If any of these file patterns are not received as a part of your normal traffic, blocking them may help protect your network. This also saves resources since files blocked in this way do not need to be scanned for viruses.
  • To conserve system resources, avoid scanning email messages twice. Scan messages as they enter and leave your network or when clients send and retrieve them, rather than both.
  • Enable Treat Windows Executables in Email Attachments as Viruses if you are concerned about incoming ‘.exe’ files.


FortiGuard Web Filtering

The web is the most popular part of the Internet and, as a consequence, virtually every computer connected to the Internet is able to communicate using port 80, HTTP. Botnet communications take advantage of this open port and use it to communicate with infected computers. FortiGuard Web Filtering can help stop infections from malware sites and help prevent communication if an infection occurs.


FortiGuard Web Filtering recommendations

  • Enable FortiGuard Web Filtering at the network edge.
  • Install the FortiClient application and use FortiGuard Web Filtering on any systems that bypass your FortiGate unit.
  • Block categories such as Pornography, Malware, Spyware, and Phishing. These categories are more likely to be dangerous.
  • In the email filter profile, enable IP Address Check in FortiGuard Email Filtering. Many IP addresses used in spam messages lead to malicious sites; checking them will protect your users and your network.


DNS Filter

The following filtering options can be configured in a DNS Filter profile:


Blocking DNS requests to known Botnet C&C addresses

A new FortiGuard database contains a list of known Botnet C&C addresses. This database is updated dynamically and stored on the FortiGate. This database is covered by FortiGuard web filter licensing, so you must have a FortiGuard web filtering license to use this feature. You can view the botnet list by going to System > FortiGuard > Botnet Definitions.

When you block DNS requests to known Botnet C&C addresses, using IPS, DNS lookups are checked against the Botnet C&C database. All matching DNS lookups are blocked. Matching uses a reverse prefix match, so all sub- domains are also blocked.

To enable blocking of DNS requests to known Botnet C&C addresses, go to Security Profiles > DNS Filter, and enable Block DNS requests to known botnet C&C.


Static URL filter

The DNS inspection profile static URL filter allows you to block, exempt, or monitor DNS requests by using IPS to look inside DNS packets and match the domain being looked up with the domains on the static URL filter list. If there is a match the DNS request can be blocked, exempted, monitored, or allowed.

If blocked, the DNS request is blocked and so the user cannot look up the address and connect to the site. If exempted, access to the site is allowed even if another method is used to block it.

DNSbased web filtering

This feature is similar to the FortiGuard DNS web filtering available in FortiOS 5.2. You can configure DNS web filtering to allow, block, or monitor access to web content according to FortiGuard categories. When DNS web filtering is enabled, your FortiGate must use the FortiGuard DNS service for DNS lookups. DNS lookup requests sent to the FortiGuard DNS service return with an IP address and a domain rating that includes the FortiGuard category of the web page.

If that FortiGuard category is set to block, the result of the DNS lookup is not returned to the requester. If the category is set to redirect, then the address returned to the requester points at a FortiGuard redirect page.

You can also allow access or monitor access based on FortiGuard category.


AntiSpam

Spam is a common means by which attacks are delivered. Users often open email attachments they should not, and infect their own machine. The FortiGate email filter can detect harmful spam and mark it, alerting the user to the potential danger.


AntiSpam filter recommendations

  • Enable email filtering at the network edge for all types of email traffic.
  • Use FortiClient endpoint scanning for protection against threats that get into your network.
  • Subscribe to the FortiGuard Anti-Spam Service.


Data Leak Prevention

Most security features on the FortiGate unit are designed to keep unwanted traffic out of your network while Data Leak Prevention (DLP) can help you keep sensitive information from leaving your network. For example, credit card numbers and social security numbers can be detected by DLP sensors.


DLP recommendations

  • Rules related to HTTP posts can be created, but if the requirement is to block all HTTP posts, a better solution is to use application control or the HTTP POST Action option in the web filter profile.
  • While DLP can detect sensitive data, it is more efficient to block unnecessary communication channels than to use DLP to examine it. If you don’t use instant messaging or peer-to-peer communication in your organization, for example, use application control to block them entirely.

Having trouble configuring your Fortinet hardware or have some questions you need answered? Check Out The Fortinet Guru Youtube Channel! Want someone else to deal with it for you? Get some consulting from Fortinet GURU!

Route Based (Interface Based) IPSec Tunnels

This is a video I created to provide guidance on how to configure a basic IPSec tunnel (route based) between two FortiGates. A more advanced video will be released that provides a more in depth look later.


Having trouble configuring your Fortinet hardware or have some questions you need answered? Check Out The Fortinet Guru Youtube Channel! Want someone else to deal with it for you? Get some consulting from Fortinet GURU!

Chapter 22 – Security Profiles

Chapter 22 – Security Profiles

This FortiOS Handbook chapter contains the following sections:

  • What’s new in FortiOS 5.4 lists and describes the new security profile features in FortiOS 5.4.
  • Security Profiles overview describes Security Profiles components and their relation to firewall policies, as well as SSL content scanning and inspection. We recommend starting with this section to become familiar with the different features in your FortiGate unit.
  • AntiVirus explains how the FortiGate unit scans files for viruses and describes how to configure the antivirus options.
  • Web filter describes basic web filtering concepts, FortiGuard Web Filtering, the order in which the FortiGate unit performs web filtering, and configuration.
  • Application Control describes how your FortiGate unit can detect and take action against network traffic based on the application generating the traffic.
  • FortiClient Profiles describes the FortiClient Profiles endpoint protection features and configuration.
  • Intrusion protection explains basic Intrusion Protection System (IPS) concepts and how to configure IPS options;
  • includes guidance and a detailed table for creating custom signatures as well as several examples.
  • Custom Application & IPS Signatures describes how to create custom Application Control and IPS signatures. Anti-Spam filter explains how the FortiGate unit filters email, describes how to configure the filtering options and the action to take with email detected as spam.
  • Data leak prevention describes the DLP features that allow you to prevent sensitive data from leaving your network and explains how to configure the DLP rules, compound rules, and sensors.
  • ICAP support describes how to off load traffic to a separate server specifically set up for the specialized processing of the traffic.
  • Other Security Profiles considerations describes topics like Security Profiles VDOMs, conserve mode, SSL content scanning and inspection, Using wildcards and Perl regular expressions, Adding External Security Devices, CPU allocation and tuning commands to survive reboot and so on.


Whats new in FortiOS 5.4


Proxy and flow-based inspection per VDOM

You can select flow or proxy mode from the System Information dashboard widget to control your FortiGate’s security profile inspection mode. Having control over flow and proxy mode is helpful if you want to be sure that only flow inspection mode is used (and that proxy inspection mode is not used). As well, switching to flow inspection mode also turns off the explicit web proxy and the explicit FTP proxy, making sure that no proxying can occur.

In most cases proxy mode (the default) is preferred because more security profile features are available and more configuration options for these individual features are available. Some implementations; however, may require all security profile scanning to only use flow mode. In this case, you can set your FortiGate to flow mode knowing that proxy mode inspection will not be used.

If you select flow-based to use external servers for FortiWeb and FortiMail you must use the CLI to set a Web Application Firewall profile or Anti-Spam profile to external mode and add the Web Application Firewall profile or Anti-Spam profile to a firewall policy.


Changing between proxy and flow mode

By default proxy mode is enabled and you change to flow mode by changing the Inspection Mode on the System Information dashboard widget. When you select Flowbased you are reminded that all proxy mode profiles are converted to flow mode, removing any proxy settings. As well proxy-mode only features (for example, Web Application Profile) are removed from the GUI.

In addition, when you select Flowbased the Explicit Web Proxy and Explicit FTP Proxy features are removed from the GUI and the CLI. This includes Explicit Proxy firewall policies.

If required you can change back to proxy mode just as easily. As well, if your FortiGate has multiple VDOMs you can set the inspection mode independently for each VDOM.


Security profile features available in proxy mode

When set to proxy mode, the following security profiles are available:

  • AntiVirus
  • Web Filter
  • DNS Filter
  • Application Control
  • Intrusion Protection
  • Anti-Spam
  • Data Leak Prevention
  • VoIP
  • ICAP
  • Web Application Firewall
  • FortiClient Profiles
  • Proxy Options
  • SSL Inspection
  • Web Rating Overrides
  • Web Profile Overrides
  • ICAP Servers

In proxy mode, from the GUI you can only configure antivirus and web filter security profiles in proxy mode. From the CLI you can configure flow-based antivirus profiles, web filter profiles and DLP profiles and they will appear on the GUI and include their inspection mode setting. Also, flow-based profiles created when in flow mode are still available when you switch to proxy mode.


Security profile features available in flow mode

When you change to flow mode, proxy mode antivirus and web filter security profiles are converted to flow mode and the following reduced set of security profiles features are available:

  • AntiVirus
  • Web Filter
  • Application Control
  • Cloud Access Security Inspection
  • Intrusion Protection
  • FortiClient Profiles
  • SSL Inspection
  • Web Rating Overrides

In flow mode, antivirus and web filter profiles only include flow-mode features. Web filtering and virus scanning is still done with the same engines and to the same accuracy, but some inspection options are limited or not available in flow mode. Application control, intrusion protection, and FortiClient profiles are not affected when switching between flow and proxy mode.

Unfortunately CASI does not work when using Proxy-based profiles for AV or Web fil- tering. Make sure to only use Flow-based profiles in combination with CASI on a specific policy.

Even though VoIP profiles are not available from the GUI in flow mode, the FortiGate can process VoIP traffic. In this case the appropriate session helper is used (for example, the SIP session helper).

Setting flow or proxy mode doesn’t change the settings available from the CLI. However, you can’t save security profiles that are set to proxy mode.

You can also add add proxy-only security profiles to firewall policies from the CLI. So, for example, you can add a VoIP profile to a security policy that accepts VoIP traffic. This practice isn’t recommended because the setting will not be visible from the GUI.


Proxy mode and flow mode antivirus and web filter profile options

The following tables list the antivirus and web filter profile options available in proxy and flow modes.


Antivirus features in proxy and flow mode

 
Feature Proxy Flow
 

Scan Mode (Quick or Full)


no


yes


Detect viruses (Block or Monitor)


yes


yes


Inspected protocols


yes


no (all relevant protocols are inspected)


Inspection Options


yes


yes (not available for quick scan mode)


Treat Windows Executables in Email Attachments as Viruses


yes


yes


Include Mobile Malware Protection


yes


yes


Web Filter features in proxy and flow mode

Feature                                                                                                       Proxy  Flow

FortiGuard category based filter                                                                         yes       yes (show, allow, monitor, block)

Category Usage Quota                                                                                       yes       no

Allow users to override blocked categories (on some models)                            yes       no

Search Engines                                                                                                   yes       no

Enforce ‘Safe Search’ on Google, Yahoo!, Bing, Yandex yes       no

YouTube Education Filter                                        yes       no

Log all search keywords                                           yes       no

Static URL Filter                                                                                                  yes       yes

Block invalid URLs                                                   yes       no

URL Filter                                                                yes       yes

Block malicious URLs discovered by FortiSand- box yes       yes

Web Content Filter                                                  yes       yes

Feature                                                                                                       Proxy  Flow
 

Rating Options                                                                                                    yes       yes


Allow websites when a rating error occurs               yes       yes


Rate URLs by domain and IP Address                     yes       yes


Block HTTP redirects by rating                                yes       no


Rate images by URL                                               yes       no


Proxy Options                                                                                                      yes       no


Restrict Google account usage to specific               yes       no domains


Provide details for blocked HTTP 4xx and 5xx         yes       no errors


HTTP POST Action                                                 yes       no


Remove Java Applets Remove ActiveX                   yes       no


Remove Cookies                                                     yes       no


Filter Per-User Black/White List                               yes       no


Cloud Access Security Inspection (CASI)


This feature introduces a new security profile called Cloud Access Security Inspection (CASI) that provides support for fine-grained control on popular cloud applications, such as YouTube, Dropbox, Baidu, and Amazon. The CASI profile is applied on a policy much like any other security profile.

Unfortunately CASI does not work when using Proxy-based profiles for AV or Web fil- tering for example.

Make sure to only use Flow-based profiles in combination with CASI on a specific policy.

casi1


For this feature, Deep Inspection of Cloud Applications (set deep-app-inspection [enable| disable]) has been moved out of the Application Control security profile options.

You will find the Cloud Access Security Inspection feature under Security Profiles > Cloud Access Security Inspection, but you must first enable it in the Feature store under System > Feature Select > CASI.


Editing CASI profiles

The CASI profile application list consists of the Application Name, Category, and Action. A default CASI profile exists, with the option to create custom profiles. For each CASI profile application, the user has the option to Allow, Block, or Monitor the selected cloud application. The following image demonstrates the ability to Allow, Block, or Monitor YouTube using CASI:

casi2

When the user drills down into a selected cloud application, the following options are available (depending on the type of service):


  • For business services, such as Salesforce and Zoho: Option to allow, block, or monitor file download/upload and login.
  • For collaboration services, such as Google.Docs and Webex: Option to allow, block, or monitor file access/download/upload and login.
  • For web email services, such as Gmail and Outlook: Option to allow, block, or monitor attachment download/upload, chat, read/send message.
  • For general interst services, such as Amazon, Google, and Bing: Option to allow, block, or monitor login, search phase, and file download/upload.
  • For social media services, such as Facebook, Twitter, and Instagram: Option to allow, block, or monitor chat, file download/upload, post, login.
  • For storage backup services, such as Dropbox, iCloud, and Amazon Cloud Drive: Option to allow, block, or monitor file access/download/upload and login.
  • For video/audio services, such as YouTube, Netflix, and Hulu: Option to allow, block, or monitor channel access, video access/play/upload, and login.


CLI Syntax

configure application casi profile edit “profile name”

set comment “comment”

set replacemsg-group “xxxx”

set app-replacemsg [enable|disable]

configure entries edit

set application “app name” set action [block|pass]

set log [enable|disable]

next edit 2

next end


configure firewall policy edit “1”

set casi-profile “profile name” next

end


config firewall sniffer edit 1

set casi-profile-status [enable|disable]

set casi-profile “sniffer-profile” next

end


config firewall interface-policy edit 1

set casi-profile-status [enable|disable]

set casi-profile “2” next

end


External Security Devices

External Security Devices can be configured as means to offload processes to other devices, such as a FortiWeb, FortiCache, or FortiMail. Example processes could include HTTP inspection, web caching, and anti-spam.

casi3


To configure such a device, go to System > External Security Devices.


FortiWeb

To be able to offload HTTP inspection to a FortiWeb device you should:

1. Go to System > External Security Devices, enable HTTP Service, select FortiWeb and add the IP address of your FortiCache device.

2. Go to Policy & Objects > IPv4 Policy, add or edit a firewall policy and select Web Application Firewall. When you add Web Application Firewall to a firewall policy, web traffic accepted by the policy is offloaded to the FortiWeb device for processing.


Enabling FortiWeb on the External Security Devices page adds the following configuration to the CLI:

config system wccp set service-id 51

set router-id 5.5.5.5 (the IP address of the FortiGate interface that communicates with the FortiWeb)

set group address 0.0.0.0

set server-list 5.5.5.25 255.255.255.255 (the IP address of the FortiWeb)

set authentication disable set forward-method GRE

set return-method GRE

set assignment-method HASH

end


FortiCache

To be able to offload Web Caching to a FortiCache device you should:

1. Go to System > External Security Devices, enable HTTP Service, select FortiCache and add the IP address of your FortiCache device.

2. Go to Policy & Objects > IPv4 Policy, add or edit a firewall policy and select Web Cache.

When you add web caching to a firewall policy, web traffic accepted by the policy is offloaded to the FortiCache device for processing.

Enabling FortiCache on the External Security Devices page adds the following configuration to the CLI:

config system wccp set service-id 51

set router-id 5.5.5.5 (the IP address of the FortiGate interface that communicates with the FortiCache)

set group address 0.0.0.0

set server-list 5.5.5.45 255.255.255.255 (the IP address of the FortiCache)

set authentication disable set forward-method GRE

set return-method GRE

set assignment-method HASH

end


FortiMail

To be able to offload Anti-Spam processing to a FortiMail device you should:

1. Go to System > Feature Select and turn on AntiSpam Filter.

2. Go to System > External Security Devices, enable SMTP Service – FortiMail and add the IP address of your FortiMail device.

3. Go to Security Profiles > Anti-Spam and edit an Anti-Spam profile and set Inspection Device to External.

4. Go to Policy & Objects > IPv4 Policy, add or edit a Firewall policy, enable AntiSpam and select the profile for which you set Inspection Device to External.

When you add this Anti-Spam profile to a firewall policy, email traffic accepted by the policy is offloaded to the FortiMail device for processing.

If your FortiGate or VDOM inspection mode is set to flow-based you must use the CLI to set an Anti-Spam profile to external mode and add the Anti-Spam profile to a fire- wall policy.


Enabling FortiMail on the External Security Devices page adds the following configuration to the CLI:

config system wccp set service-id 52

set router-id 5.5.5.5 (the IP address of the FortiGate interface that communicates with the FortiMail)

set group address 0.0.0.0

set server-list 5.5.5.65 255.255.255.255 (the IP address of the FortiMail)

set authentication disable set forward-method GRE

set return-method GRE

set assignment-method HASH

end

Selecting External in the Anti-Spam profile adds the following configuration to the CLI:

config spamfilter profile edit default

set external enable end


Web Application Firewall

Go to Security Profiles > Web Application Firewall. From here you can customize the default Web Application Firewall profile, or create new profiles, to protect against a variety of web-based threats. Web Application Firewall profiles can be created with a variety of options (Signatures and Constraints), similar to other security profiles.

You can set the Web Application Firewall to use an External Security Device, such as FortiWeb, by setting Inspection Device to External.

waf

Configure the ability to store FortiClient configuration files (171380)

1. Enable the advanced FortiClient configuration option in the endpoint profile:

config endpoint-control profile edit “default”

set forticlient-config-deployment enable set fct-advanced-cfg enable

set fct-advanced-cfg-buffer “hello” set forticlient-license-timeout 1 set netscan-discover-hosts enable

next end

2. Export the configuration from FortiClient (xml format).

3. Copy the contents of the configuration file and try to paste in the advanced FortiClient configuration box.


If the configuration file is greater than 32k, you need to use the following CLI:

config endpoint-control profile edit <profile>

config forticlient-winmac-settings config extra-buffer-entries

edit <entry_id>

set buffer xxxxxx next

end

next end


FortiOS 5.4 no longer supports FortiClient 5.0 or earlier (289455)

FortiOS 5.2 would support FortiClient 5.0 (only if the FortiGate upgraded to FortiOS 5.2), however FortiOS 5.4 will no longer support FortiClient 5.0. Customers need to purchase a FortiClient 5.4 subscription-based FortiClient license.


Session timers for IPS sessions (174696 163930)

The standard FortiOS session-ttl (time to live) timer for IPS sessions has been introduced to reduce synchronization problems between the FortiOS Kernel and IPS. This has been added so that FortiGate hard- coded timeout values can be customized, and IPS was using too much overall memory.


Botnet protection with DNS Filter (293259)

The new botnet list from FortiGuard can be used to block DNS requests to known botnet C&C IP addresses within a new DNS filter profile.

You can view the botnet list by going to System > FortiGuard > Botnet Definitions.


Secure white list database (288365)

Secure white list exemption for SSL deep inspection. To enable, go to Security Profiles > SSL/SSH Inspection and enable Exempt from SSL Inspection and enable Reputable Websites.


Mobile Malware Definition update (288022)

Mobile Malware is a separate license and can be downloaded as a separate object. It is packaged with the same FortiGuard object as the client app signatures. These signatures can be enabled in AV profiles by selecting Include Mobile Malware Protection.


Options not supported by the new quick mode flow-based virus scanning (288317)

Files cannot be sent to FortiSandbox for inspection while in quick mode flow-based virus scanning, and so the GUI option for it has been removed. No option to switch between quick mode and full mode, as choice between Proxy and Flow based inspection has been removed.


Add mobile malware to FortiGuard licenses page and include more version information (290049)

An entry and version information for Mobile Malware Definitions has been added in the License Information table under System > FortiGuard. Also, main items have been bolded and sub-items have been indented for clarification.


Secure white-list DB for flow based UTM features (287343)

A new feature that gathers a list of reputable domain names that can be excluded from SSL deep inspection. This list is periodically updated and downloaded to FortiGate units through FortiGuard.


Syntax:

config firewall ssl-ssh-profile edit deep-inspection

set whitelist enable

end


New customizable replacement message that appears when an IPS sensor blocks traffic (240081)

A new replacement message will appear specifically for IPS sensor blocked Internet access, to differentiate between IPS sensor blocking and application control blocking.


Low end models don’t support flow AV quick mode and don’t support the IPS block-malicious- url option (288318)

AV quick mode and the IPS block-malicious-url option have been disabled on low-end FortiGate models, however these features can be enabled if the FortiGate unit has a hard disk. Low-end models will only supportFullscan mode (the option is left in the GUI to show which mode is active for the user).


New quick mode flow-based virus scanning (281291)

When configuring flow-based virus scanning you can now choose between quick and full mode. Full mode is the same as flow-based scanning in FortiOS 5.2. Quick mode uses a compact antivirus database and advanced techniques to improve performance. Use the following command to enable quick mode in an antivirus profile:

config antivirus profile edit <profile-name>

set scan-mode {quick | full}

end


CVEIDs now appear in the FortiOS IPS signature list (272251)

The signature list can be found at Security Profiles > Intrusion Protection > View IPS Signatures.


Mobile malware protection added to Antivirus configuration (288022)

FortiGuard can now download signatures to enhance mobile antivirus protection.

To enable this option, go to Security Profiles > AntiVirus and enable Include Mobile Malware Protection.


Botnet protection added (254959)

The latest Botnet database is available from FortiGuard. You can see the version of the database and display its contents from the System > FortiGuard GUI page. You can also block, monitor or allow outgoing connections to Botnet sites for each FortiGate interface.


FortiSandbox URL database added

You can see the version of the database and display its contents from the System > FortiSandbox GUI page.


New Web Filter profile whitelist setting and changes to blacklist setting (283855, 285216)

Domain reputation can now be determined by “common sense”, for sites such as Google, Apple, and even sites that may contain sensitive material that would otherwise be trusted (i.e. there is no risk of receiving botnets or malicious attacks). You can tag URL groups with flags that exempt them from further sandboxing or AV analyzing.

You can identify reputable sites and enable certain bypasses under Security Profiles > Web Filter. Similarly, you can exempt the identified reputable sites from SSL inspection.


CLI Syntax

config firewall ssl-ssh-profile edit <profile-name>

set whitelist [enable | disable]

end

config webfilter profile edit <profile-name>

config web

set whitelist exempt-av exempt-webcontent exempt-activex-java-cookie exempt-dlp exempt-rangeblock extended-log-others

end

end


Support security profile scanning of RPC over HTTP traffic (287508)

This protocol is used by Microsoft Exchange Server so this feature supports security profile features such as virus scanning of Microsoft Exchange Server email that uses RPC over HTTP.


Users now allowed to override blocked categories using simple, wildcard, and regex expres- sions to identify the URLs that are blocked (270165)

This feature is also called per-user BWL. To be able to configure this feature from the GUI enter the following command:

config system global

set per-user-bwl enable end

Then go to Security Profiles > Web Filtering, edit a web filtering profile and select Allow users to override blocked categories.

Use the following command to configure this feature from the CLI:

config webfilter profile edit <profile-name>

set options per-user-bwl end


Set flow or proxy mode for your FortiGate (or per VDOM) (266028)

You can configure your FortiGate or a VDOM to apply security profile features in proxy or flow mode. Change between modes from the System Information dashboard widget. Proxy mode offers the most accurate results and the greatest depth of functionality. Flow mode provides enhanced performance. IPS and application control always operates in flow mode and so is not affected by changing this mode.


Security Profiles > Web Application Firewall

Signatures can now be filtered based on risk level.

The options to reset action and apply traffic shaping is now only available in the CLI.

The All Other Known Applications option has been removed, while the option for All Other Unknown Applications has been renamed Unknown Applications.


Block all Windows executable files (.exe) in email attachments (269781)

A new option has been added to AntiVirus profiles to block all Windows executable files (.exe) in email attachments.


CLI Syntax

config antivirus profile edit “default”

config imap

set executables {default | virus}

end

config pop3

set executables {default | virus}

end config smtp

set executables {default | virus}

end

config mapi

set executables {default | virus}

end end

end


Cookies can now be used to authenticate users when a web filter override is used (275273)

Cookies can be used to authenticate users when a web filter override is used. This feature is available in CLI only.


CLI Syntax

config webfilter cookie-ovrd set redir-host <name or IP> set redir-port <port>

end

config webfilter profile edit <name>

config override

set ovrd-cookie {allow | deny}

set ovrd-scope {user | user-group | ip | ask}

set profile-type {list | radius} set ovrd-dur-mode {constant | ask} set ovrd-dur <duration>

set ovrd-user-group <name>

set profile <name>

end end

end


Blocking malicious URLs (277363)

A local malicious URL database dowloaded from FortiGuard has been added to assist IPS detection for live exploits, such as drive-by attacks. You enable blocking malicious URLs in an IPS profile from the CLI using the following command:


CLI Syntax

config ips sensor edit default

set block-malicious-url {enable | disable}

next end


The FortiGuard IPS/AV update schedule can be set by time intervals (278772)

This feature allows updates to occur more frequently (syntax below shown for updates randomly every 2-3 hours).


CLI Syntax

config system autoupdate schedule set frequency every set time 02:60 end

Application Control signatures belonging to industrial category/group are excluded by default (277668)

Use the following command to be able to add industrial signatures to an application control sensor:

config ips global

set exclude-signatures {none | industrial}

end


The Indistrial category now appears on the Application Control sensor GUI.


An SSL server table can now be used for SSL offloading (275273)


CLI Syntax

config firewall ssl-ssh-profile edit <name>

set use-ssl-server {enable | disable}

next end


MAPI RPC over HTTP/HTTPS traffic is now supported for security scanning (278012)


CLI Syntax

config firewall profile-protocol-options edit “default”

set comment “All default services.” config http

set ports 80 3128

set options rpc-over-http end

end end


New Dynamic DNS FortiGuard web filtering sub-category (276495)

A new FortiGuard web filtering sub-category, Dynamic DNS, has been added and can be found in the Security Risk Category. Also, the sub-category Shopping and Auction has been separated into two sub-categories: Auction and Shopping.


New Filter Overrides in the Application Sensor GUI (260901)

The overrides allow you to select groups of applications and override the application signature settings for them.


FortiGate CA certificates installed on managed FortiClients (260902)

This feature allows you to enable or disable CA certificate installation on managed FortiClients in a FortiClient Profile.


Syntax

config endpoint-control profile edit <profile>

config forticlient-winmac-settings

set install-ca-certificate [enable | disable]

end next

end


More exemptions to SSL deep inspection (267241)

Some common sense exemptions have been added to the default SSL deep inspection profile, such as Fortinet, Android, Apple, Skype, and many more.


Exempting URLs for flow-based web filtering (252010)

You can once again exempt URLs for flow-based web filtering.


Filter overrides in Application Sensors (246546)

In the Application Sensor page, a new section named Filter Overrides has been introduced. From this section, clicking Add Filter/Edit Filter will launch a dialog to pick/edit the advanced filter and save it back to the list.


New keyword byte_extract for custom IPS and Application Control signatures (179116)

The new byte_extract custom IPS signature key has been added that supports snort-like byte extraction actions. It is used for writing rules against length-encoded protocols. The keyword reads some of the bytes from the packet payload and saves it to a variable. You can use the -quiet option to suppress the reporting of signatures.


IPS logging changes (254954)

IPS operations severely affected by disk logging are moved out of the quick scanning path, including logging, SNMP trap generation, quarantine, etc.

Scanning processes are dedicated to nothing but scanning, which results in more evenly distributed CPU usage. Slow (IPS) operations are taken care of in a dedicated process, which usually stays idle.


New FortiGuard web filtering category: Dynamic DNS (265680)

A new FortiGuard web filtering category has been added forDynamic DNSunder theSecurity Riskheading, to account for nearly half a million URLs of “Information Technology” rated by BlueCoat as “Dynamic DNS Host”.


Syntax

config webfilter profile edit <profile>

config ftgd-wf config filters

edit <id>

set category 88<— New category, Dynamic DNS; number 88

end end

end


Access Control Lists in DoS Policies (293399)

You can go to Policy & Objects > IPv4 Access Control List or Policy & Objects > IPv6 Access Control List and select an incoming interface and add a list of Firewall source and destination addresses and services and drop traffic that matches.


access-control-list

You can use the following CLI command to add an ACL:

config firewall acl edit 1

set interface “port1”

set srcaddr “google-drive” set dstaddr “all”

set service “ALL” next

end


WebSense web filtering through WISP (287757)

WISP is a Websense protocol that is similar in functionality to ICAP, it allows for URLs to be extracted by a firewall and submitted to WebSense systems for rating and approval checking.

This feature provides a solution for customers who have large, existing, deployed implementations of Websense security products to replace their legacy firewalls with a Fortigate family, such that they are not forced to make a change to their web filtering infrastructure at the same time.

In order to use WebSense’s web filtering service, a WISP server per VDOM needs to be defined and enabled first. A Web filtering profile is then defined that enables WISP, which in turn is applied to a firewall policy.

When WISP is enabled, the FortiGate will maintain a pool of TCP connections to the WISP server. The TCP connections will be used to forward HTTP request information and log information to the WISP server and receive policy decisions.


Syntax

config web-proxy wisp set status enable

set server-ip 72.214.27.138 set max-connection 128

end

config webfilter profile edit “wisp_only”

set wisp enable next

end


Other new Security Profiles features:

  • CPU allocation & tuning commands now remain after a system reboot (276190)
  • The GUI notifies an administrator when the FortiGate is in conserve mode (266937)
  • A new custom IPS signature option, “–ip_dscp” has been added to be compatible with engine 1.x. (269063 )
  • The RTP/RTSP decoder can now detect slave sessions (273910)
  • ISNIFF can now dump all HTML files if the dump-all-html CLI command is used (277793)
  • Sender and recipient fields have been added to flow-based SMTP spam logs (269063)
  • Browser Signature Detection added to Application Control profiles (279934)

Having trouble configuring your Fortinet hardware or have some questions you need answered? Check Out The Fortinet Guru Youtube Channel! Want someone else to deal with it for you? Get some consulting from Fortinet GURU!

Chapter 21 – Sandbox Inspection

Chapter 21 – Sandbox Inspection


Sandbox Inspection

This guide explains how to set up sandbox inspection using FortiSandbox with a FortiGate. It contains the following sections:

  • An Overview of Sandbox Inspection: General information about how sandbox inspection works.
  • Using FortiSandbox with a FortiGate: How to set up sandbox inspection on a FortiGate.
  • Sandbox Integration: Integrating sandbox inspection with FortiGate, FortiSandbox, and FortiClient.
  • Sandbox Inspection FAQ: Frequently asked questions to help troubleshoot sandbox inspection.


An Overview of Sandbox Inspection

This section contains information about how Fortinet sandbox inspection works.The following topics are included in this section:

  • What is Sandbox Inspection?
  • Sending Files for Sandbox Inspection
  • FortiSandbox Appliance vs FortiSandbox Cloud


What is Sandbox Inspection?

sanboxing


Sandbox inspection is a network process that allows files to be sent to a seperate device, such as FortiSandbox, to be inspected without risking network security. This allows the detection of threats which may bypass other security measures, including zero-day threats.

When a FortiGate uses sandbox inspection, files are sent to the FortiSandbox. Then the FortiSandbox uses virtual machines (VMs) running different operating systems to test the file, to determine if it is malicious. If the file exhibits risky behavior, or is found to contain a virus, a new signature can be added to the FortiGuard AntiVirus signature database.


Sending Files for Sandbox Inspection

There are three options concerning what type of files can be sent for sandbox inspection: All Files, Suspicious Files, or Executable Files.

All Files is recommended to increase the likelihood of detecting unknown malware, which may appear safe to the FortiGate.

If Suspicious Files is selected, then the FortiGate will examine each file and determine if it should be considered suspicious. A file is deemed suspicious when it does not contain a known threat but has characteristics that suggest it may be malware. The characteristics that determine if a file is suspicious are updated by Fortinet to reflect the current threat climate.

If Executable Files is chosen, all executable files will be sent to FortiSandbox while other file types are not inspected.


FortiSandbox Appliance vs FortiSandbox Cloud

FortiSandbox is available as a physical or virtual appliance (FortiSandbox Appliance), or as a cloud advanced threat protection service integrated with FortiGate (FortiSandbox Cloud). The table below highlights the supported features of both types of FortiSandbox:


Feature

FortiSandbox Appliance

(including VM)


FortiSandbox Clou


Sandbox inspection for FortiGate


Yes (FortiOS 5.0.4+)


Yes (FortiOS 5.2.3+)


Sandbox inspection for FortiMail


Yes (FortiMail OS 5.1+)


No


Sandbox inspection for FortiWeb


Yes (FortiWeb OS 5.4+)


No


Sandbox inspection for FortiClient


Yes (FortiClient 5.4 for Windows only)


No


Manual File upload for analysis


Yes


No


Sniffer mode


Yes


No


File Status Feedback and Report


Yes


Yes


Dynamic Threat Database updates for FortiGate


Yes (FortiOS 5.4+)


Yes (FortiOS 5.4+)


Dynamic Threat Database updates for FortiMail


Yes (FortiMail OS 5.4+)


No


Dynamic Threat Database updates for FortiClient


Yes (FortiClient 5.4 for Windows only)


No


For more information, see the FortiSandbox documentation.


Using FortiSandbox with a FortiGate

This section contains information about how to use sandbox inspection with FortiSandbox and FortiGate. It includes the following sections:

  • Connecting a FortiGate to FortiSandbox
  • The FortiSandbox Dashboard


Connecting a FortiGate to FortiSandbox

The procedures for connecting a FortiGate to FortiSandbox differ depending whether you are using FortiSandbox Appliance or FortiSandbox Cloud.


Connecting to FortiSandbox Appliance

1. Connect the FortiSandbox Appliance to your FortiGate so that port 1 and port 3 on the FortiSandbox are on different subnets.

FortiSandbox port 3 is used for outgoing communication triggered by the execution of the files under analysis. It is recommended to connect this port to a dedicated inter- face on your FortiGate to protect the rest of the network from threats currently being investigated by the FortiSandbox.

2. FortiSandbox port 3 must be able to connect to the Internet. On the FortiGate, go to Policy & Objects > IPv4

Policy and create a policy allowing connections from the FortiSandbox to the Internet (using the isolated interface on the FortiGate mentioned above).

3. On the FortiSandbox, go to System > Network > Static Routing and add static routes for port 1 and port 3.

4. On the FortiSandbox, go to System > Status and locate the System Information widget. Now that the FortiSandbox has Internet access, it can activate its VM licenses. Wait until a green arrow shows up beside Windows VM before continuing to the next step.

5. On the FortiGate, go to System > External Security Devices. Select Enable Sandbox Inspection and select FortiSandbox Appliance. Set the IP Address and enter a Notifier Email. If you select Test Connectivity, the Status shows as Service is not configured because the FortiGate has not been authorized to connect to the FortiSandbox.

6. On the FortiSandbox, go to File-based Detection > File Input > Device. Edit the entry for the FortiGate. Under Permissions, enable Authorized.

7. On the FortiGate, go to System > External Security Devices and for FortiSandbox select Test Connectivity. The Status now shows that Service is online.

Once the FortiGate is connected to FortiSandbox, an AntiVirus profile can be configured to send suspicious files for inspection. Sandbox integration can also be configured, for more information see “Sandbox Integration” on page 2051.


Connecting to FortiSandbox Cloud

Before you can connect a FortiGate to FortiSandbox Cloud, you need an active FortiCloud account. For more information, see the FortiCloud documentation.

Once you have created a FortiCloud account, sandbox inspection should be enabled by default. To verify this, go to System > External Security Devicesand make sure Enable Sandbox Inspection is selected and set to FortiSandbox Cloud.

To see the results from FortiSandbox Cloud in the FortiGate logs, go to Log & Report > Log Settings and make sure Send Logs to FortiCloud is enabled and GUI Preferences is set to Display Logs from FortiCloud.

Now that the FortiGate is connected to FortiSandbox, an AntiVirus profile can be configured to send suspicious files for inspection. Sandbox integration can also be configured, for more information see “Sandbox Integration” on page 2051.


The FortiSandbox Dashboard

The FortiSandbox dashboard is available from FortiView > FortiSandbox. The dashboard shows all samples submitted for inspection. Information on the dashboard can be filtered by checksum, file name, result, source, status, and user name.

If you right-click on an entry, you can choose to Drill Down to Details, Quarantine Source Address, or Quarantine FortiClient Device.

Information about the FortiSandbox database and sandboxing statistics are also available at System > External Security Devices once sandbox inspection is enabled.

Information can also be found by accessing FortiSandbox. For more information, please refer to the FortiSandbox documentation.


Sandbox Integration

Sandbox integration adds another level to sandbox inspection, allowing you allows you to set up automatic actions to protect your network from files FortiSandbox determines are malicious. These actions include: receiving AntiVirus signature updates from FortiSandbox, adding the originating URL of any malicious file to a blocked URL list, and extending sandbox scanning to FortiClient devices.

This section contains the following topics:

  • Overview
  • Example Configuration


Overview

FortiSandbox integration involves three different FortiGate security profiles: AntiVirus, Web Filtering, and FortiClient Profiles.


AntiVirus

When FortiSandbox discovers a malicious file, it can create a AntiVirus signature for that file. Through FortiSandbox integration, this signature can be sent to a FortiGate to block the file from re-entering the network and to prevent the future retransmission of that file to FortiSandbox.

Use of the FortiSandbox AntiVirus database is enabled in an AntiVirus profile, found at Security Profiles > AntiVirus. It can also be configured using the following CLI commands:

config antivirus profile edit <profile>

set analytics-db enable

end


Web Filtering

ortiSandbox integration can also be used to allow FortiSandbox to add a URL filter blocking the source of a discovered malicious file to the FortiGate’s blocked URL list.

Blocking malicious URLs discovered by FortiSandbox is enabled in a Web Filter profile, found at SecuritProfiles > Web Filter. It can also be configured using the following CLI commands:

config webfilter profile edit <profile>

config web

set blacklist enable end


FortiClient Profiles

Extended FortiSandbox scanning is currently only supported by FortiClient 5.4 for Win- dows. It can also only be used with FortiSandbox Appliance.

When extended FortiSandbox scanning is enabled for FortiClient, files downloaded by FortiClient can be sent to the FortiSandbox for inspection. Also, if a suspicious file is discovered, FortiClient can be configured to wait until sandbox inspection is complete before allowing that file to be accessed.

AntiVirus signatures can also be pushed by the FortiGate to FortiClient.

If a FortiClient device attempts to download a file that FortiSandbox discovers is malicious, the FortiSandbox notifies the FortiGate. The administrator can take action to quarantine the device. When a quarantine is in effect, FortiClient cuts off other network traffic from the device directly, preventing it from infecting or scanning the local network. When a device is under quarantine, FortiClient cannot be shutdown or uninstalled. A user is also unable to unregister from the FortiGate that quarantined them, or register to another FortiGate unit. A quarantine can only be lifted by the administrator of the FortiGate where the FortiClient device is registered.

Extending FortiSandbox scanning can by configured in the Security settings of a FortiClient Profile, found at Security Profiles > FortiClient Profiles. It can also be configured using the following CLI commands:

config endpoint-control profile edit <profile>

config forticlient-winmac-settings set scan-download-file enable set sandbox-scan enable

set sandbox-address <address>

set wait-sandbox-result {enable | disable}

set use-sandbox-signature {enable | disable}

end


Extending FortiSandbox scanning can also be configured directly in the FortiClient AntiVirus settings.


Example Configuration

sandboxing2

The following example configuration sets up FortiSandbox integration using AntiVirus, Web Filtering, and a FortiClient profile. This configuration assumes that a connection has already been established between the FortiSandbox Appliance and the FortiGate.

1. Go to Security Profiles > AntiVirus and edit the default profile. Under Inspection Options, enable both SenFiles to FortiSandbox Appliance for Inspection and Use FortiSandbox Database. Select Apply.

2. Go to Security Profiles > Web Filter and edit the default profile. Under Static URL Filter, enable Block malicious URLS discovered by FortiSandbox. Select Apply.

3. Go to Security Profiles > FortiClient Profiles and edit the default profile. Under AntiVirus, enable Realtime Protection, then enable Scan Downloads, followed by Scan with FortiSandbox. Enter the IP of the FortiSandbox, then enable Use FortiSandbox signatures. Select Apply.

4. Go to Policy & Objects > IPv4 Policy and view the policy list. If a policy has AntiVirus and Web Filtering scanning applied, the profiles will be listed in the Security Profiles column. If scanning needs to be added to any security policy (excluding the Implicit Deny policy) select the + button in the Security Profiles column for that policy, then select the default AntiVirus Profile, the default Web Filter Profile, the appropriate Proxy Options, and the deepinspection profile for SSL Inspection Options (to ensure that encrypted traffic is inspected).

5. Select OK.


Results

If your FortiGate discovers a suspicious file, it will now be sent to the FortiSandbox. To view information about the files that have been sent on the FortiGate, go to FortiView > FortiSandbox to see a list of file names and current status.

To view results on the FortiSandbox, go to System > Status and view the Scanning Statistics widget. There may be a delay before results appear on the FortiSandbox.

Open FortiClient using a Windows PC on the internal network. Make sure it is registered to your FortiGate. Go to AntiVirus > Realtime Protection Enabled and edit the settings. You will see that the Realtime Protection settings match the FortiClient Profile configured on the FortiGate. These settings cannot be changed using FortiClient.

If a PC running FortiClient downloads a suspicious file that the FortiSandbox determined was malicious, a quarantine would be applied automatically. While the quarantine is in effect, FortiClient cannot be shutdown on the PC. It can not be uninstalled or unregistered from the FortiGate. The quarantine can only be released from the FortiClient Monitor on the FortiGate.


Sandbox Inspection FAQ

The following are some frequently asked questions about using sandbox inspection with FortiSandbox and FortiGate.


Why is the FortiSandbox Cloud option not available when sandbox inspection is enabled?

This option is only available if you have already created a FortiCloud account. For more information, see the FortiCloud documentation.


Why don’t results from FortiSandbox Cloud appear in the FortiGate GUI?

Go to Log & Report > Log Settings and make sure Send Logs to FortiCloud is enabled and GUI Preferences is set to Display Logs from FortiCloud.


Why are the FortiSandbox Appliance VMs inactive?

Make sure that port 3 on the FortiSandbox has an active Internet connection. This is required in order to active the FortiSandbox VMs.


Why aren’t files are being scanned by FortiSandbox?

Make sure an AntiVirus profile that sends files to FortiSandbox is enabled for all policies that require sandbox inspection.


Having trouble configuring your Fortinet hardware or have some questions you need answered? Check Out The Fortinet Guru Youtube Channel! Want someone else to deal with it for you? Get some consulting from Fortinet GURU!