To configure the route for a route-based VPN
1. On FortiGate_2, go to Network > Static Routes and select Create New.
2. Enter the following information, and then select OK:
Destination IP / Mask 10.21.101.0/24
Device FGT2_to_FGT1_Tunnel
Gateway Leave as default: 0.0.0.0.
Distance (Advanced) Leave this at its default.
If there are other routes on this FortiGate unit, you may need to set the distance on this route so the VPN traffic will use it as the default route. However, this normally happens by default because this route is typically a better match than the generic default route.
Creating policy-based VPN security policy
Define an IPsec security policy to permit communications between the source and destination addresses.
1. Go to Policy & Objects > IPv4 Policy.
2. Complete the following:
Incoming Interface Select internal.
The interface that connects to the private network behind this FortiGate unit.
Source Address Select Finance_network when configuring FortiGate_1.
Select HR_network when configuring FortiGate_2.
The address name defined for the private network behind this FortiGate unit.
Outgoing Interface Select wan1.
The FortiGate unit’s public interface.
Destination Address Select HR_network when configuring FortiGate_1.
Select Finance_network when configuring FortiGate_2.
VPN Tunnel Select Use Existing and select peer_1 from the VPN Tunnel
drop-down list.
Select Allow traffic to be initiated from the remote site to enable traffic from the remote network to initiate the tunnel.
Comments Bidirectional policy-based VPN policy.
Place VPN policies in the policy list above any other policies having similar source and destination addresses.
How to work with overlapping subnets
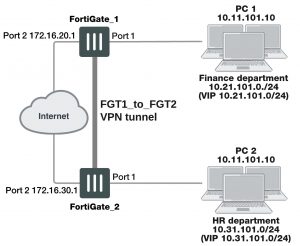
A site-to-site VPN configuration sometimes has the problem that the private subnet addresses at each end are the same. You can resolve this problem by remapping the private addresses using virtual IP addresses (VIP).
VIPs allow computers on those overlapping private subnets to each have another set of IP addresses that can be used without confusion. The FortiGate unit maps the VIP addresses to the original addresses. This means if PC1 starts a session with PC2 at 10.31.101.10, FortiGate_2 directs that session to 10.11.101.10 — the actual IP address of PC2.The figure below demonstrates this — Finance network VIP is 10.21.101.0/24 and the HR network is 10.31.101.0/24.
Overlapped subnets example